Native Plants . Wildflowers . Forest Friends . Creatives . Plants for People . Woodland Gardens . Apothecary
Author Archives: botanigal
Mad botanist growing native plants with local genetics along with local heirloom heritage plants. Forest gardener with a crew of Botanigals. Producing plants and other useful items from woodland botanical gardens. Come visit the gardens where hope sprouts eternal.
So, is anyone wondering how to eat their greens like good little humans these days?
“How safe are transported greens?”
“How do you wash them once they get home?”, or
“Screw it, I don’t want to gear up to brave the store at all!”…
You know,… those runaway ponderings and questionable conclusions.
Well we’re going to try an experiment. Let’s see how many of us can get some greens going!
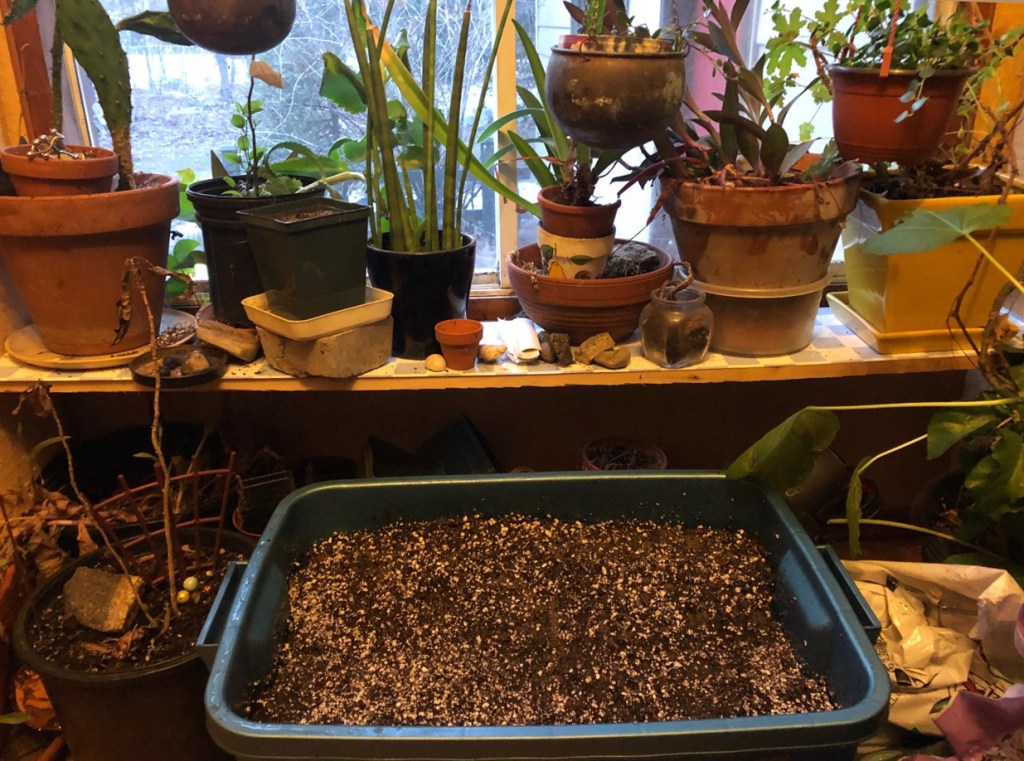
We aren’t going to create the idyllic garden pictured in the title—c’mon guys, times have changed—we’re thrifting!
We thought that this Rubbermaid tub garden idea is perfect to start greens throughout this foolish time of year called April, when temperatures fluctuate wildly from snow squalls to sunshine. The tubs are fairly manageable, they can be moved outside for sun and rain, and brought back inside for cold nights here in Muskoka and Haliburton.
Shout out to our friend Marty who gave us this Sweet idea!
So… we’ll try our best to explain this through photos:
MATERIALS:
A tub (Rubbermaid are best because they are indestructible, we know this because we destroy tubs)
30 Litre bags of:
Peat Moss
Soil-less Mix
Nutrient Rich soil—Manure or Compost, or Triple Mix
Sharp Sand (sand from the side of the road which you can flush the salt out of—not play sand).
METHOD:
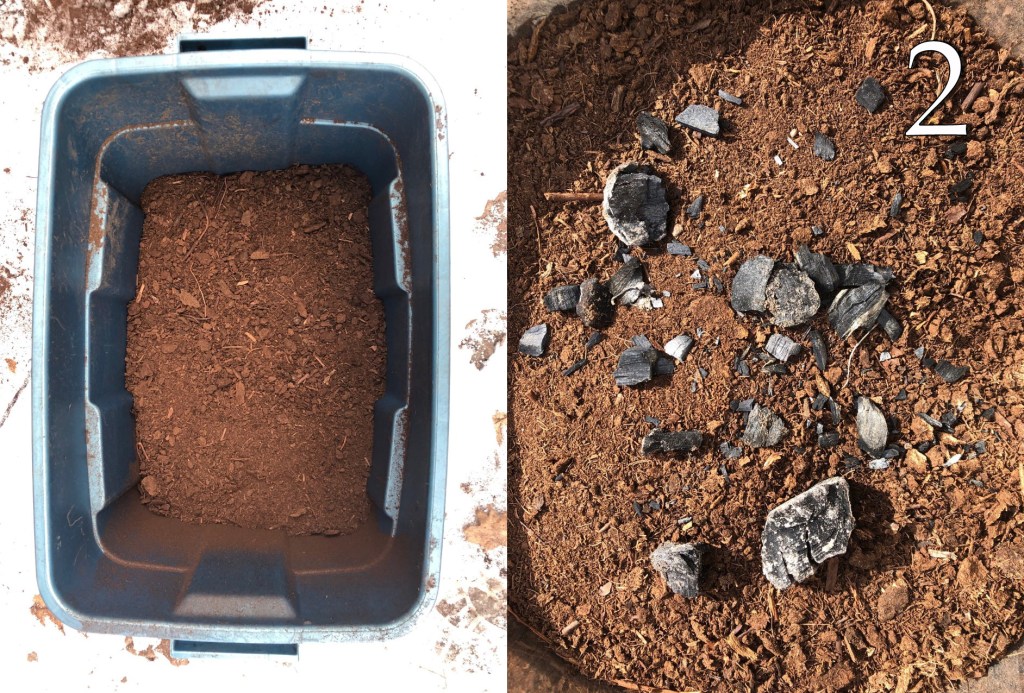
1. Pick a tub size. The smaller tub would be best for greens, the larger could probably produce two determinate tomato plants with decent yield.
2. Fill ¼ of the tub with peat moss to allow for ‘drainage’ and to hold moisture. * If you want to get fancy and add some carbon chunks in the way of WET charcoal, go at it. Seriously though, soak your charcoal for a couple of days, you don’t want your bin to catch fire, and it will if it is not saturated.
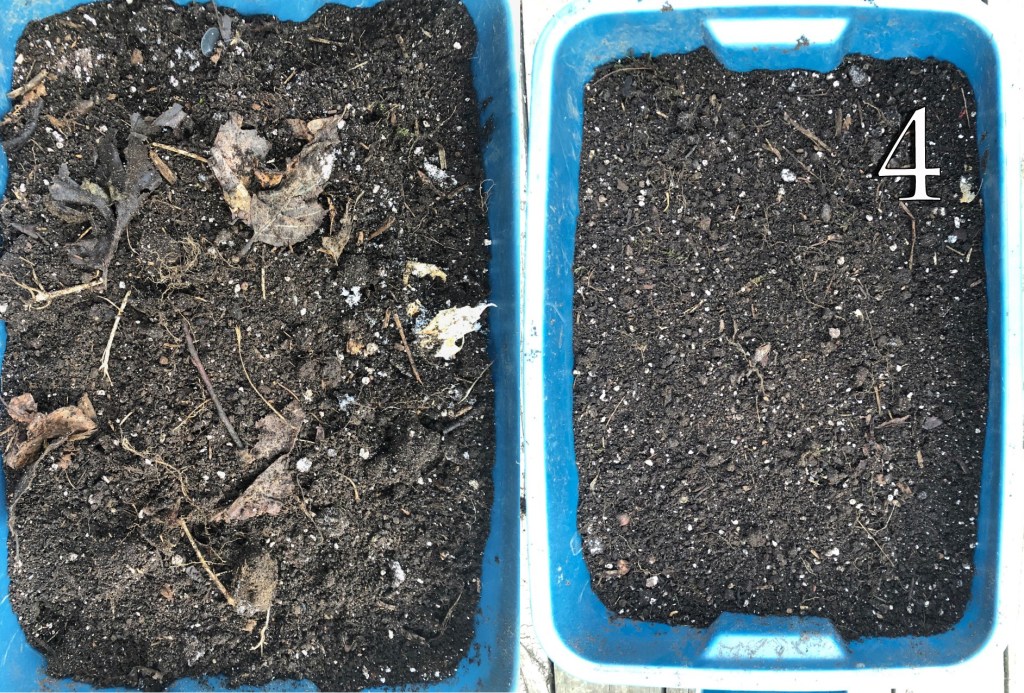
3. Mix together equal parts Soil-less Mix, and your Nutrient Rich choice, throw in a few handfuls of sand, mix well, pour over top of peat moss drainage base.
4. Break up clumps and pick out detritus. Pat down gently.
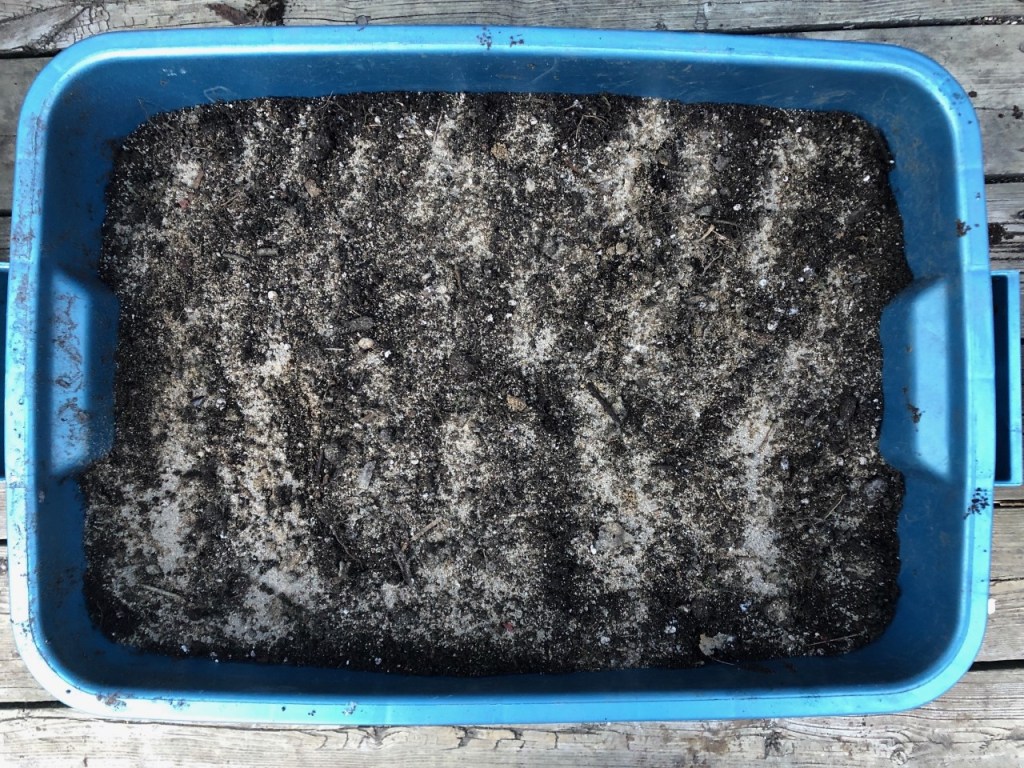
5. Sprinkle a thin base of sand on top of the mix (sand being pure mineral will lend to more efficient ion action within the soil mix and it scrapes the seeds up a bit to stimulate them)
6. Sprinkle your greens of choice (arugula, baby kale, mustard greens, spinach, lettuce, cilantro,… anything you want) on top of the sand. We sprinkled our seeds chaotically and will thin them out to eat, or to plant in other places or tubs, but you can plant rows and label too if you are more organized.
7. Sprinkle a bit more of your soil mix on top then,
8. Sprinkle a bit more sand on top to finish. This kindov keeps the seeds from floating when watering, but still, water with care. A good deep misting would be ideal.
9. Water deeply (with a better watering can than this botch-it can). Misting patiently is your best bet. You want the soil to moisten and allow the peat moss base to soak up some water, but you don’t want your garden to float.
10. We brought our tub into the house and put it beside a heat vent for the first little bit.
11. Get yourself some bubble wrap—it is a wonderful invention! Cover with bubble wrap. This insulates the seeds from wild temperature fluctuations, and it holds in heat and moisture while allowing light to penetrate.
*13. So, “What about drainage?” you might be asking. Well, we’re leaving our tub whole—without holes—BUT we are in complete control of watering. If you want to leave the tub out in the rain, or accidentally leave it out during a downpour, perhaps you will want to sacrifice your tub and drill holes in it just a little bit above the bottom so that the water can still be retained and absorbed rather than run straight through.
Voila! You’ve made a garden container! Hope this works. We’re flying by the seat of our pants these days, this could all be gibberish!
We’ll post our tub on social media as it develops. Good luck!
The bear necessities of life
will come to you when you are not afraid of the Prickly Pear.
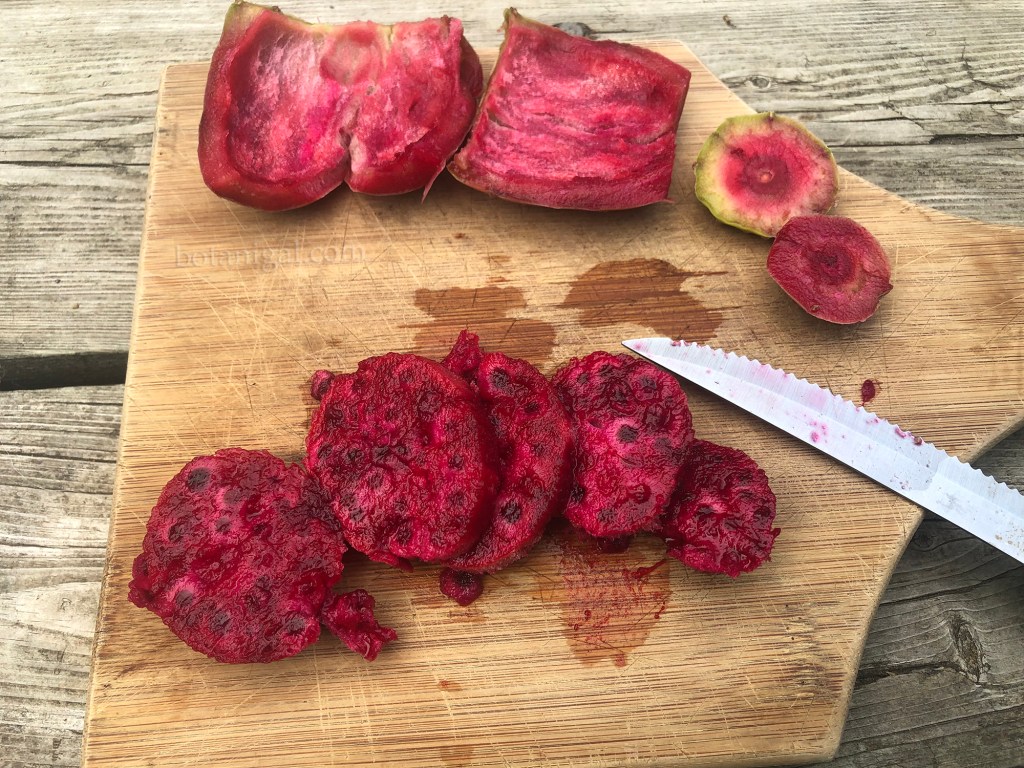
Paws down, Prickly Pear is one
of the most interesting, delicious, and easy to prep fruit we’ve come across. We have to give a shout out to our Auntie Katrina
Del Mar who first introduced us to the exotic bounty and preparation methods
for this juicy fruit.
We don’t see this species of prickly
pear often—if ever here in Haliburton and Muskoka—but we found some this
week in Bracebridge Food Basics!
(Optunia ficus-indica)
is in fact a cactus, a.k.a. Tuna, and it’s an example of yet another
prickly edible where the precious fruit is protected by spikes and thorns—so
the plant needs to be treated with respect to get to the sweet flesh of the ‘pear’.
This ‘pear’ fruit is a complex
fruit that is apparently difficult to describe,1 and has the water-filled
sweetness of a watermelon, but holds dense, round, ‘bb’-sized seeds. Other species of Optunia are also edible
coming in all shapes, sizes and flavours.
The green cactus segments—or ‘pads’ a.k.a. Nopals or Nopales,
—are edible too, and the O.ficusindica species of cactus can become
invasive in ideal conditions, but we’re not going to dive into that rabbit
hole.
How can you tell Prickly Pear are
ripe? The fruit should hold quite a bit
of red and pink, and even some purple, with a little green at the base. The real key is the callous on the bottom,
which is the wound where the fruit was removed from the mother plant.
So, take a closer look at the
callouses of the harvest offered to you and pick those with the flattest, best
calloused bottoms with a hearty diameter. The flatter the callous, the riper
the pear, easy as that!
So now your prickly pears are in your kitchen and you can’t wait to see what they taste like. Patience now—they’re prickly.
It is wise to prepare prickly pear
with gloves. The fruit is covered in glochids; glassy barbed spines, that are
hard to see and difficult to remove. Typical
to cacti. They are on the most part,
removed by the producer, but many of the tiniest wily spines are left behind—so
the pear still needs to be approached with caution.
Next step is to select your ideal
cacti fruit for the dish—the fattest-bottomed pears—and stick them in the
fridge. Leave the deeper calloused
specimens room temperature to ripen more.
After the chosen pears have chilled
for a few hours you can get them ready to eat.
Cut off the ends of the fruit
and proceed to carve a shallow groove around the length of the fruit. Peel off the outer flesh as it will go. The outer skin with the spine clusters is best
left uneaten because you don’t want any glochids in your digestive tract. Don’t feel guilty because the potassium and
phosphorous contained in the flesh are a nice addition to the compost.
When we eat prickly pear with
our family, we just eat mouthfuls and swallow the seeds. It is because of this seed swallowing that
one does not want to have a feast of prickly pear alone. Prickly pear is best eaten with other foods,
or—as our prickly pear mentor and feisty card shark Madeira Mama Maria Faria
tells us— “It will back you up”.
Prickly pear are a good source
of potassium, magnesium, and calcium, which in human digestion actually balance
each other out. Interesting how our bods
have figured out the plant nutrition stuff.
We just have to swallow it. Enjoy!
We like to have nitrile gloves around the nursery but didn’t use them here for the photos. If you go ahead without gloves, like in this demo, there is a makeshift remedy that many of our peers may understand—as this is something we’d mess around with while bored in school—white craft glue fingerprinting. Seriously. Smear white craft glue over the area with the spines and thin it around and work it until it is clear and dry. Kind of fun! Once it is dry and clear, peel it off and hopefully the spines will come out. This technique works for most fine cacti spines.
We have fallen in love with Manousheh—a Lebanese breakfast pie—and have adapted a Zaatar recipe to work with our local grocers’ spice aisles, along with a recipe for Manousheh that fits right in with our hectic seasonal business lives this time of year.
Our friends from the city say we’ve pretty much nailed the authenticity of the taste—even without the Lebanese Wild Thyme—which is hardly available to us in Canada, let alone our small town.
Our grocers are ever expanding upon what used to be a limited ethnic food selection available here in cottage country. We don’t make our own bread this time of year and Naans make a fine substitute.
For two large pieces of Naan or 4 Mini Naans you will need:
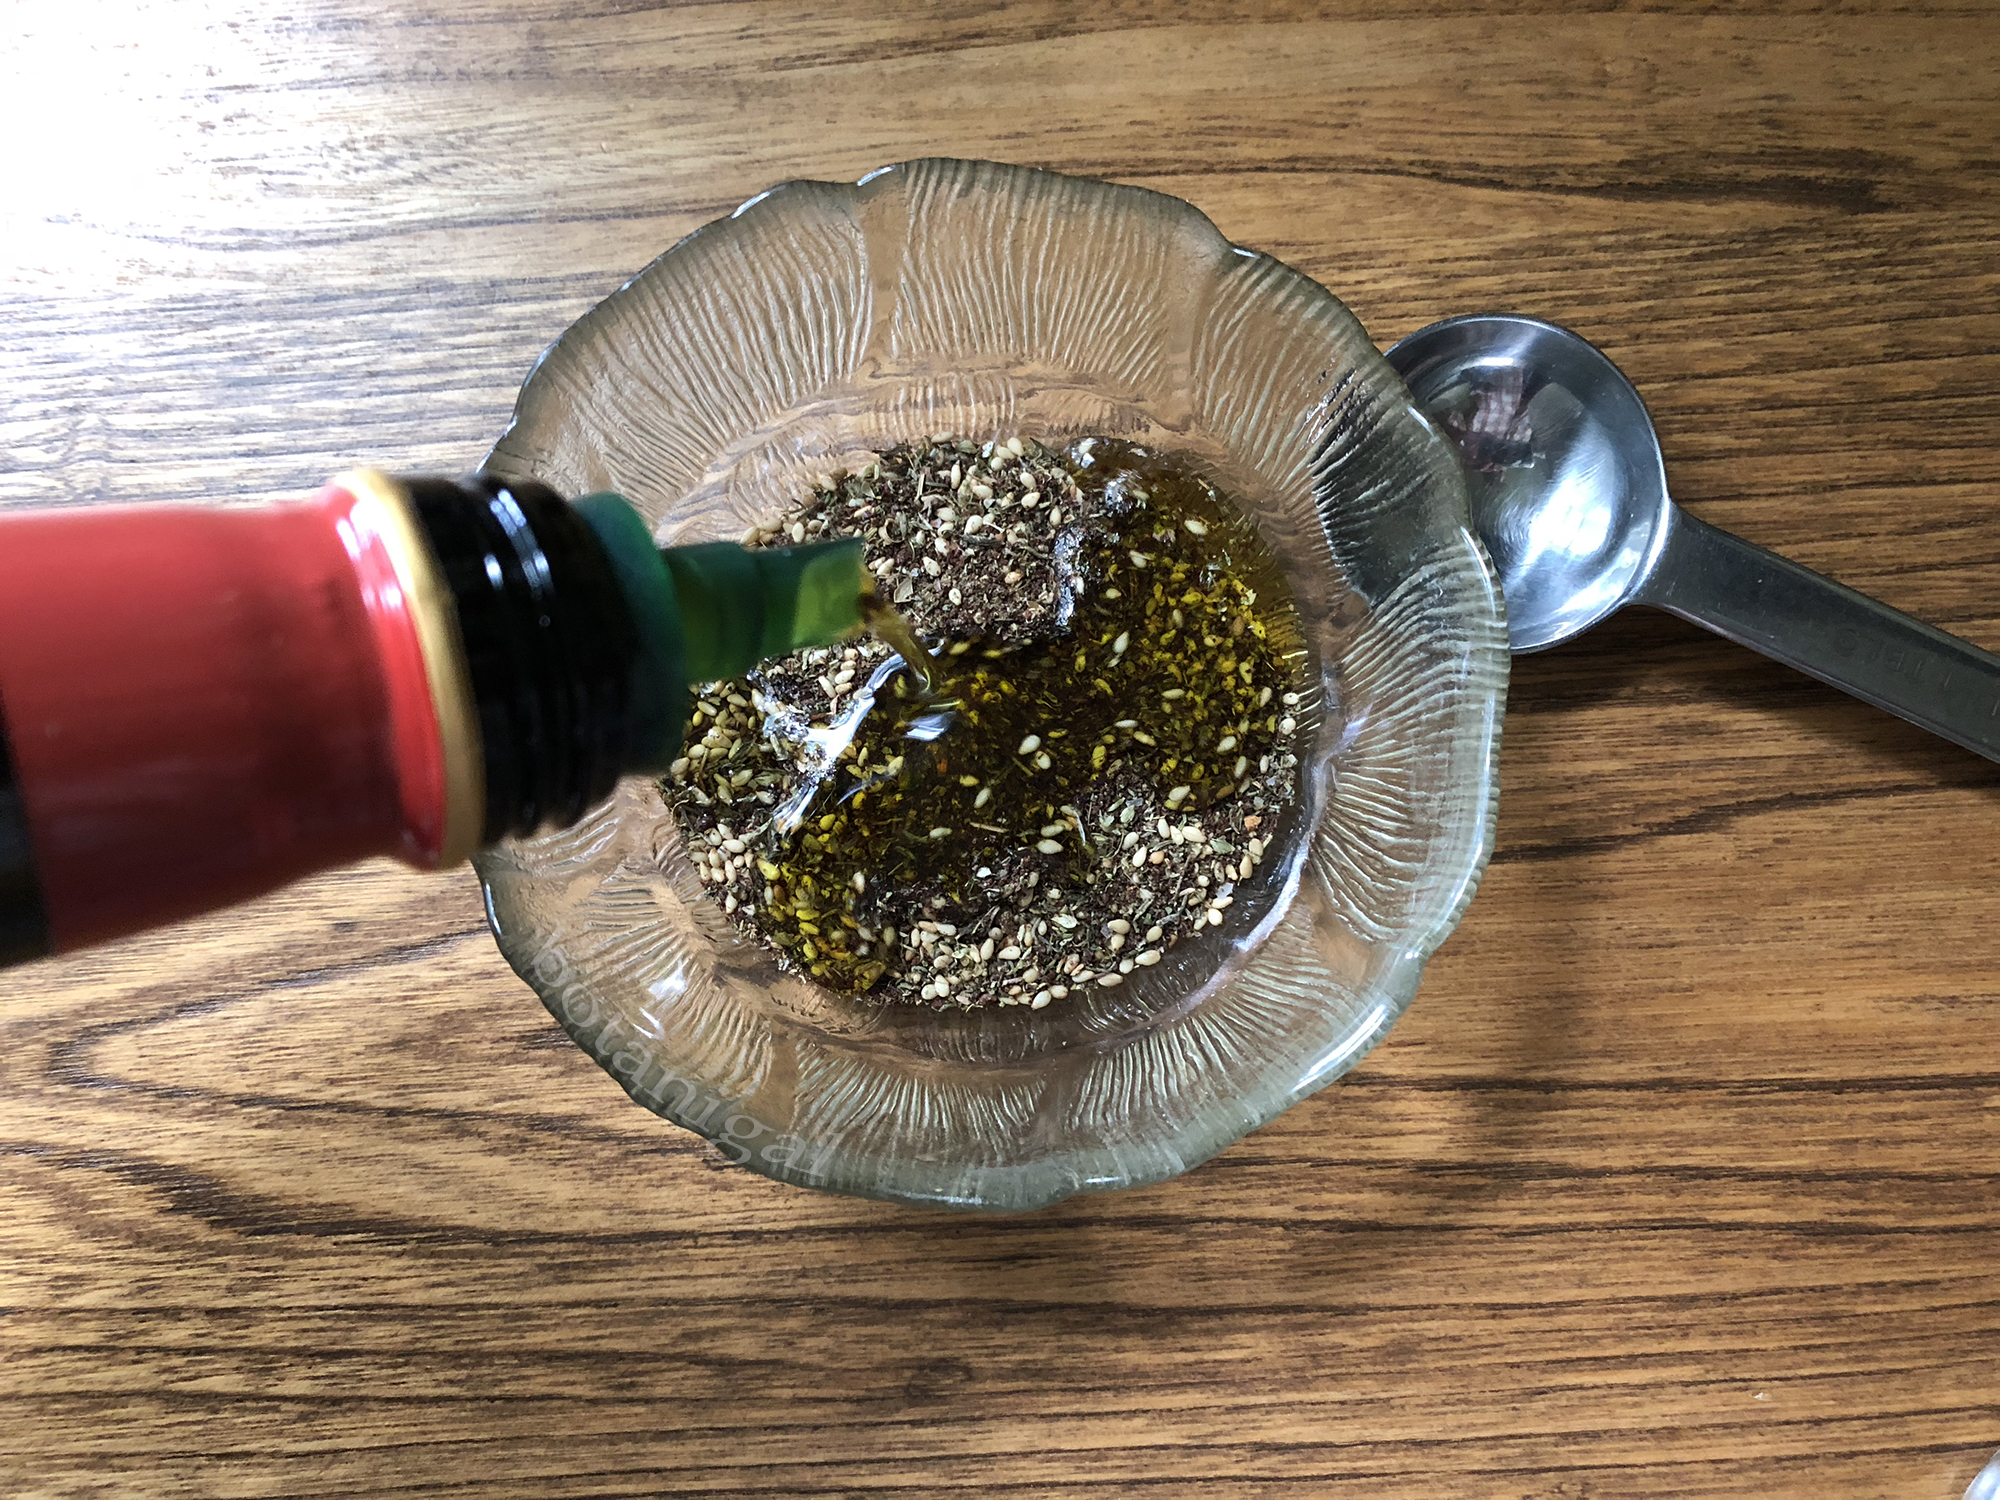
1 TBSP Botanigals Canadian Zaatar spice mix
1-1.5 TBSP of a good quality olive oil
1-2 pieces of Naan bread or 2-4 mini Naans (white or whole wheat),
and though this is the first Botanigals Odd Spice to contain a bit of kosher sea salt, you may want extra salt on hand to cater to your tastes.
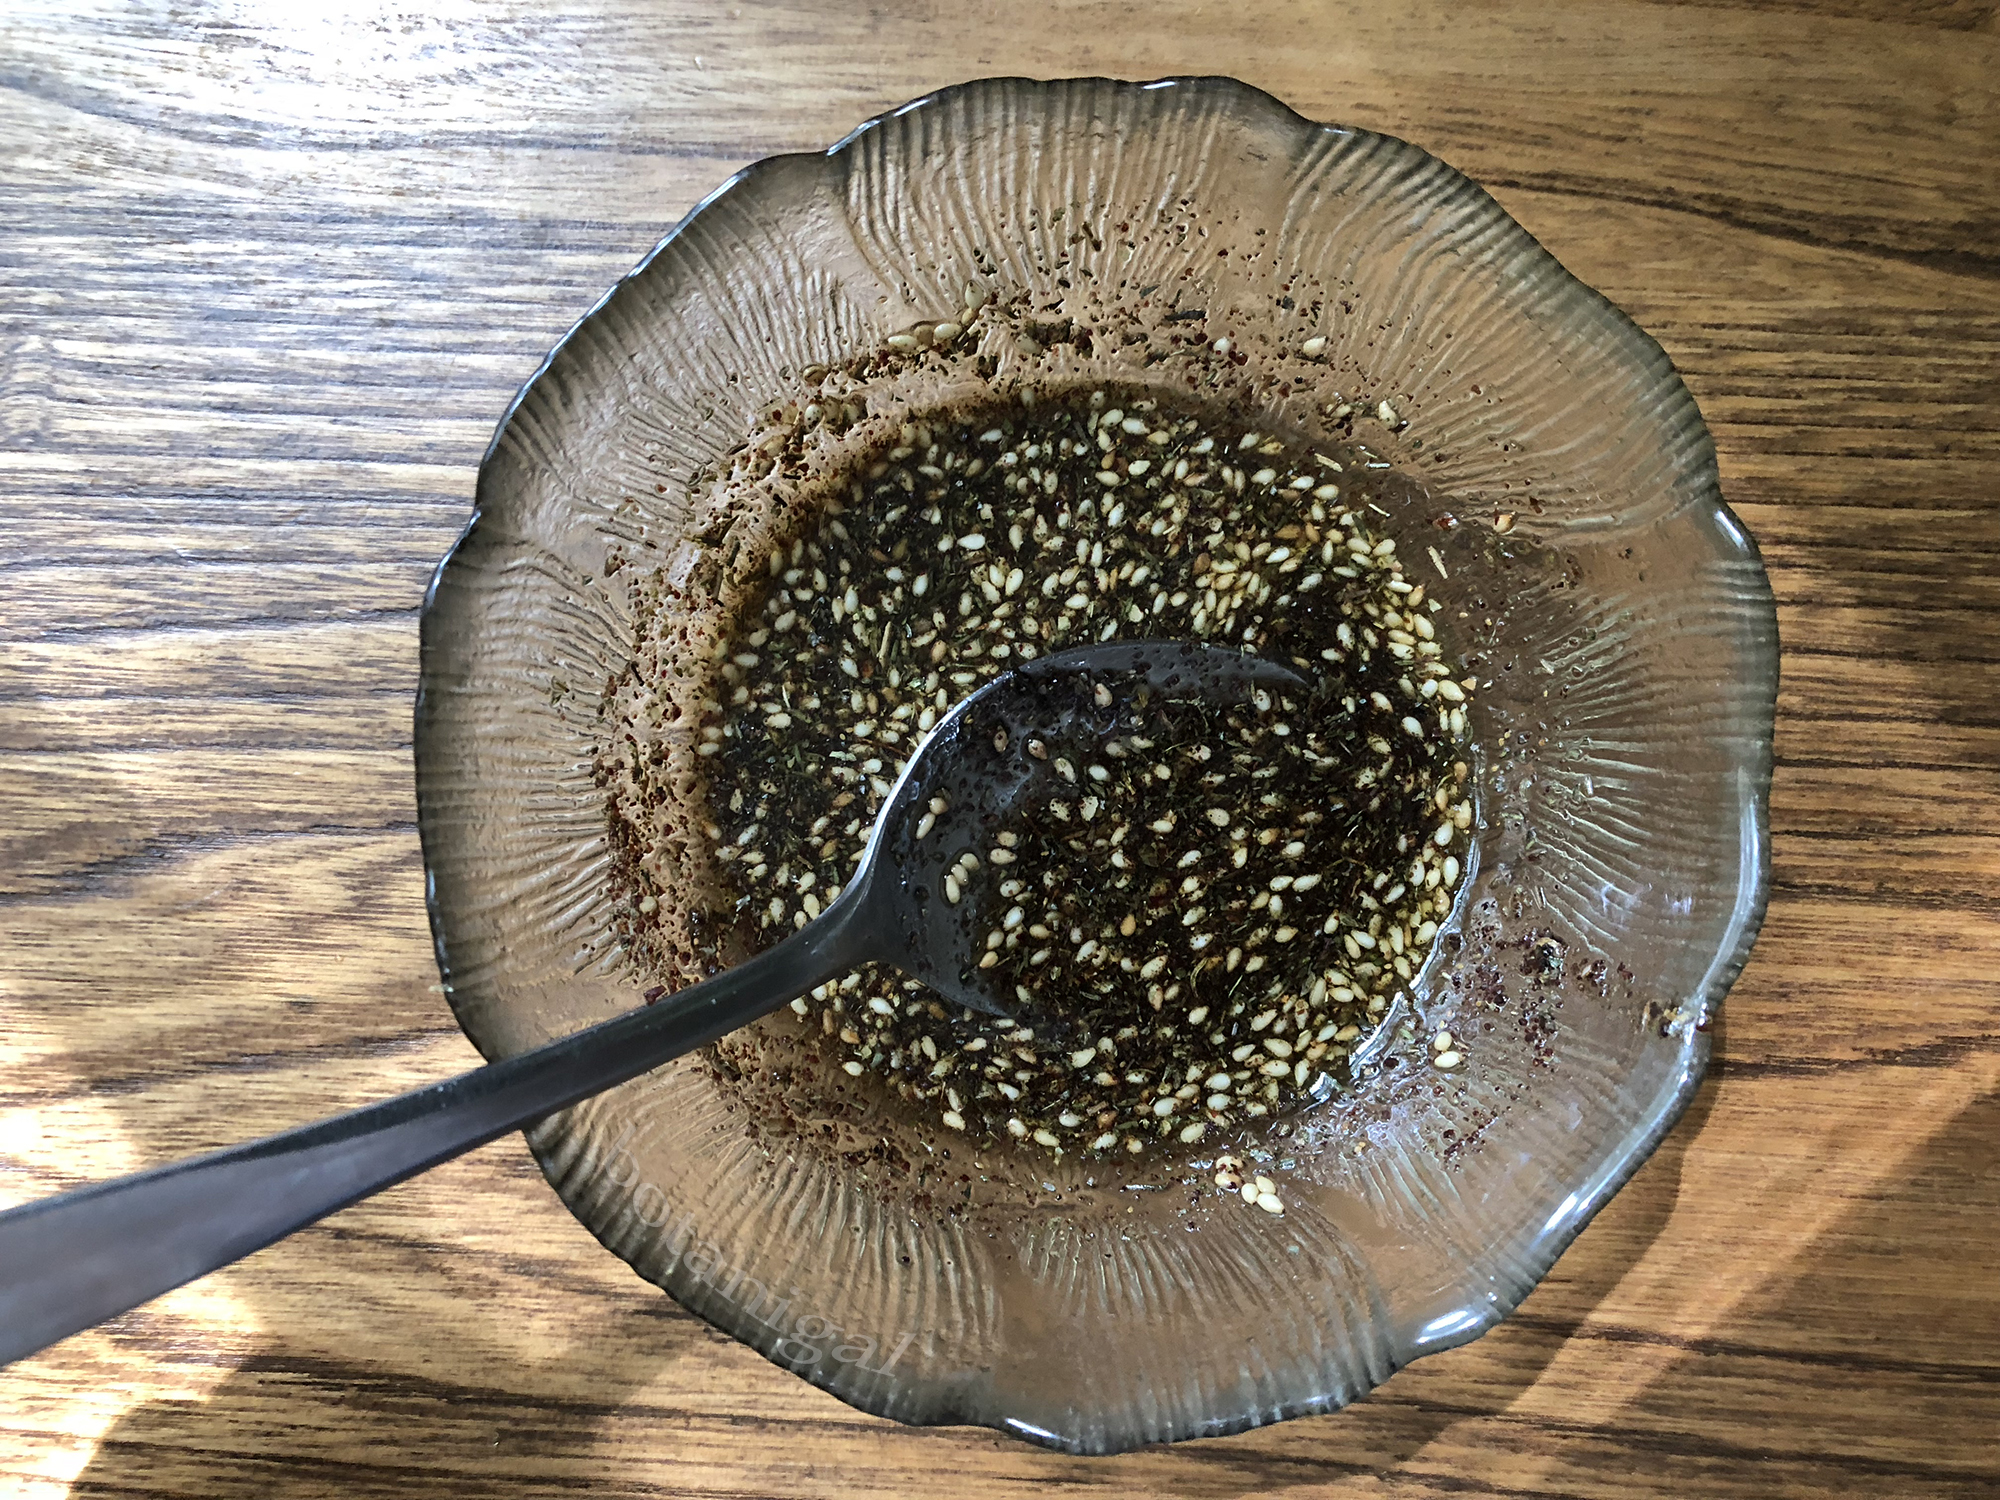
You can store the extra paste in a covered container in the fridge for up to a week.
This is 2 Tablespoons of Zaatar Mix because we are making Manousheh for many today so we’ve doubled the recipe.
We are adding 2 Tablespoons of Olive oil (and perhaps a splash more) to the 2 Tablespoons of Zaatar spice mix, again remember that the images represent a double recipe.
You want your Zaatar and Olive Oil mix to be not too pasty AND not too oily—though we find that too much oil does no harm—other than reducing the sour bite of the spice.
Spread the paste to the edges of the Naan so that it sits about a 1/4 inch thick. Evenly distribute the oil as the ingredients will somewhat settle out from each other.
Mini Naans. Aren’t they cute?!
Place paste-coated Naan on parchment paper, which will catch any dripping oil.
Place your Manousheh and parchment on a middle rack and set the timer for 10 minutes (more or less depending on your texture preferences). You want the oil to sizzle, not scorch.
Cut your Naan Manousheh with scissors while warm. The bread is easier to cut while warm.
A nice addition to your Manousheh is fresh tomato and/ or fresh mint and/ or both.
HOW HAVE YOU FRINGED YOUR SHORELINE? The latest gossip in riparian fashion is all about which shorelines host the bees, and which host…the geese.
It is most satisfying to overhear rave reviews regarding one’s waterfront attire such as: “This shoreline has a great blend of colour and texture, what a stunning promenade!” or, “I wish I had that! A perfect balance of the vernacular—and the extravagant!” or best yet, to catch a whisper of: “What beautiful trees! I can see the boat, but I can’t see the building; how elegant!” Wow.
To be certain, dear reader, that you don’t get caught eroding in the rain without a canopy, we will highlight here our most successful tried-and-tested shoreline swatches, with nods towards the ideal textures and palettes; from the sensational to the subdued. Take your pick according to your style – no choice is the wrong choice—all of the following species roll out the red carpet for shoreline diversity, stability, pleasure, and vitality.
For the demure and private type, a tree palette is recommended. Eastern White pine, Hemlock, Cedar, and Silver Birch will work even on the rockiest of shorelines. Tamarack, Balsam fir and White birch are best for those sandy shores. Remember that conifers, with their higher thread count, are far less translucent than the lacy, winter-bare deciduous, and one must always stay mindful of the effects of sun exposure!
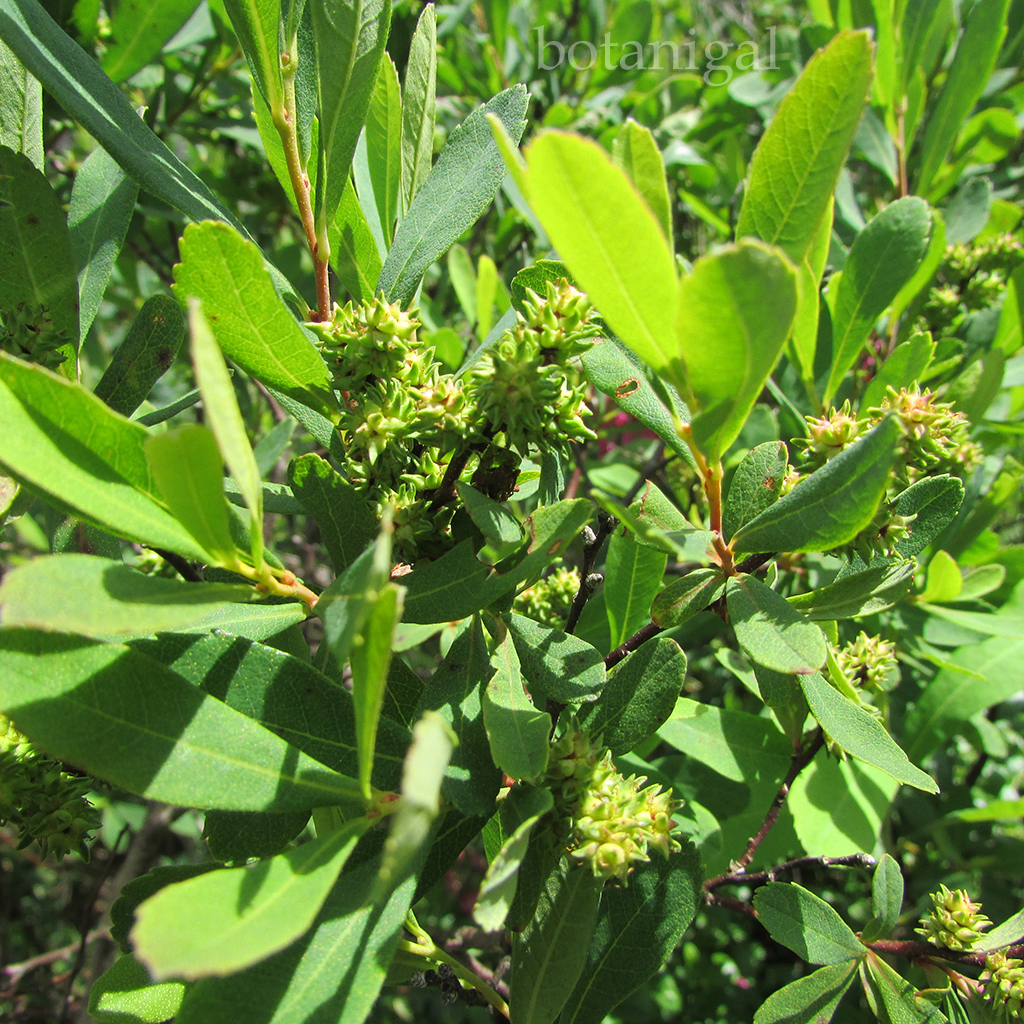
For botanical trims and fringes, where sight-lines and vistas must remain clear, shrubs such as Wild Raisin, shrubby Willows, Elderberries, Sweet Gale, Bush Honeysuckle, and Wild Roses add just the right hint of pattern and fragrance.
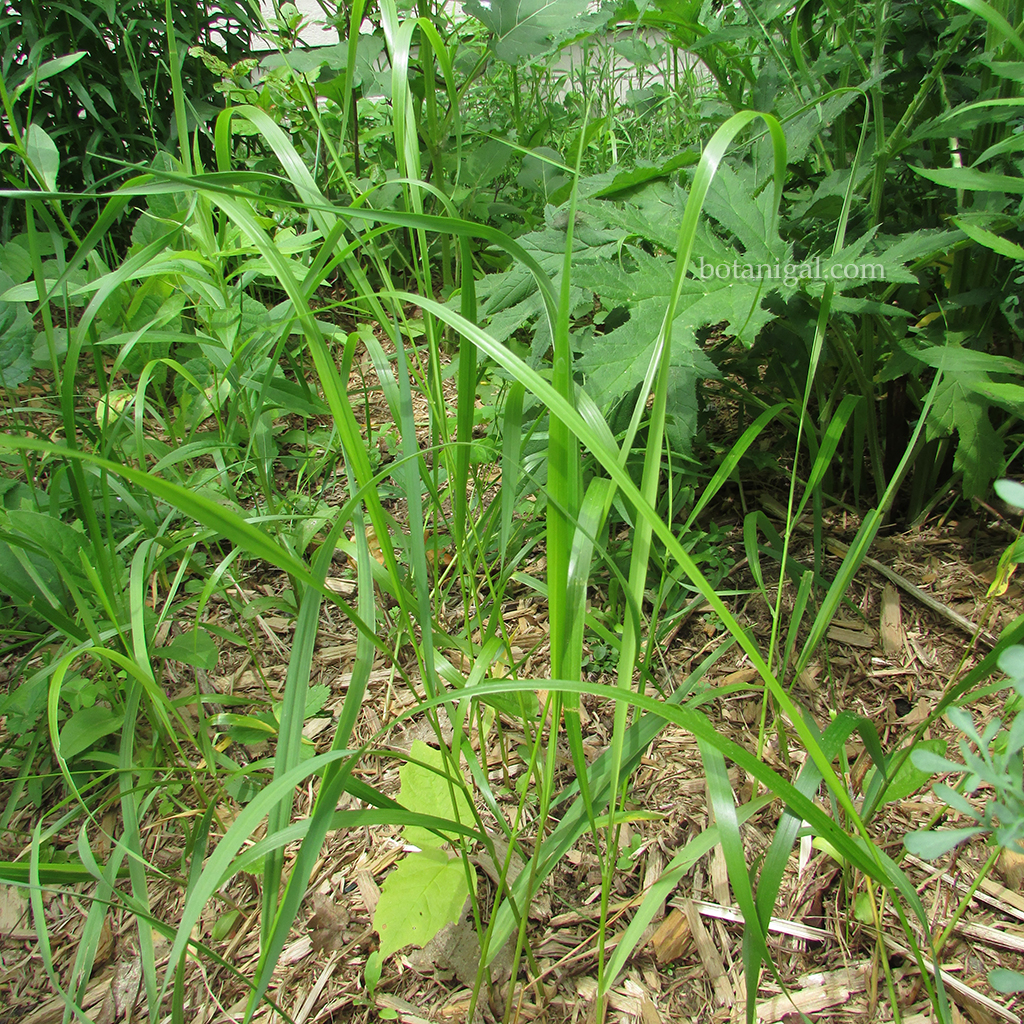
For colour and texture accessories: Sweet Flag, Blue Flag Iris, Sweetgrass, Joe-Pye Weed, Swamp Milkweed, Asters, Sensitive Fern, and Cinnamon Fern will bring glittering insects and flittering birds into a space—and are a most divine way to soften the hem of a lawn!
Cedar (Thujaoccidentalis) Height: 20m Spread: 2m
This fragrant tree lines many a shoreline along our watersheds. Deer love to eat cedar and this is quite evident along cedar shorelines—you can see the precise line along the waterfront where deer have nibbled the lower branches as far as they can reach from the ice in the winter. If you are planting young cedar, they must be protected until their upper foliage has grown out of the reach of a deer. Once cedars achieve this height (and one should think twice before removing existing cedars as they take a very long time to grow), they will bring graceful, cascading texture to any shoreline habitat.
White Pine (Pinusstrobus)
Height: 30m Spread: 7m Shade intolerant
One of the most famous icons of the North is the stately White Pine whose invigorating scent is said to speed healing. Pine has historically been placed in sick rooms where it can be inhaled often during recovery from illness. The scent of sunbaked pine needles is indeed sweet and uplifting. White pines whistle in the wind like no other and they bring shelter to many a bird. The mature White Pine is the top-hat-and-tails in shoreline high society.
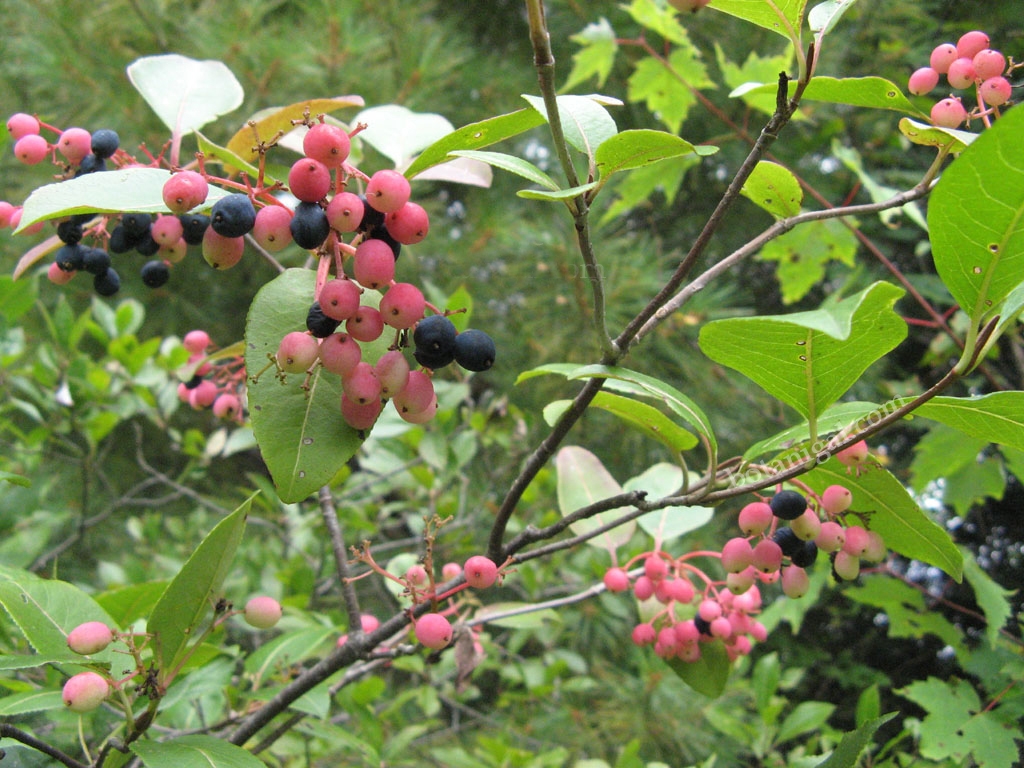
Wild Raisins love shoreline soils and are showy all year round!
Wild Raisin (Viburnumcassinoides)
Height: 6m Spread: 2m 4-6 hours sun
This shrub thrives on shorelines and when given more than 5 hours of daily sun, produces plump, pitted fruit. These drupes are adored by birds, which prefer to eat the raisins (along with Elderberries) after they have fermented. It is in this way that birds celebrate a successful summer season, and can they ever get tipsy! Do our feathered friends imbibe and fly?! They sure do—though not very straight—or far for that matter, which brings flocks of those ornithological paparazzi! The roots of the Wild Raisin reach deep and far, and when paired with willows, are an excellent shoreline stabilizer species.
Sweet Gale (Myricagale) Height: 1.5m Spread: 1m
The yellow nutlets found on the Sweet Gale shrub are highly fragrant and resinous. The scent is rich and woody like frankincense, and the leaves of the Sweet Gale will give off a lovely, spicy scent when crushed. Sweet Gales skirt the majority of sunny shorelines upon the Canadian Shield, are one of the main shelter species for so many creatures in the riparian zone and are an invaluable asset to any shoreline ensemble.
This grass (of rich land) is dried, braided and considered sacred by many of Canada’s Aboriginal Nations. This practice is being widely rediscovered among those who meditate. The end of the braid is ignited and then calmed to a smoulder. The resulting smoke is used to purify the area in which the meditation is taking place. Ebony Jewelwings (among other dragonflies) can often be seen twinkling on blades of sweet grass swaying in the breeze.
Wild Roses hold single pink flowers with an enchanting scent. Their hips contain more vitamin C than an orange and make a wonderful tea. These beautiful specimens also create thickets that feed, house, and protect many species of birds, butterflies, and dragonflies. Wild Roses will run, so set them well back from pathways and access points. Or, if you like to stop and smell the roses, the runners can be cut back from your paths and be planted elsewhere for more colourful habitat.
A Monarch butterfly sips nectar from a Joe-Pye weed bloom.
Joe-Pye Weed (Eupatoriummaculatum)
Height: 1.5m Spread: 0.5m Sun to part shade
A wonderful, late-summer addition to any shoreline collection! From pink to lavender, these blooms look and feel like a feather boa! Light and feathery on sturdy stems, the members of Genus Eupatorium are preferred nectar plants and shelter species for butterflies and bees. The weed known as Joe-Pye loves to have its feet wet, so shorelines, swales or ditches is among its favourite places to grow. The seeds take flight in fall like baby spiders on delicate fluffs to grow elsewhere, though colonies do establish quite readily around the parent plants.
Now get ready for the attention- this is your year! With these hot new swatches under your belt, it is time to accessorize with a cool pair of binoculars. Dress the coffee table with field guides and enjoy the show that a biodiverse shoreline will surely bring your way!
The winter of 2017/ 2018 can not be hailed as a great winter for snowfall here in Muskoka.
I had set my next blog mission for the Bracebridge Resource Management Centre Ski Trails in the fall, not knowing what the winter would bring. It started off by snowing a good deal, and then the rain melted the snow away. It snowed again nicely when we had a house full of guests for the holidays, and then it rained immediately into the new year—so the snow melted again, leaving a hard crust—and it simply had not snowed significantly since! Knowing that my skiing skills were close to their expiration date, having not skied for a very long time, I was none too eager to hit the trails only to fall on hard, sharp, crusty snow.
Thankfully, it snowed the entire second week of February, and sufficiently enough to give trails crews the chance to set good trail with a wee bit of cushion again. Realizing that this may be the last fluffy snow available this winter, I grabbed my skis, boots, poles, and camera, threw them into the car, and headed off to the Bracebridge Resource Management Centre.
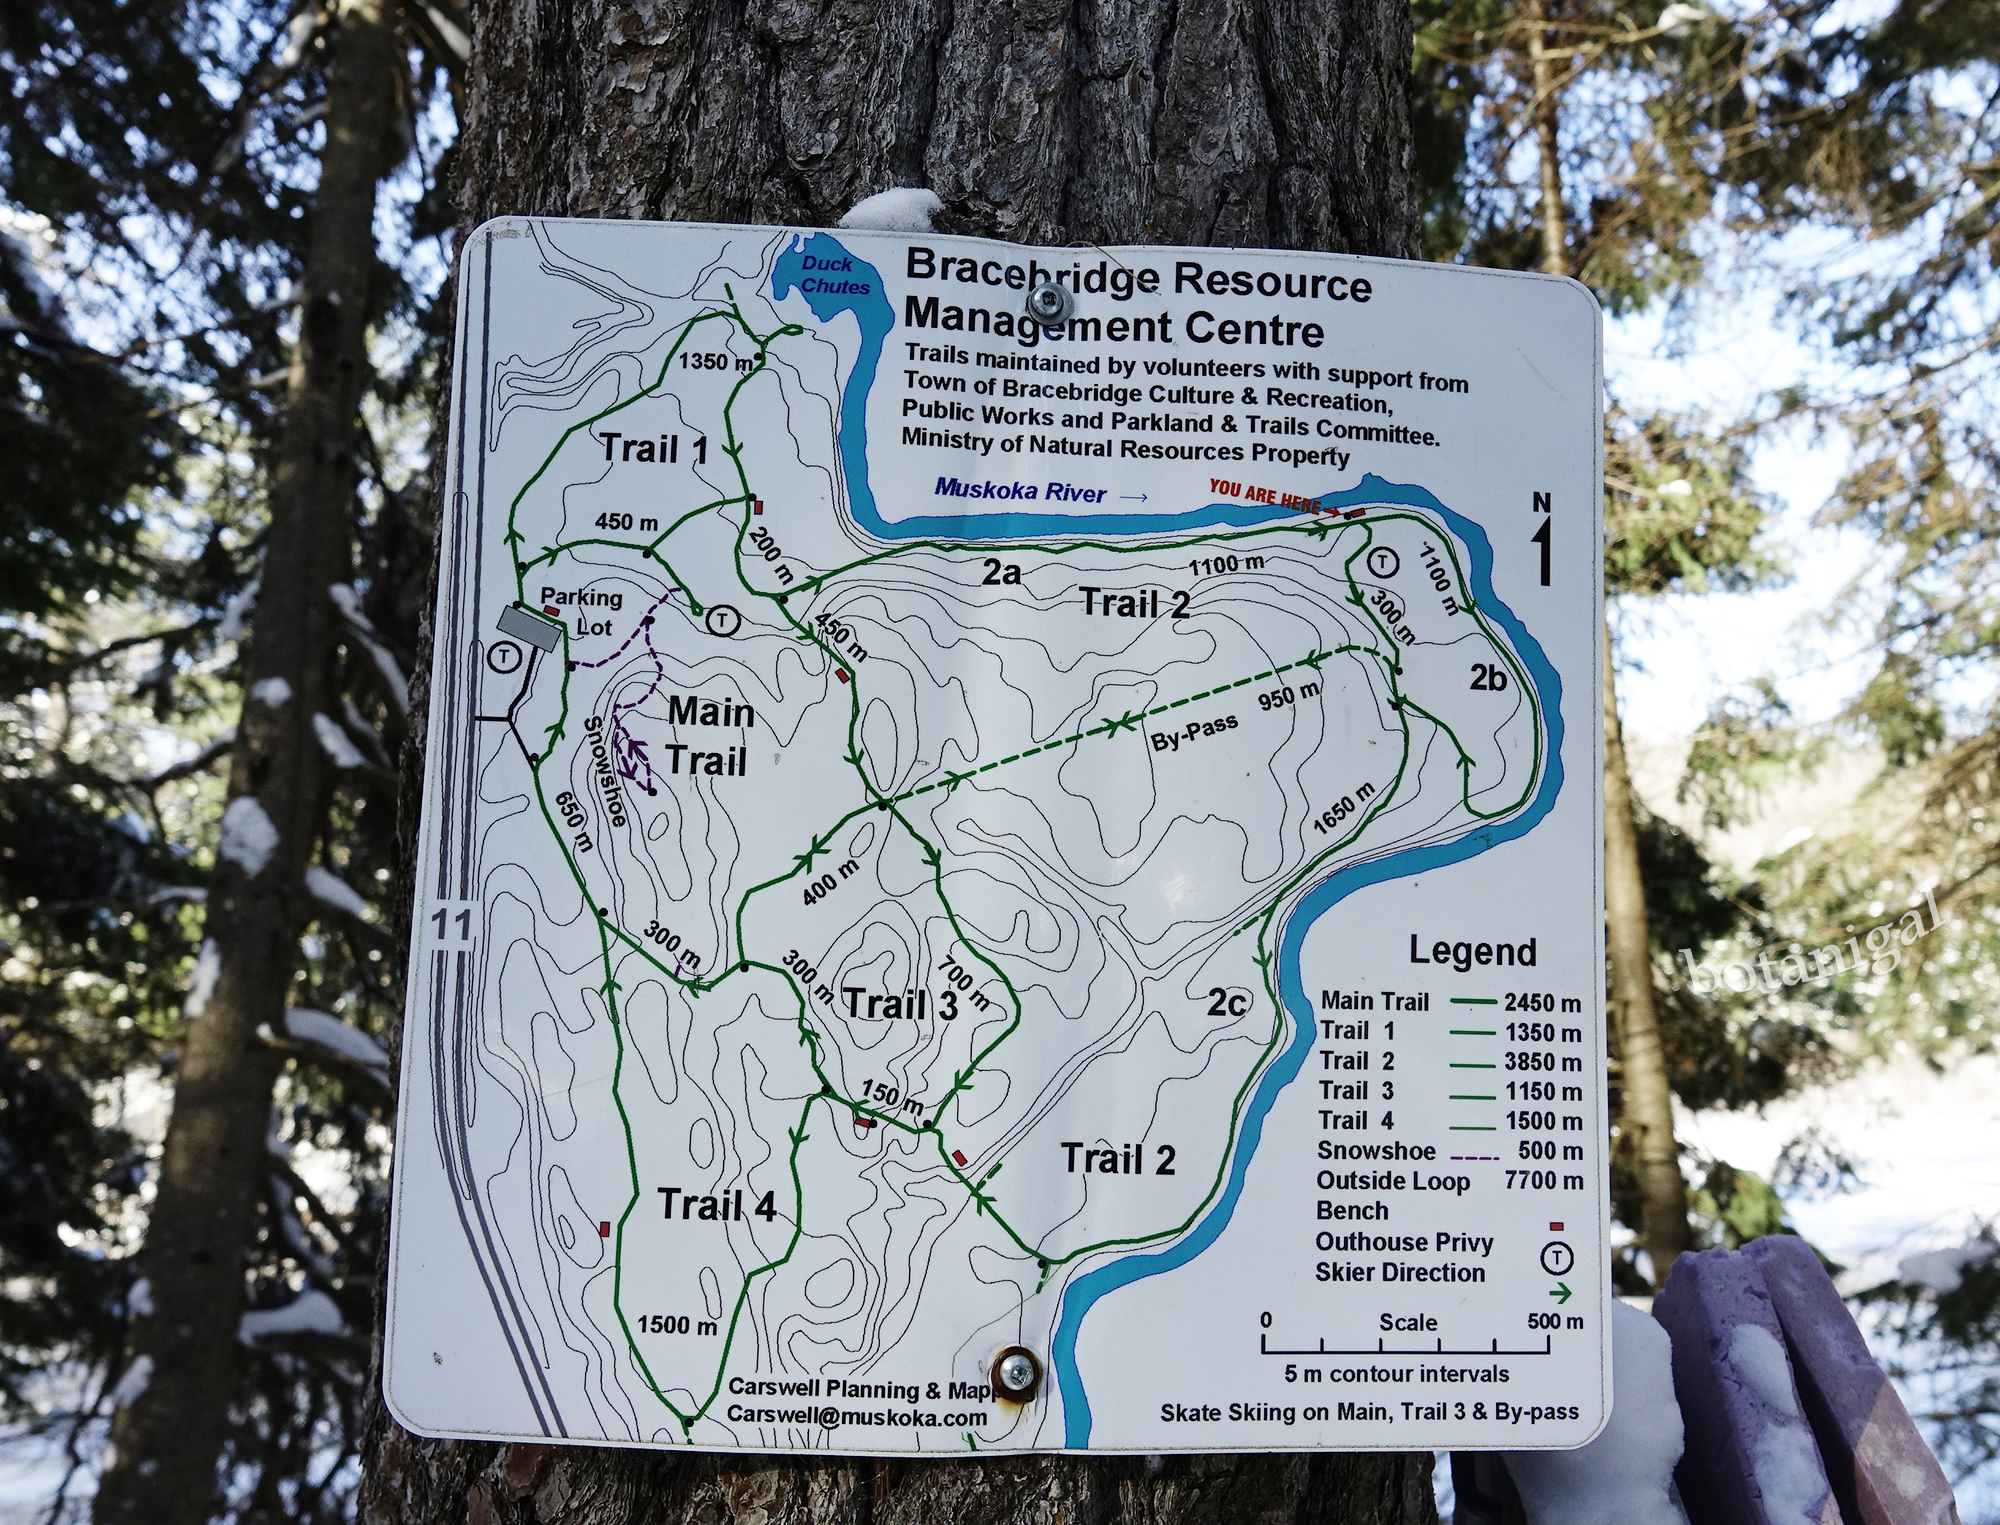
The Bracebridge Resource Management Centre trails are located at 5140 Highway 11 North.
The Bracebridge Resource Management Centre Trails offer 16.5 kilometres of ski trails in the winter. 19+ kilometres of trail are available for hiking and mountain biking in the spring, summer, and fall. This is a municipal trail system, brought to us by our taxes, so one can ski the trails at the BRMC at no cost, which is amazing, but you need to have your own equipment, as there are no rentals available. No dogs are permitted on the ski trails.
If there is a member of your party that is a staunch snowshoer, there is an allowance for them, there is a small half-kilometre snowshoe loop—snowshoes are not permitted on the ski trails.
Before I began working on the Muskoka Trails Council Blog Project—the BRMC trail system wasn’t even on my radar. I have cross-country skied many times in my life, and I may have heard someone mention that there were winter ski trails near High Falls in Bracebridge, but my brain tuned out because I am a snowshoe girl at heart, and I’ve always considered cross-country skis a pain to shuffle around. This year however, I was bequeathed a pair of beautiful back-country skis and boots. They belonged to a very dear friend who will no longer walk alongside me in the forest. The skis inspired me. This would be the year I’d start cross-country skiing again—or at least just this once.
I arrived at the BRMC parking lot, which was quite full for a Tuesday afternoon. I had no idea what my next move would be as I got out of my car with my skis—other than the fact that I would eventually have to click into them. I watched the other people in the lot. All of them were very athletic, spry, and jovial and it didn’t take long for me to realized that every single one of them had more experience in years than me. I marvelled at how fit and happy they were and was promptly snapped out of my daydream as my skis and poles rattled down the side of my car into a heap.
Now, I am quite comfortable going anywhere with my snowshoes, I know how to have my gear on, ready to go—right out the door. I drive to the mission destination, put my snowshoes on, grab my walking stick, camera, and backpack, and off I go… Standing there at the BRMC, with skis in hand, I felt like I was in a whole new universe. Cross-country ski trails are different: there are rules, there is skiing etiquette and I didn’t remember any of it! What I did remember was that skiing would involve pushing myself over the crest of hills where I’d build velocity, with two flat sticks, set in tracks, bound to my toes, pointing downhill. This made me nervous. I really didn’t want to be that lump of flesh and sticks on the trail that others had to jump over to continue their workout.
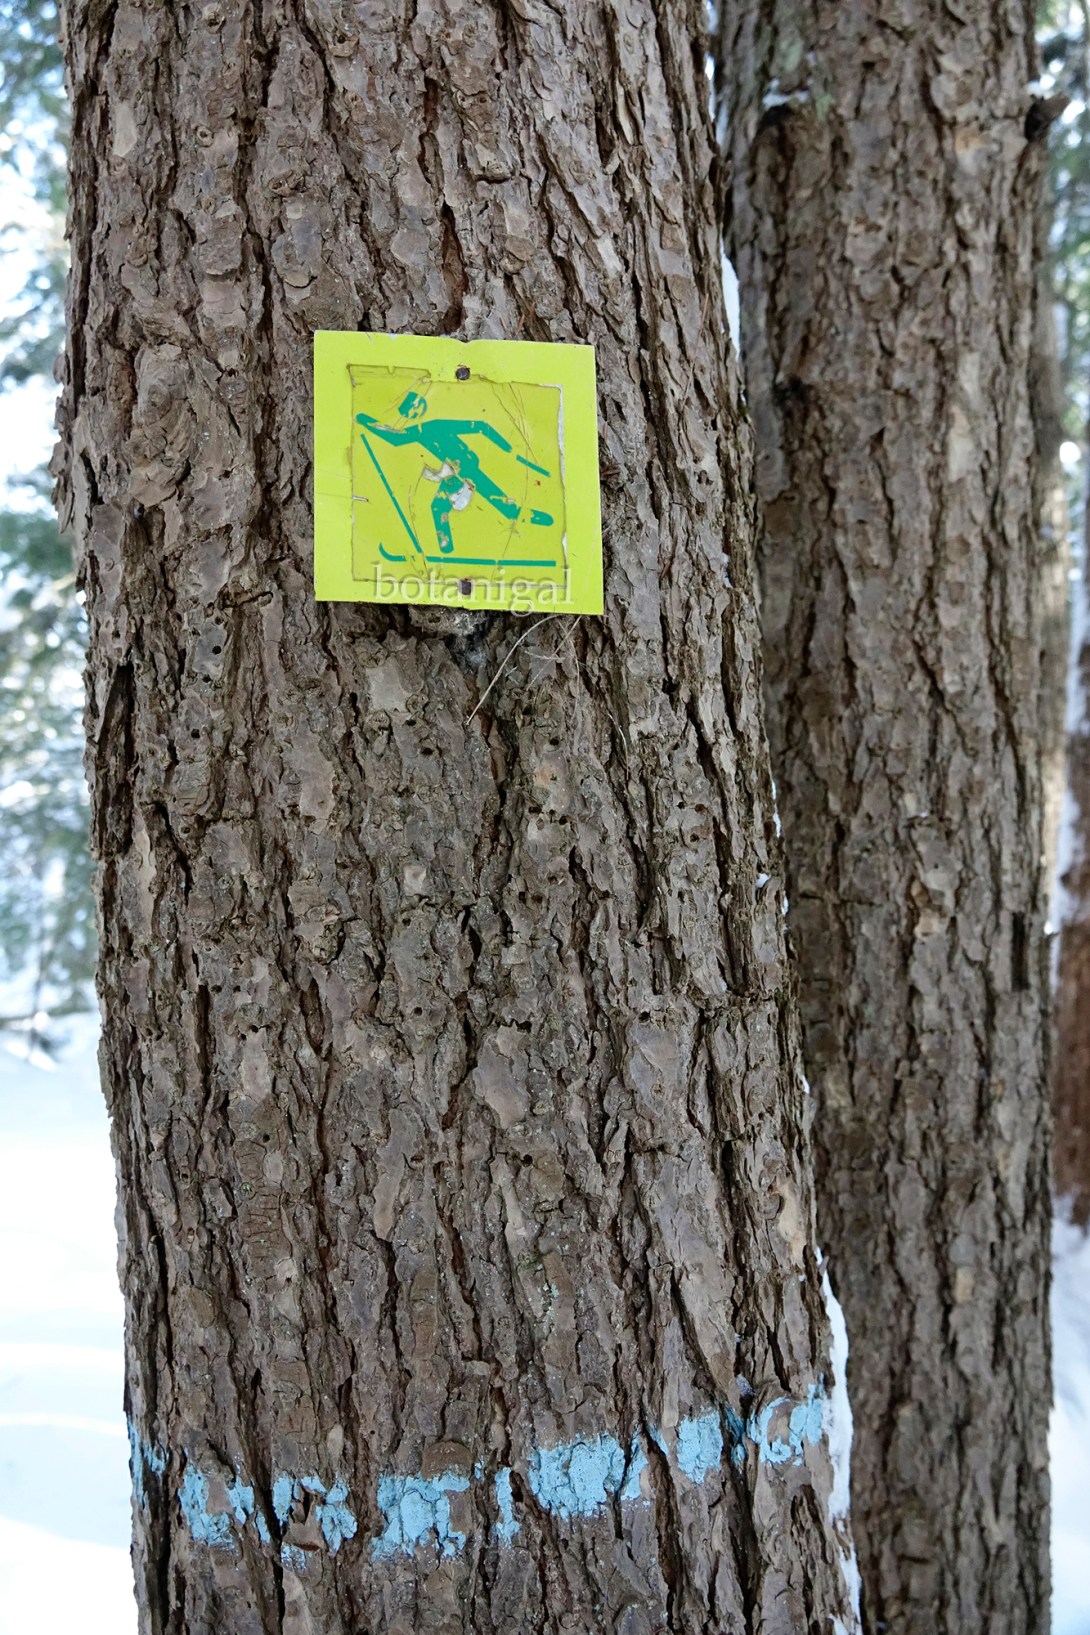
I quickly discovered that the BRMC ski trails have no shortage of signage, which is quite helpful – at least I wouldn’t need to worry about getting lost.
I decided to study the map at the trail entry adjacent to the parking lot to further familiarize myself with my route (this was a delay tactic to avoid binding skis to my feet until the experienced skiers had left the vicinity—just in case I fell over), when a pleasant, spritely woman, approached and spoke with me about her bird sightings of the day, and what a weird winter it had been for birds and migration patterns. When we ran out of birding anecdotes I asked her about the Lookout Trail Loop – Trail #1, “Was the lookout worth the extra 1.3 kilometres?” She said it was ‘nice’, referring to it further only in that it added extra distance to a workout. I imagined the ‘lookout’ to be a typical Muskoka precipice of land with a vista to photograph—when a mind’s eye vision of me clumsily skiing over the edge appeared—I shook the thought away. It would be well worth it to apply the extra 1350 meters of effort to burn calories and see what was there. I became anxious again once our conversation had wrapped, and we had waved and wished well. I looked sideways at the skis and poles that I’d stood upright beside the map panel. ‘Just put the darn things on and get going’ I said to myself, and so I did… and I didn’t fall over.
With my feet buckled to my skis I set off towards Trail 1 which would take me to the Duck Chutes Lookout. The trail was beautifully groomed, I managed to manoeuvre down the first hill without falling and was pleased to see that there was still nobody behind me—the pressure was off. Thrilled, I found my stride, I began to recall what my mother taught me about form, I got into my kick, glide, kick… I…. Was… Skiing!
Botanigal on skis—reality check number one: It is difficult to aim a camera when there are unreasonably long poles looped around your wrists.
Having x-country skied twice in the last twenty years, my plan for the day was to:
Dress in my normal forest cammo outfit (warm, puffy, bed-like—best for resting in snow)
Mosey along, slow and steady—to let my muscles and joints acclimatize—rest in snow,
Stop for plenty of re-hydration and recoup breaks,
Sleep in the snow,
Study ski trail etiquette and be ready to step off the trail for those who are more athletically inclined (which would be everybody there but me).
Ski perimeter along the river to get sufficient coverage of the trails—fall in snow,
Take lots of photos.
Five minutes in, my body started to rebel. My lungs were pleading for breath, my triceps were, ‘like, what the heck?!!’, and my thighs were shaking. I hadn’t even gone up a hill yet! I had to stop and take a photo to recover. I looked back again, still nobody behind me – thank goodness.
I skied on a few hundred meters, taking in the plantation landscape, then stopped again to catch my breath at an aged interpretive panel. It was still legible and allowed me to understand a piece of the history of the Bracebridge Resource Management Centre.
The BRMC property is a solid example of silviculture practice and has been tailored to educate trail users about forest management. There are many interpretive panels throughout the property highlighting points of interest that are typical of our forests here in Muskoka, along with explanations as to how the OMNR managed many of the forested properties that were under their mandate.
The Bracebridge Resource Management Centre was, in a way, an experimental tree farm and the plantations of Red Pine were the gardens! Sun-loving Red Pine (Pinus resinosa) were chosen by the OMNR in 1970 as the species to plant across what were once open fields. Once the Pine Gardens had reached the age of twenty-five in 1995, the trees were thinned to allow crowns of the trees to expand and catch more sun. As these trees grew taller, they were scheduled to be thinned every ten to fifteen years to keep the stand robust, and the final harvest was set to occur in 2020.
Just a few hundred meters beyond the Pine Garden, is the midpoint of Trail 1, where it forks towards a small loop so that skiers can visit the ‘lookout’—but don’t get your hopes up, this is not a photo-op lookout, there is no hill, and the view is quite overgrown. The point of interest is a set of rapid chutes across a small bay adjacent to the ski trail.
I had to remove my skis and bushwhack to get to a clearing with a view of Duck Chutes Bay. In doing so, I noticed that the botanical history on this little spit of land seemed quite rich. There was an array of native and non-native tree and shrub species. It was fun to imagine this spot being another type of garden; perhaps it was a nice picnic and swimming destination back in the day. I romanticized that many people may have held a fondness for this spot in their hearts, planting special seeds and roots, along with trees and shrubs, in the name of love and loved ones. Truth be told though, many of these species could have self-seeded, as foreign species (such as the invasive Scots Pine) tend to do.
To get a glimpse of the Duck Chutes, one must go off-ski and plow through a thin covering of Alders and Hazels. If this little bay has been named as such, perhaps the waterfowl viewing here has potential.
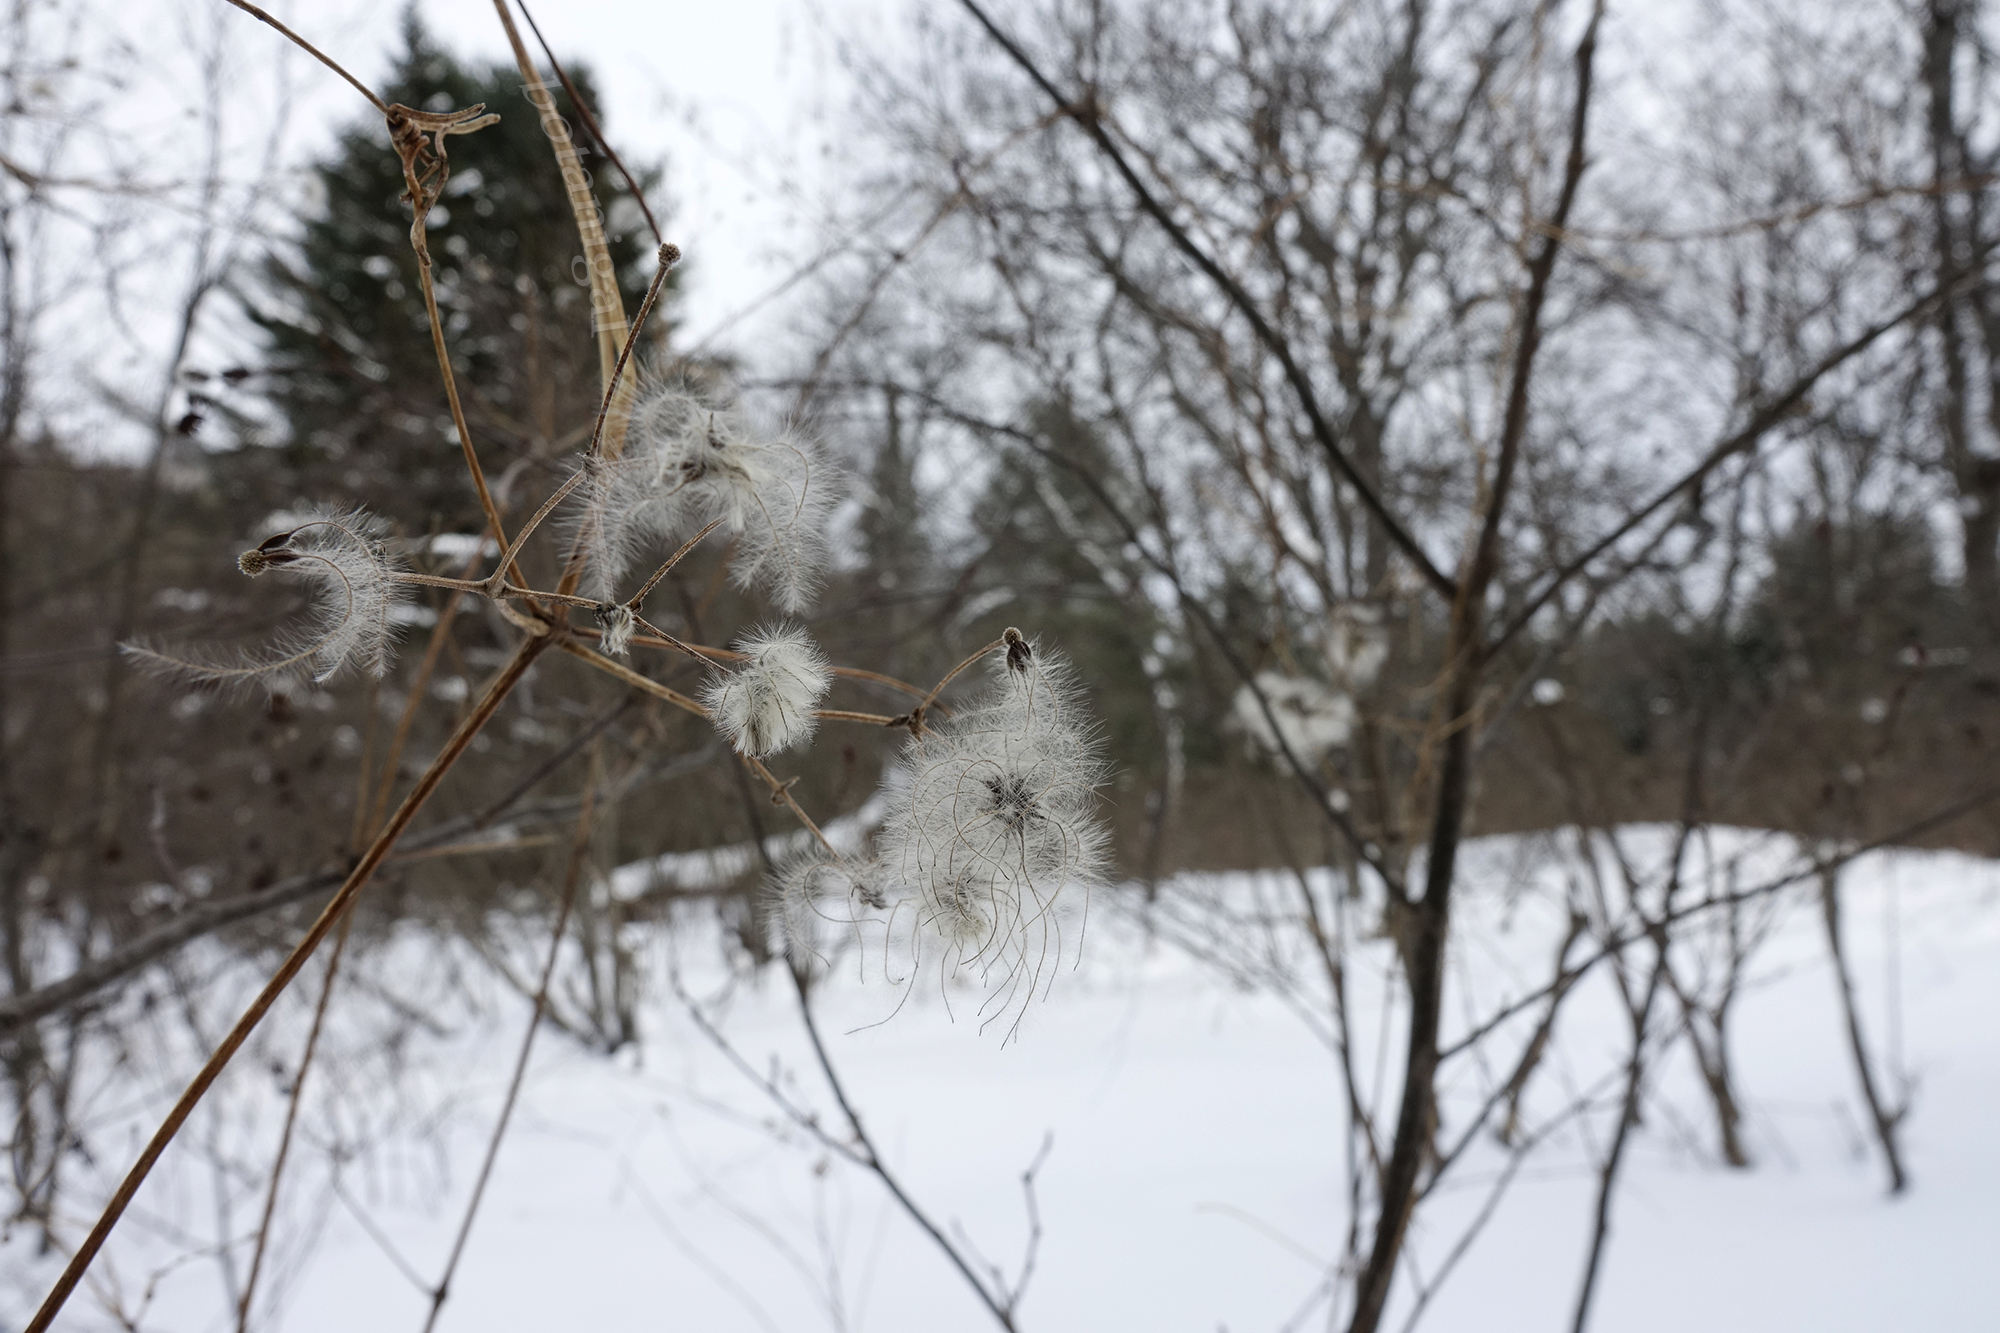
Precious evidence of Wild Clematis (Clematis virginiana) and other botanical treasures on this little peninsula which juts out into the Muskoka River, made the ski around the loop to the ‘Lookout’ worth it – because you can just feel the love.
Norway Spruce (Picea abies) and the invasive Scots Pine (Pinus sylvestris) are relics from past reforestation and erosion control campaigns, which offered tree seedlings to private landowners. One can tell by spending a bit of time here that this little spot on the BRMC property was treasured.
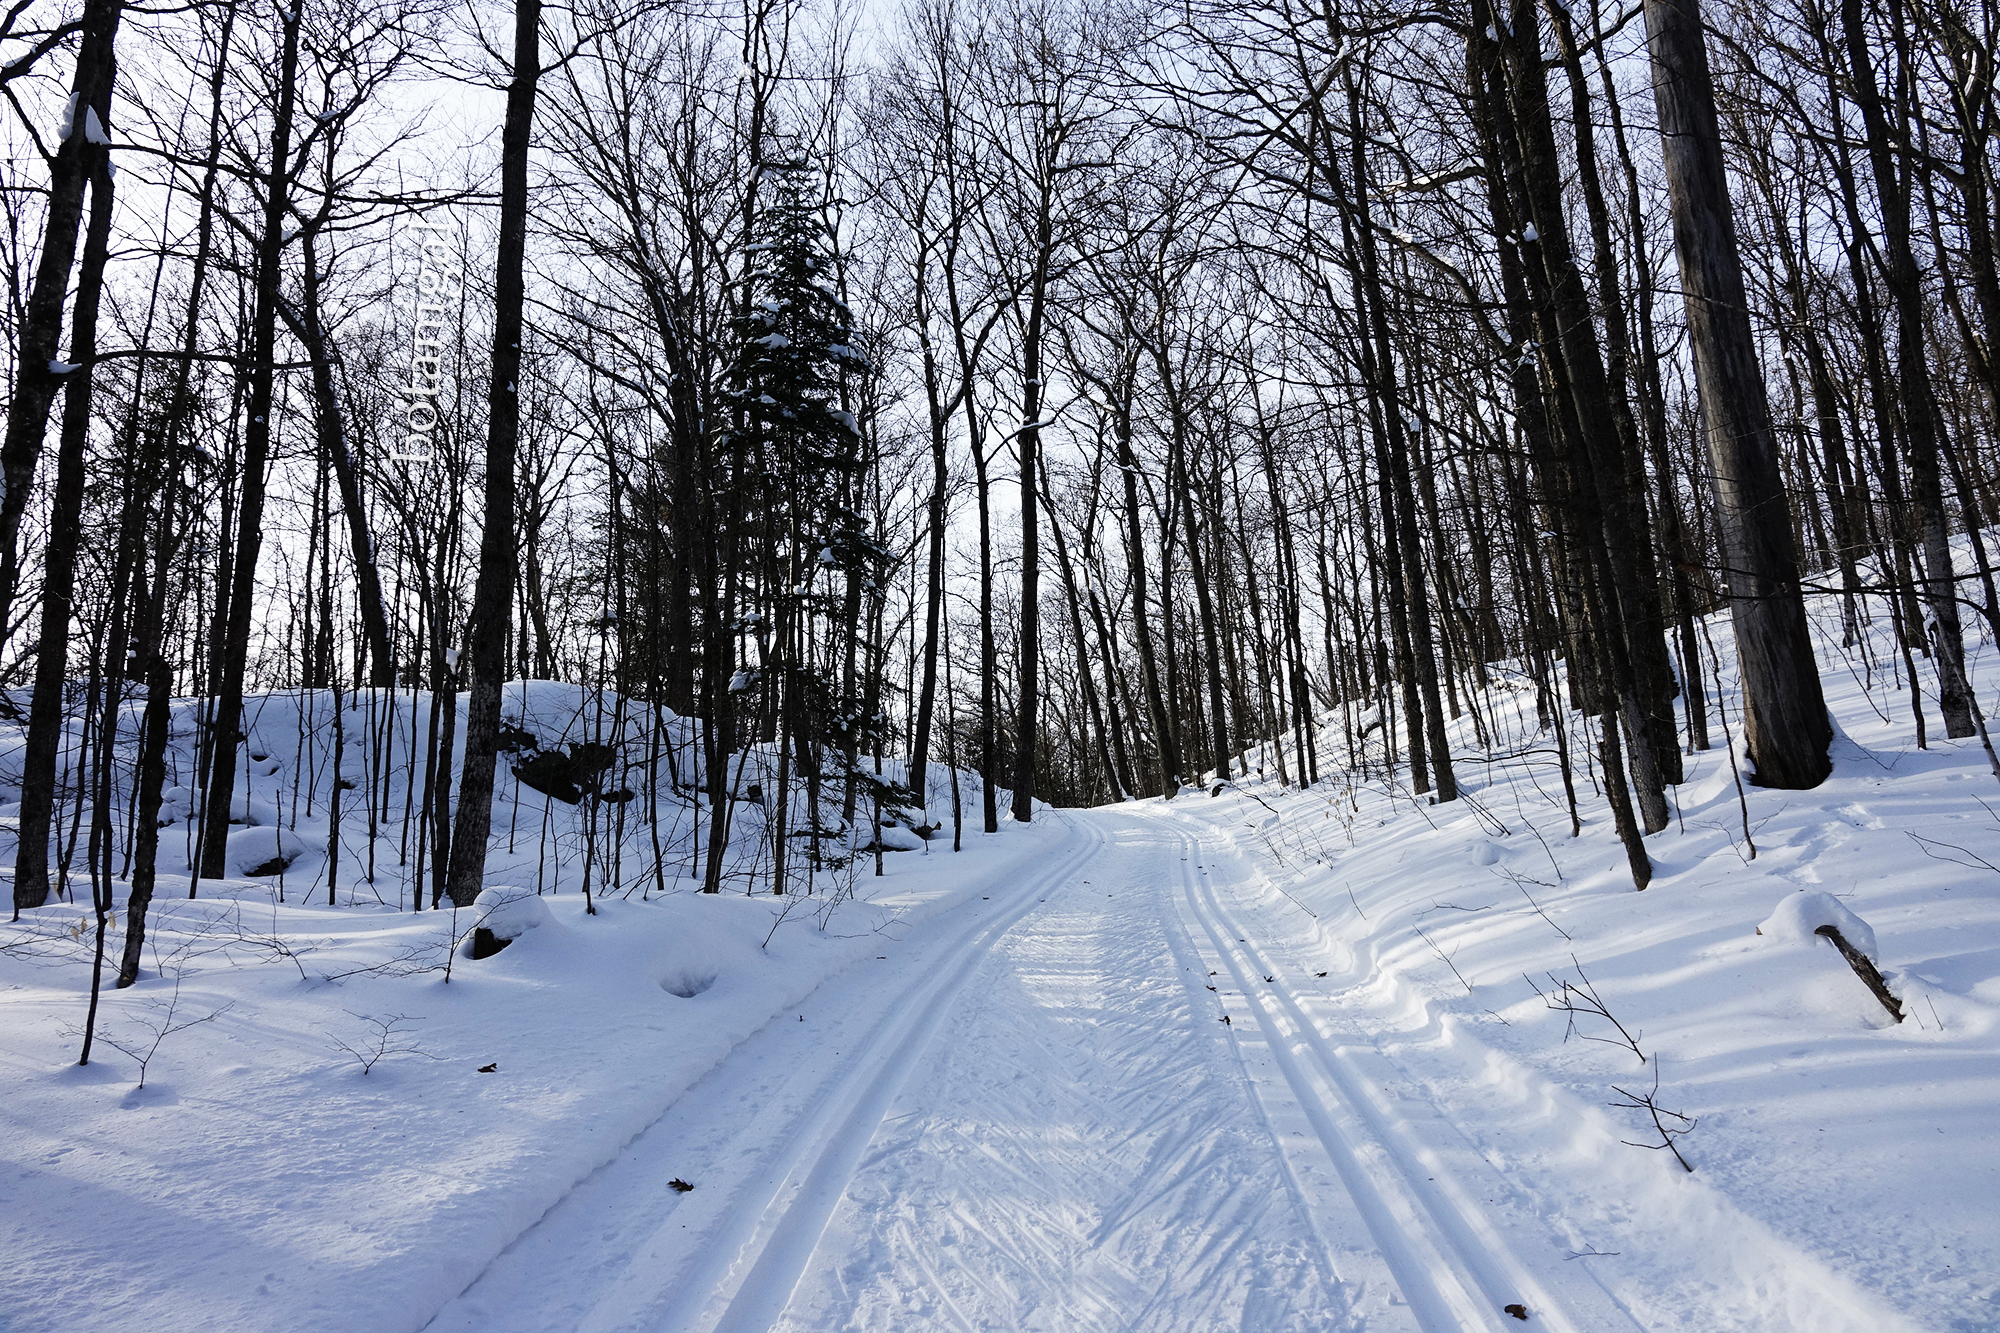
With the lookout loop under my belt I continued to the Main Trail section where the trail turns into a double trail with a skate trail running down the centre. I stuck to the right, like I do on the roads, and hoped for the best. The groomers sincerely do a wonderful job here, and the fact that I didn’t have to pay a fee made me feel quite grateful. I herringboned up my first hill and made it to the top. My confidence was building, and my legs were limbering up!
‘Herringbone’ technique helps one get up a hill that is too steep to maneuver with their x-country skis set parallel. This is accomplished by pointing the ski tips outwards and tipping your feet inwards towards each other so that the inner edge of each ski digs in to the hill and allows the skier to push upwards. Poles have a big role in this too. This technique can also be referred to as the ‘Duck Walk’.
There are several chances for one to link up with the Main Trail, which is a double track for high traffic, and allows for skate style skiing
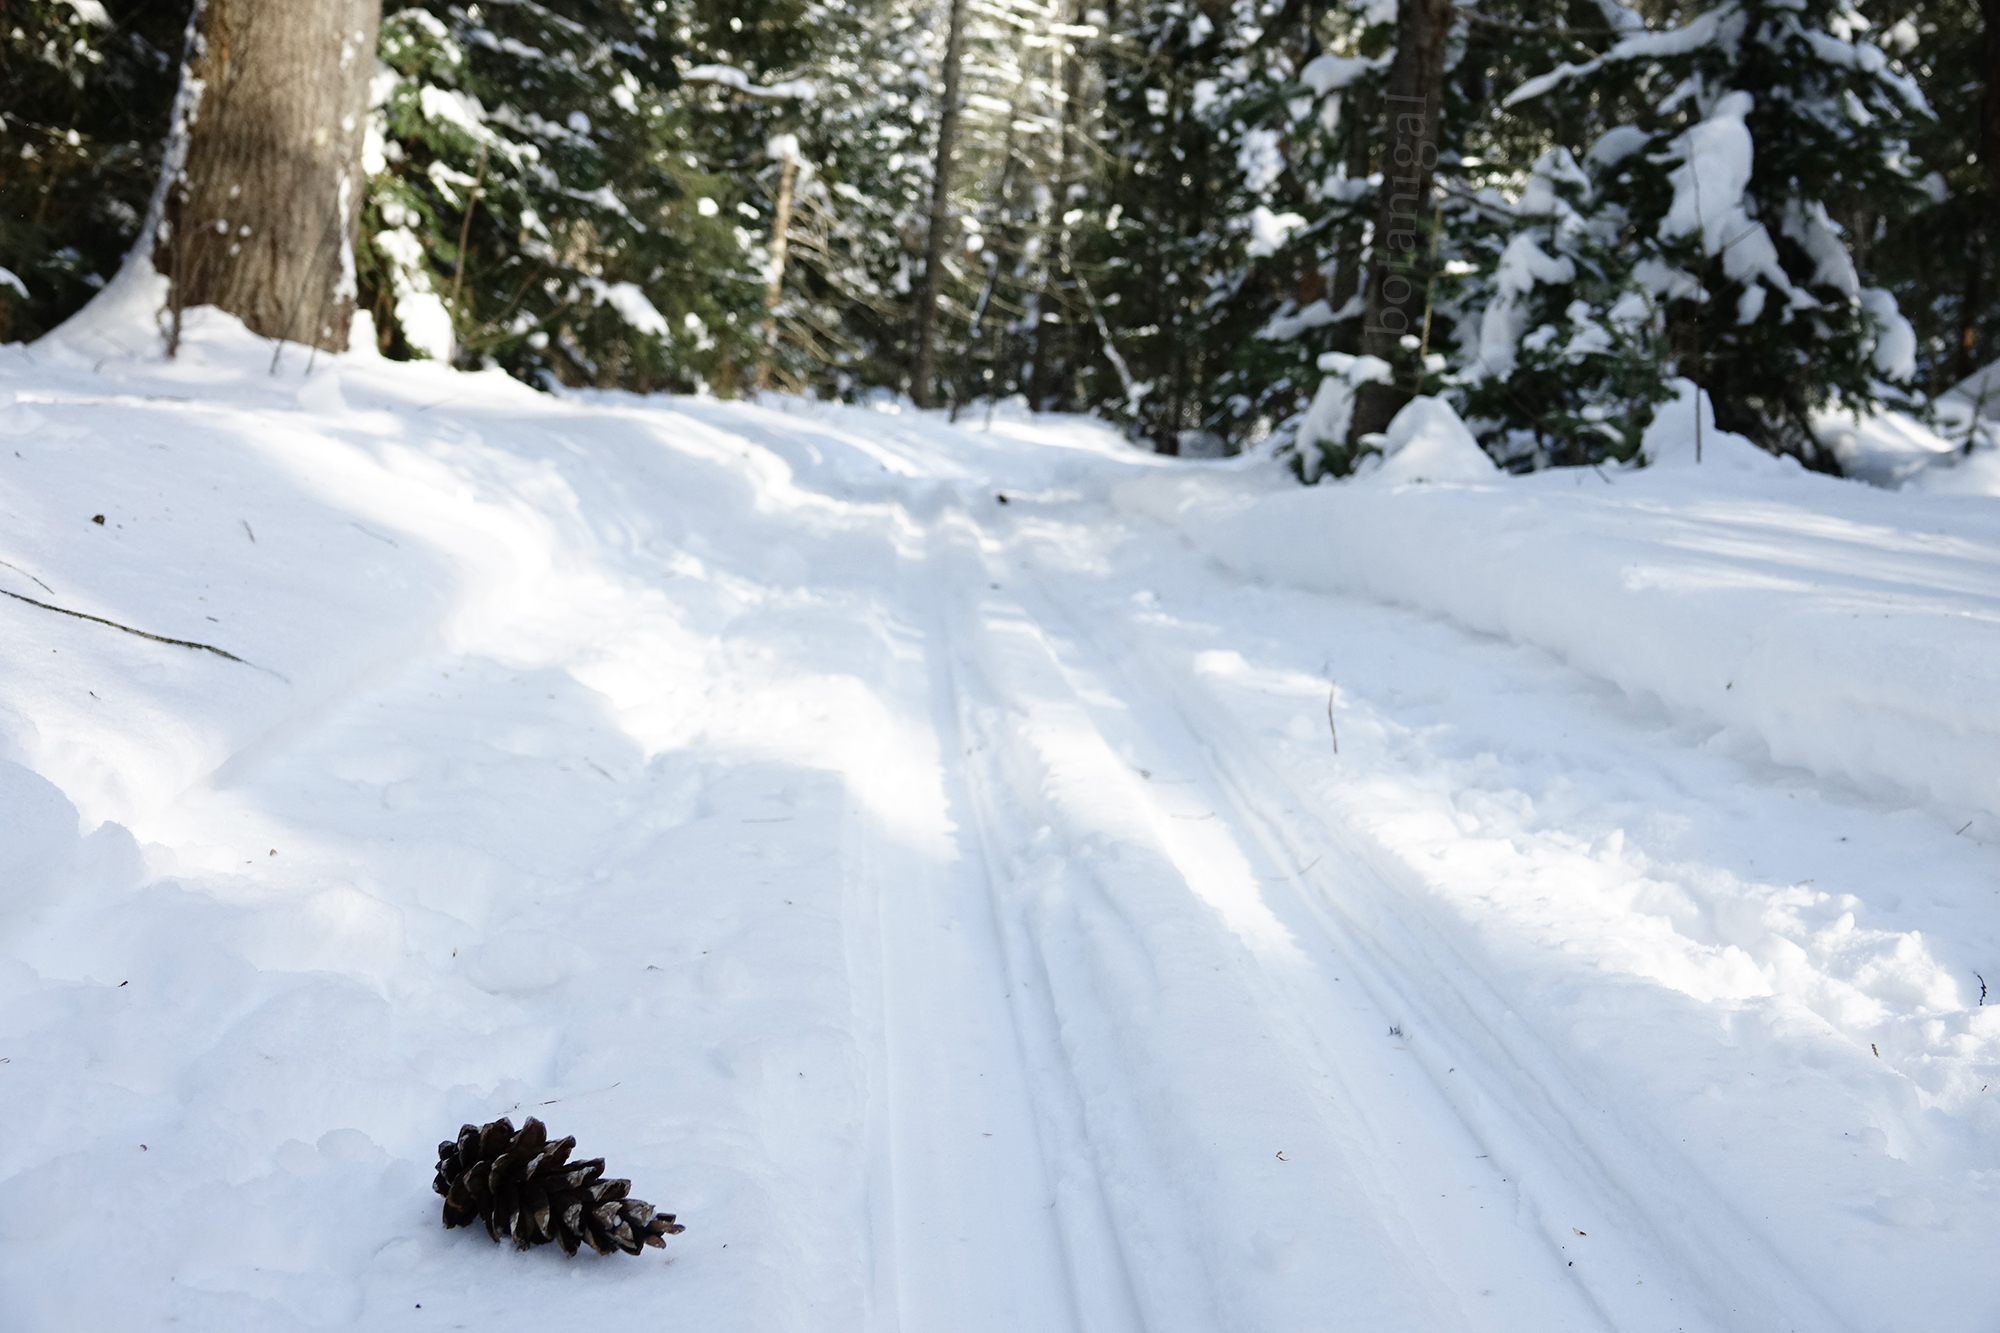
This White Pine (Pinus strobus) cone had settled in nicely beside the single track alongside the Muskoka River on trail 2a.
There is no shortage of ‘You are Here’ maps and signage at the BRMC. As a new visitor, I was thankful for them and found them reassuring
When I took this photo alongside the river on 2a after about 2500 metres in, I was thinking, ‘Thank Glob I’m here’. A crew of senior skiers passed by me, light and swift, to take the extra 1100-meter loop that Trail 2b offered. My groin muscles, which I have totally ignored for years, told me to take the 300-meter shortcut to 2c. When I got to 2c, those sprightly skiers passed me again… ‘That’s okay”, I told myself (completely out of breath), ‘I’m reporting.
2017 was a great mast year where trees produced plentiful seed. These are the seeds of a beautiful and compact tree species known as the Hop Hornbeam or Ironwood (Ostrya virginiana). Many species of seed were evident upon the fresh dusting of snow and one could tell which tree species made up the canopy above by the seeds cast about on the trails underfoot.
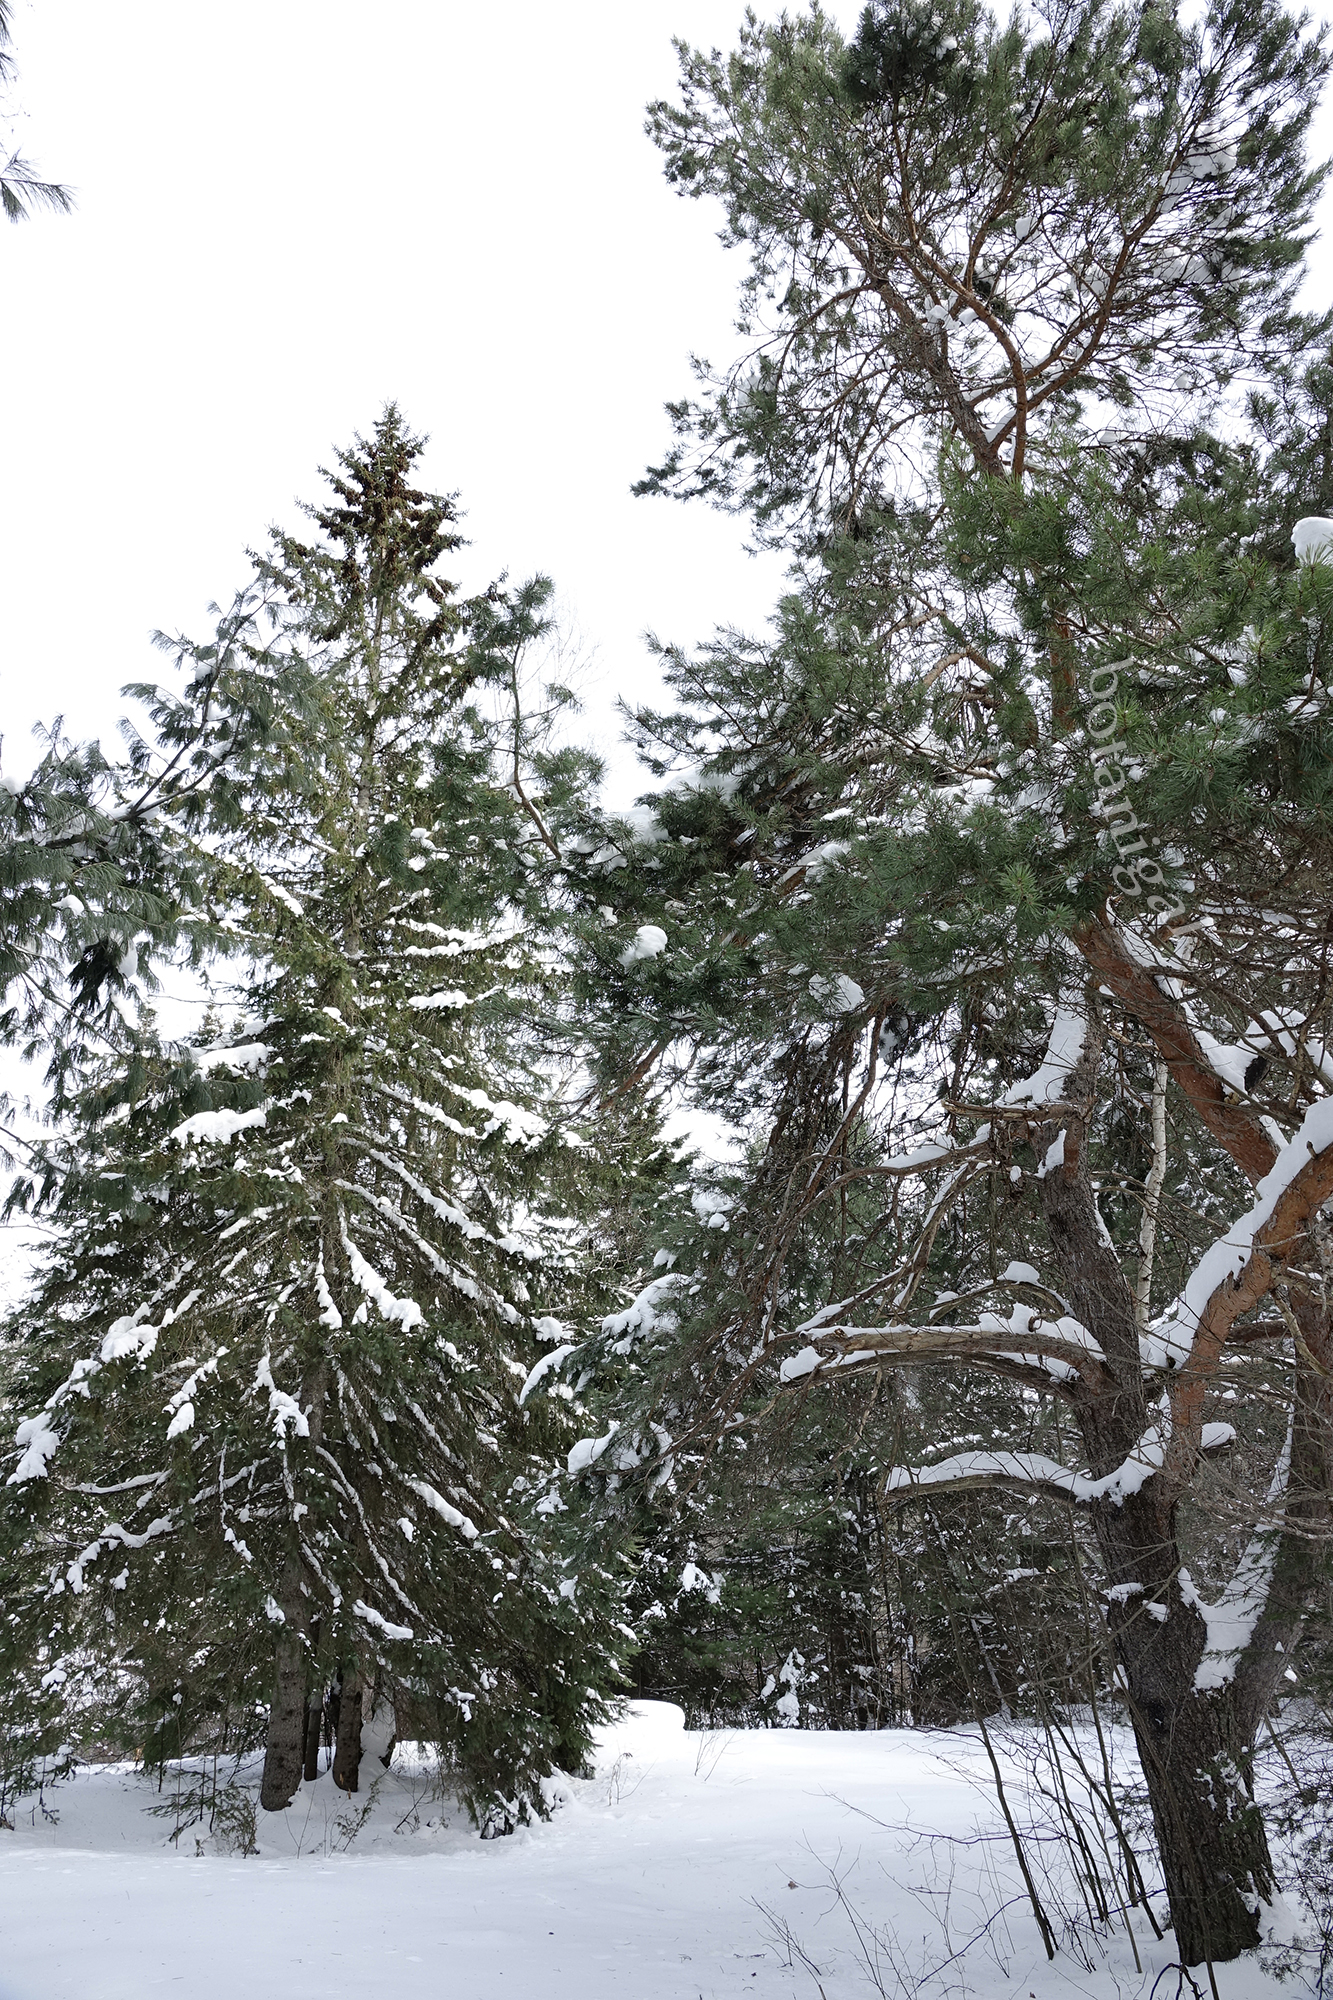
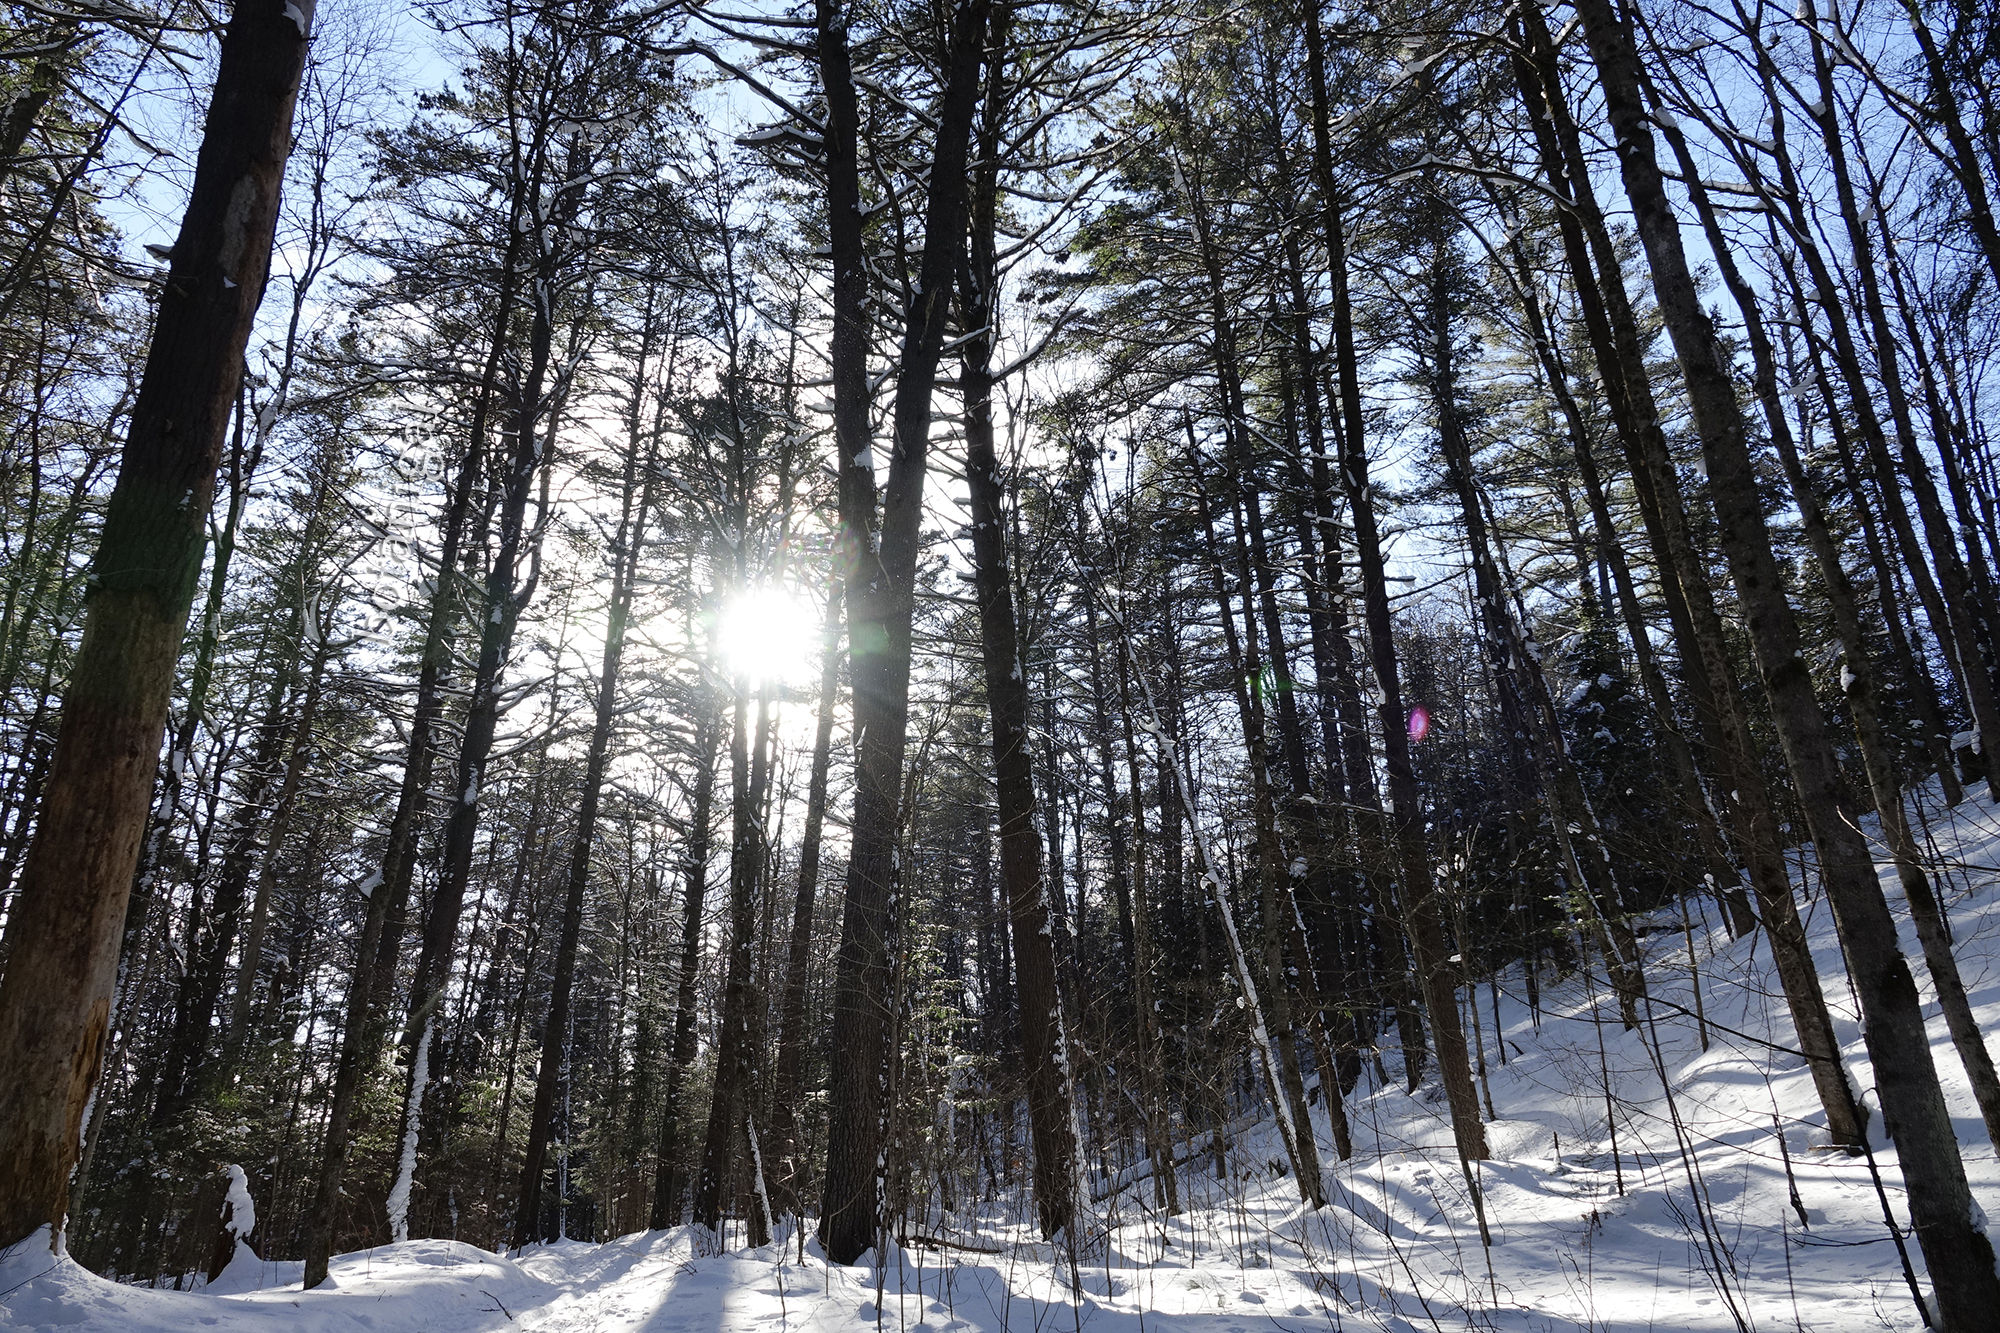
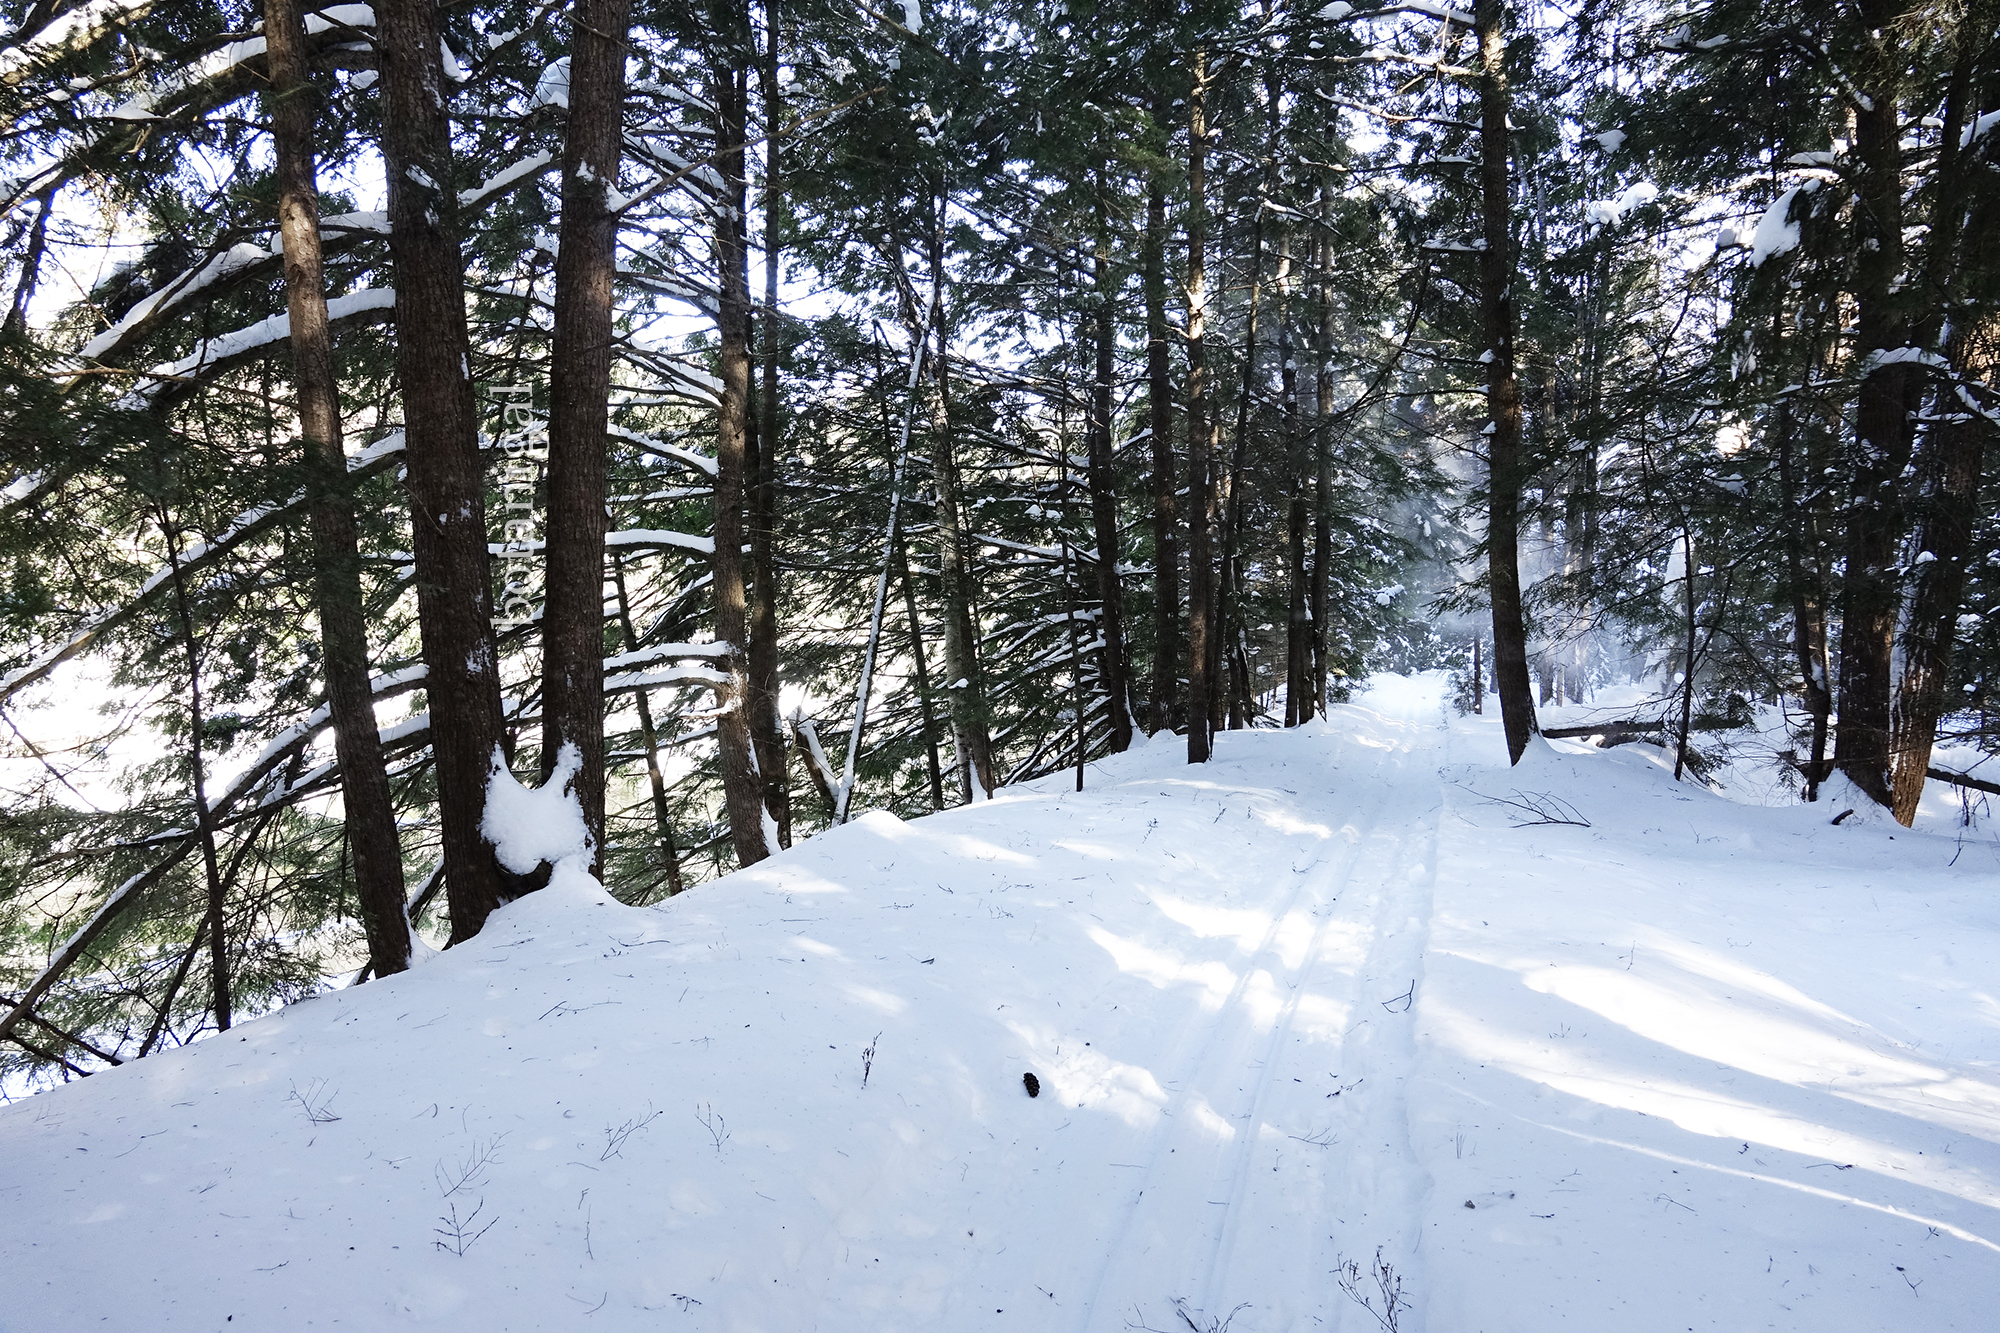
The BRMC Ski Trails run through both Plantation and Mixed forest canopies.
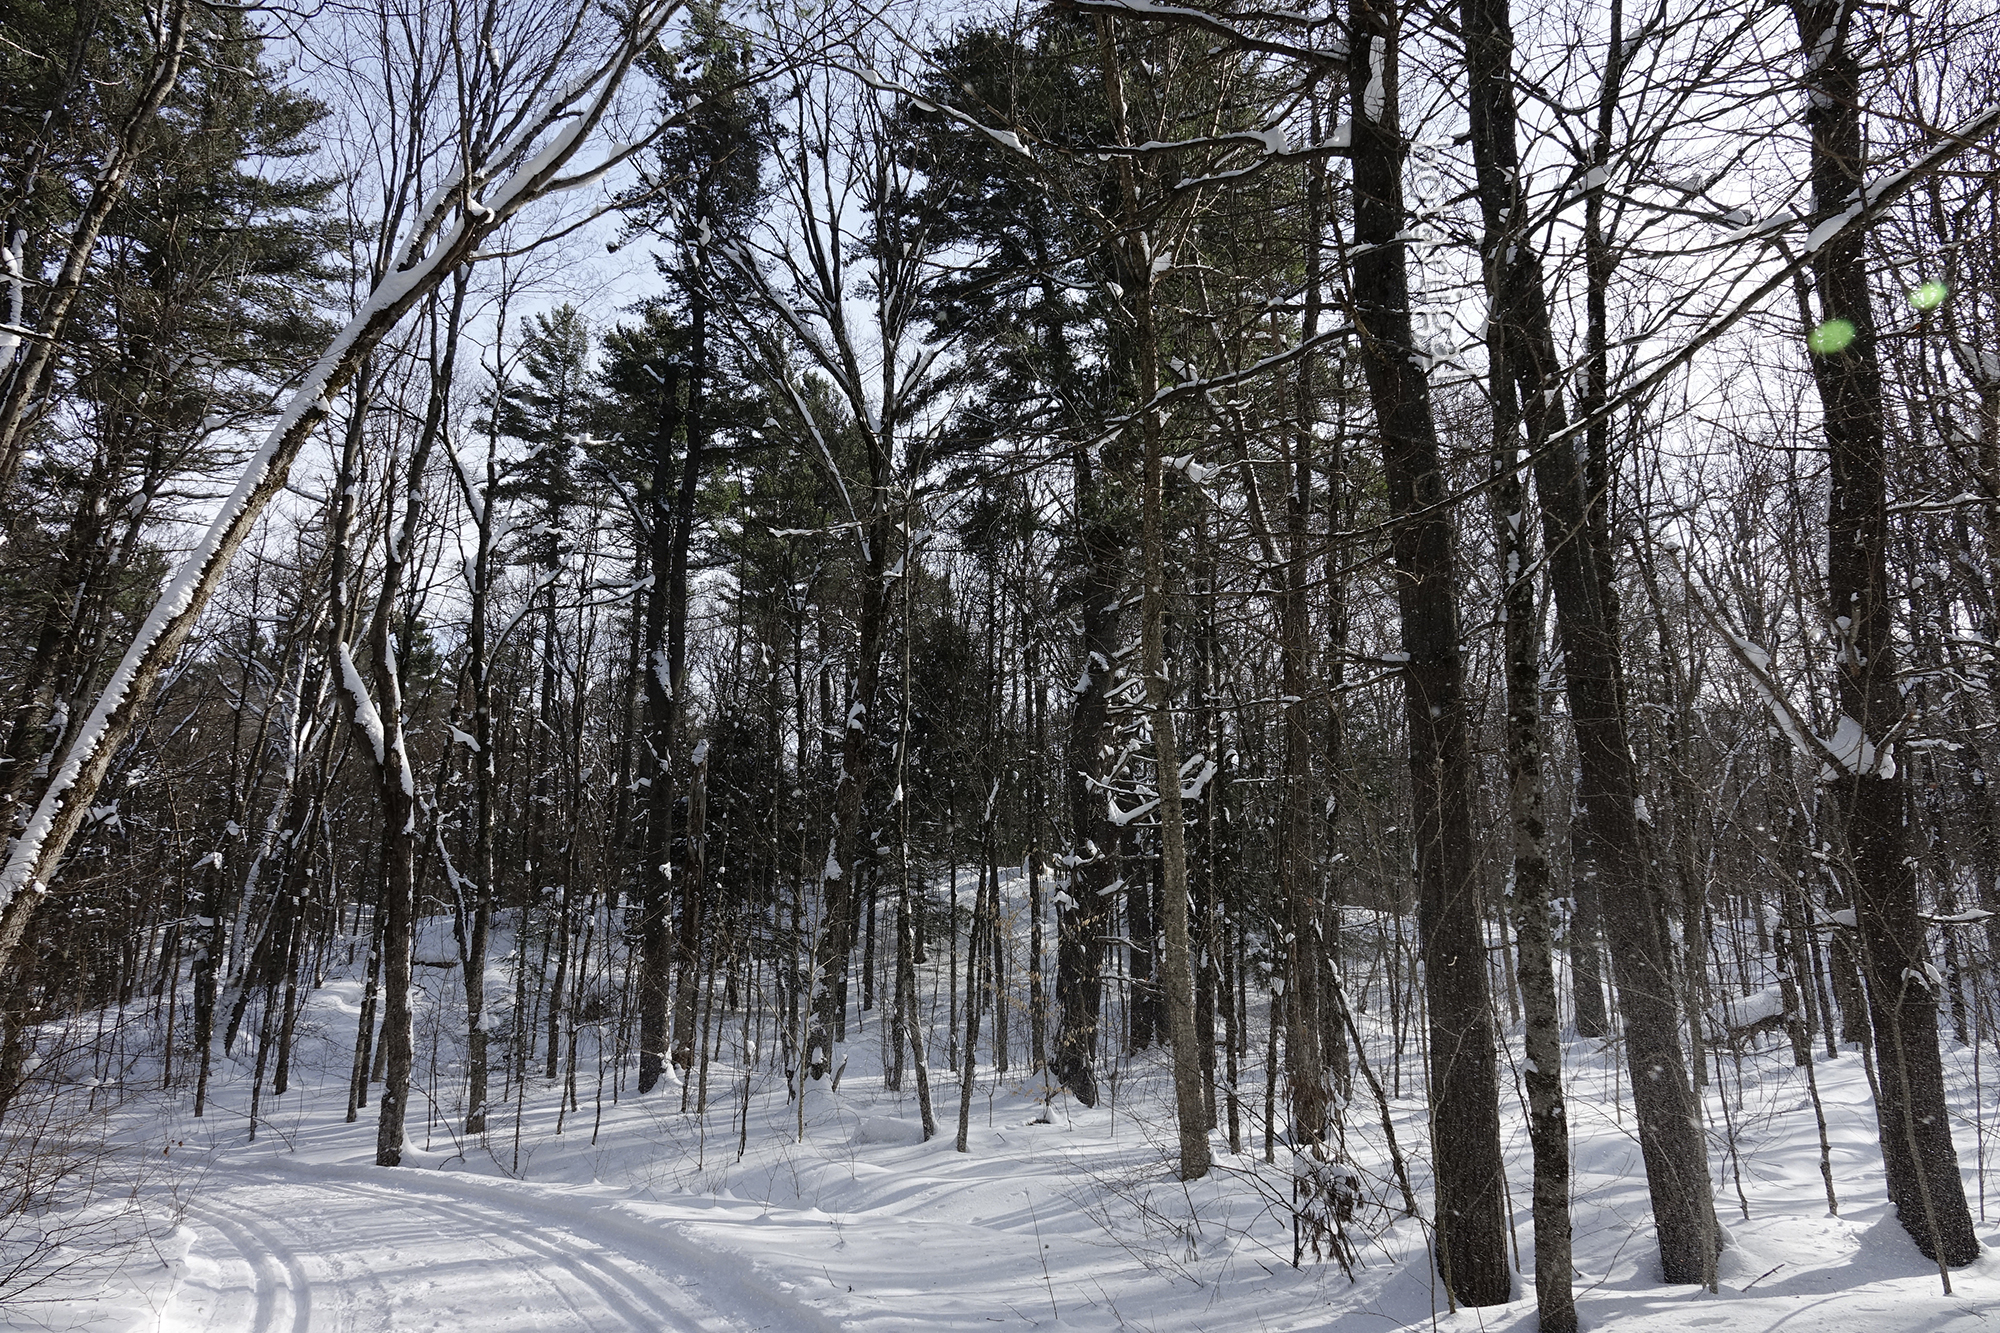
The trails along the river were peaceful and the treetops were full of birds.
This lovely group of skiers passed me three times. Being the age of my parents, they skied twice the distance I did, and were much savvier with their attire. I plan to wear lighter clothes next time, it makes for ease of movement and less sweat. Cross-country skiing is not like walking, it is like running, with reduced impact.
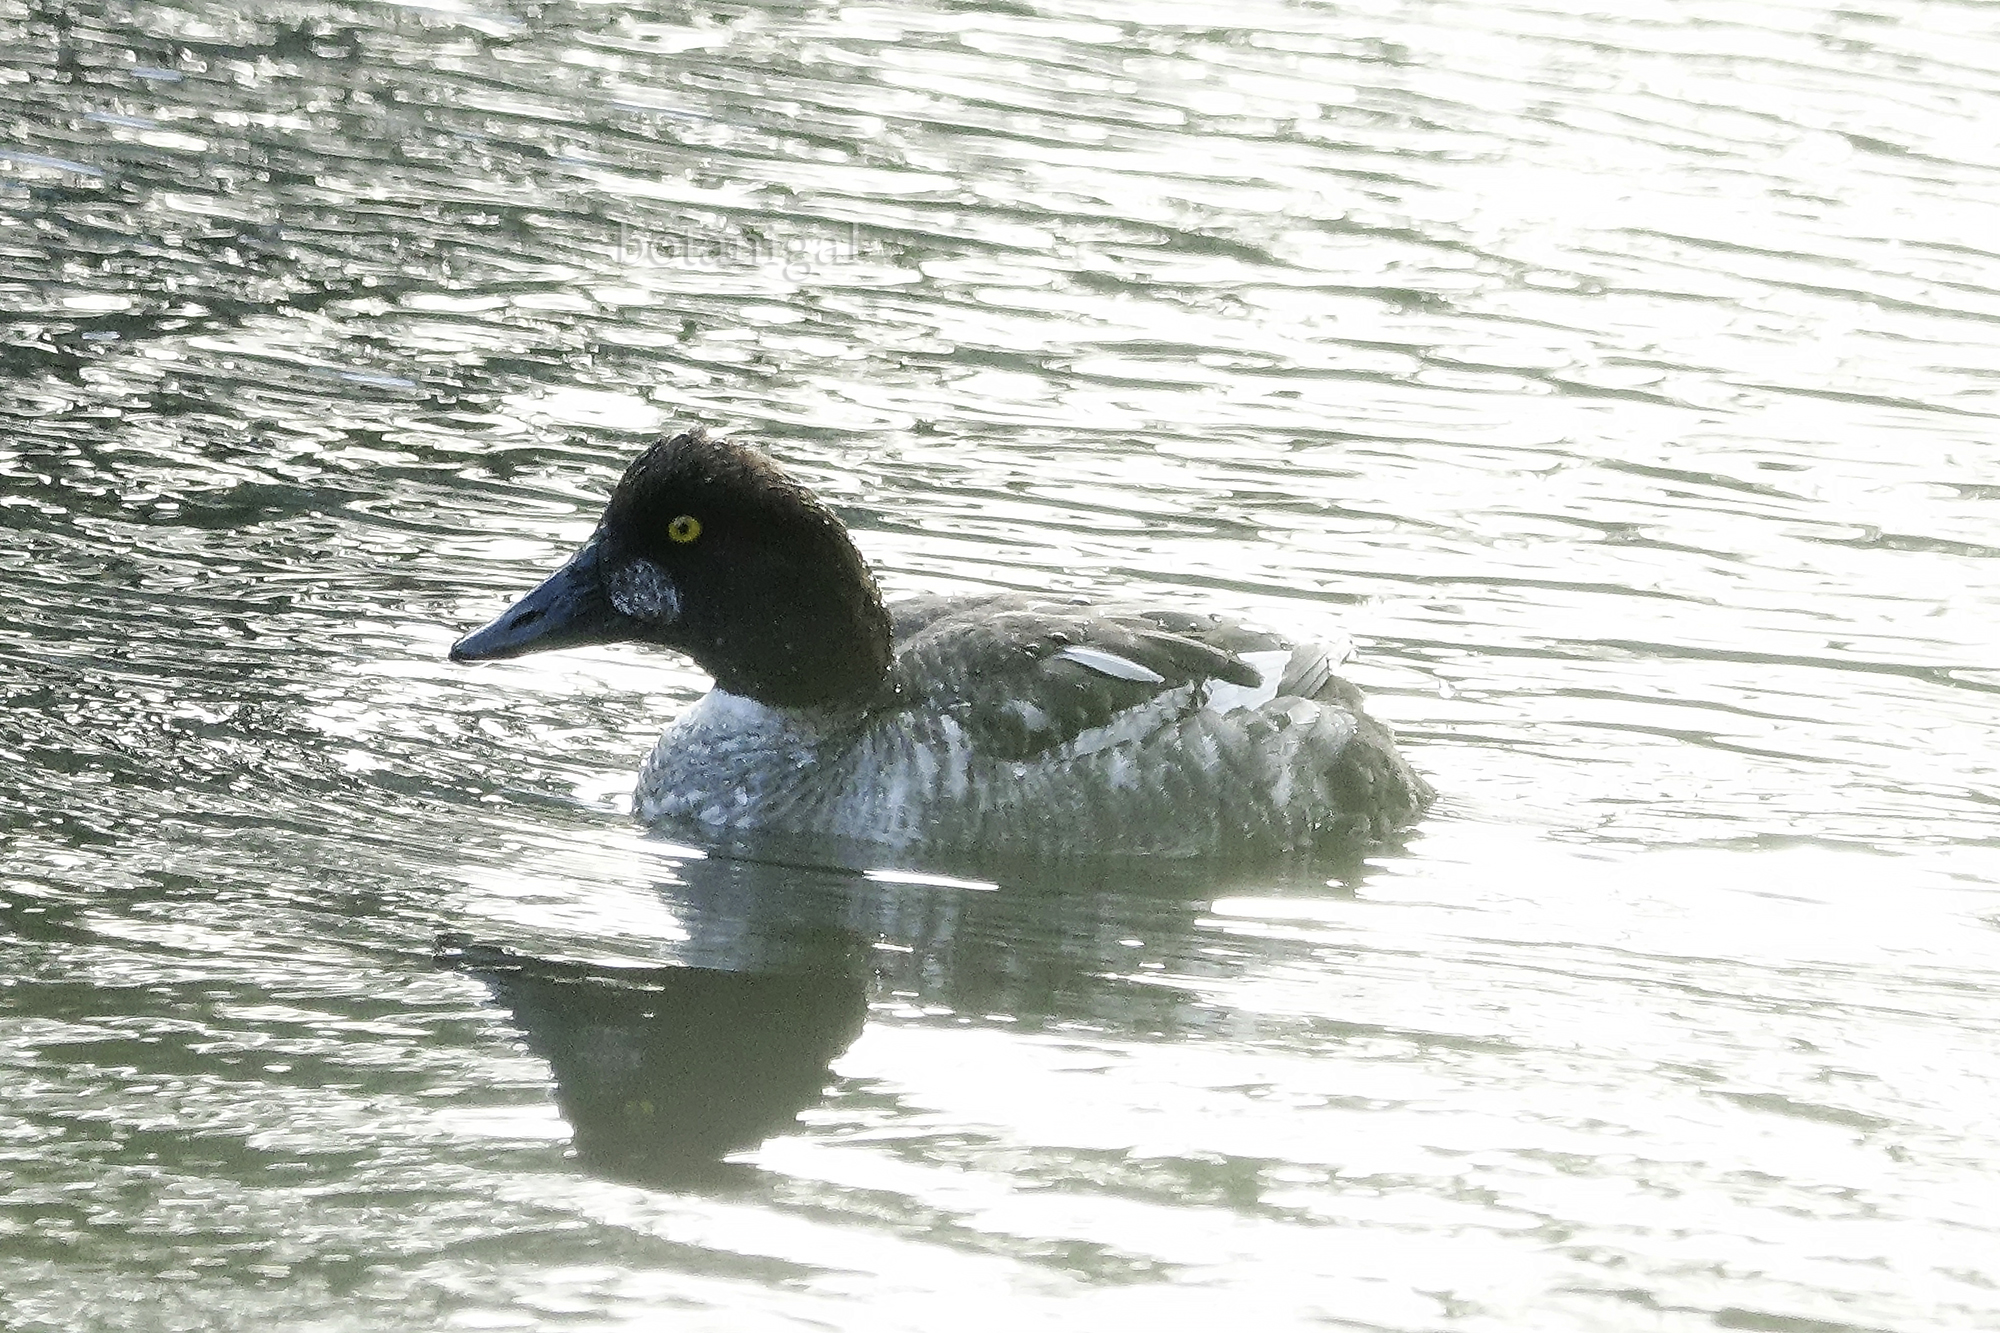
I scored a pair of Goldeneyes at the half-way point of Trail 2c, which made the mission that much sweeter. Falling into the river, as I almost did to get the shot, certainly would have put a new twist on things.
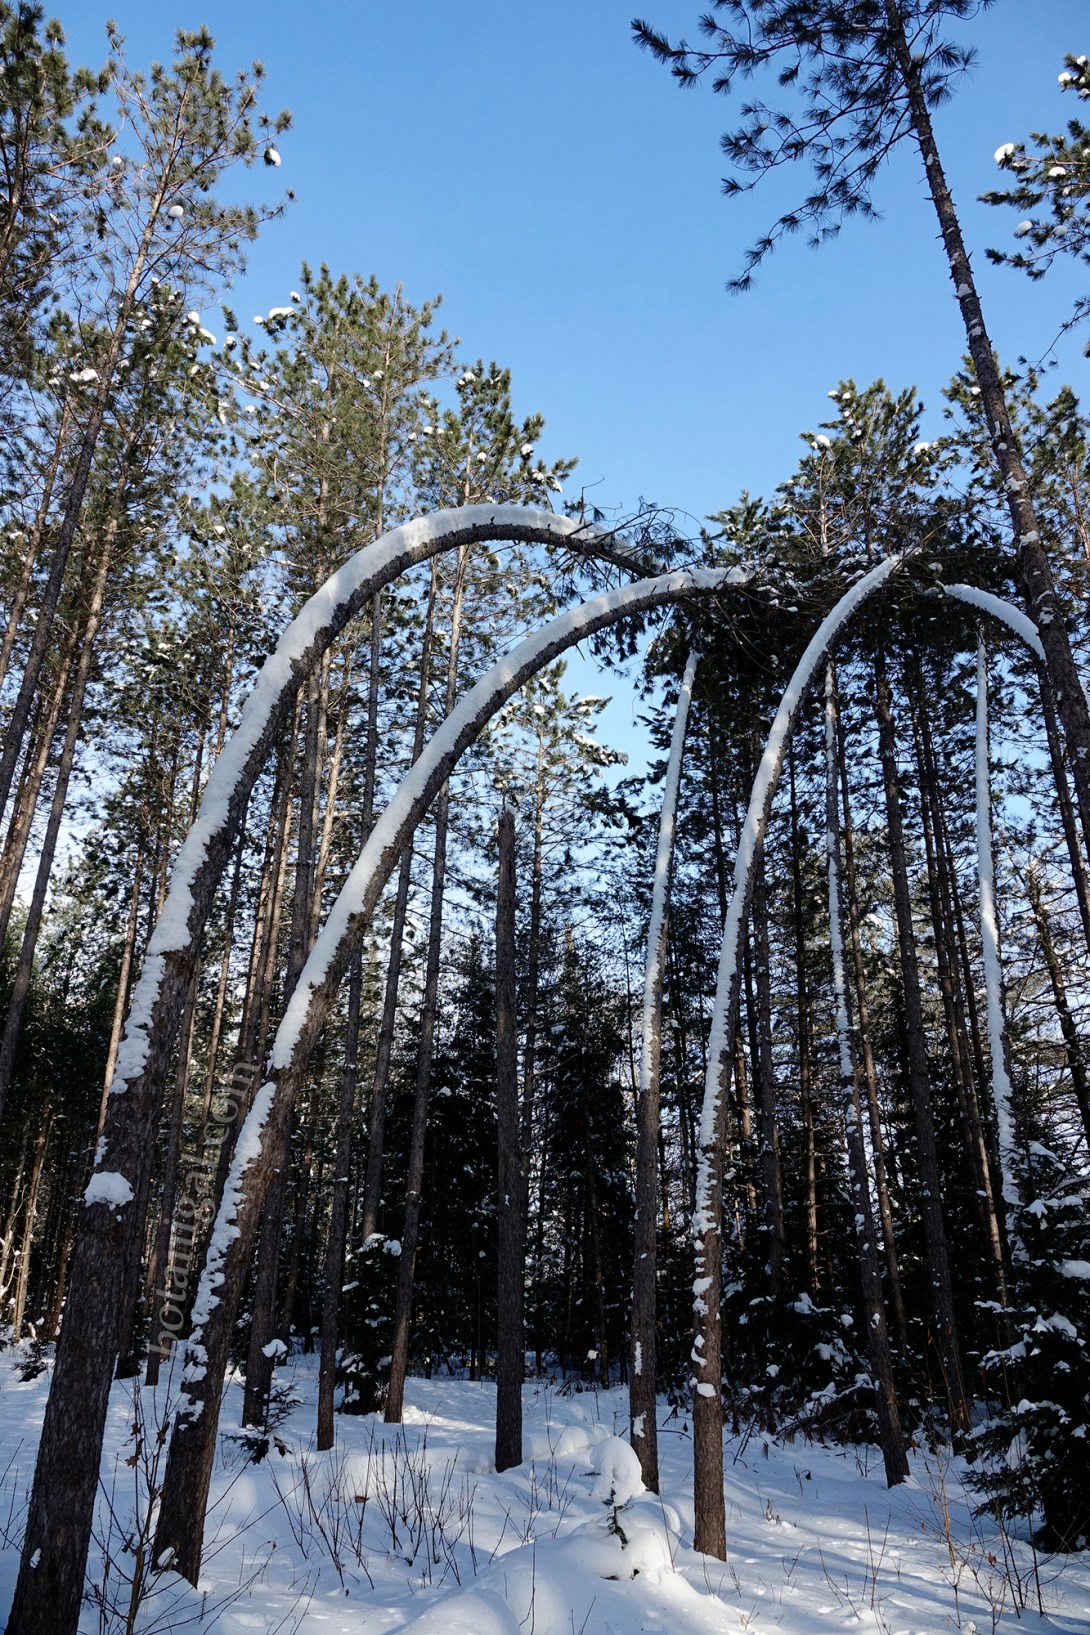
Near the end of my cross-country ski mission I forced my back-country skis through the deep snow of an open plantation to study a cluster of Red Pine that were bent over at the middle. This stem-bending is common among monoculture plantations. The trees were planted with the intent to have them grow and be thinned over 50 years, after which they’d be harvested (a bit like carrots as one interpretive panel points out). These Red Pine are all the same age, being planted all at once, and grew tall, fast, and lean, because they were all competing to be taller than their classmates—to gain bonus points in the sun. This gardening method produces the ideal timber trunks for forestry, which is why they were planted here in the first place and now they are OMNR educational timber trees.
These bent Red Pine are an example of what restoration ecologists call ‘The Lollipop Effect’.
The Bracebridge Resource Management Centre plantation gardens show us the ecological differences between mixed forest and plantation ecology. When skiing through the BRMC trails one can see that the plantation forests have little to no understory (a.k.a. mid-level plant stems). Understory plants are beneficial to forest ecosystems because they create a buffer that slows wind gusts. Mid-level plants also provide food and habitat. In this case here, a clearing was cut into this plantation for the trail grooming equipment. When a good gust of wind came along, it was able to build across the gap and catch hold of the heavy crowns of this cluster of Pine, bowling them overtop of their lanky and elastic timber stems.
In restoration ecology, we often see the ‘Lollipop Effect’ in areas where vegetation is abruptly cleared along a linear edge—and this doesn’t always apply to plantations, it happens along the edges of most new clearings cut squarely into forests, where height competition was involved. Trees along these edges, or those that are left in small forest islands with no forest friends are labelled ‘Lollipops’ and often share a predictable twist of fate, like these pines seen here.
Speaking of Forest Friends, I experienced so much kindness and friendliness throughout my ski, from my lovely fellow skiers to the volunteer trails crew, they had me laughing out loud, and to myself. You can certainly tell these ski trails are well loved by the community and are thought of fondly year-round.
Nice touch for one’s tush. Thank-you BMRC Trails Team!
Hoping this is the only HUGE hill nearing the end of my cross-country ski mission. Please, please, please— my legs and triceps are spaghetti, no more herringbone!
What goes up, must come down – and to the right. Please let the rest of the way be downhill.
Overall, the BRMC ski trails were very beginner friendly. If you are a green-circle skier, I found that if you stick to the trails along the Muskoka River, it is not too hilly. There is just the one large hill to climb near the end to get back to the parking lot. Despite my lack of practise, I sincerely enjoyed these trails! By the time I got back to the car, cross-country skiing no longer intimidated me. It was a fantastic whole-body workout. I am now driving around everywhere with the skis in tow. Botanigal is going to try to ski at least once a week and hopefully the weather will cooperate, though it is raining now, as I write this.
It takes a lot of work by an inspired crew of volunteers and an excellent trails crew to bring Muskoka the privilege of having a free cross-country skiing destination. If you haven’t tried cross-country skiing, you really should. The Bracebridge Resource Management Centre trail system is as friendly a place as any to give cross-country skiing a try.
HOW TO GET THERE
The Bracebridge Resource Management Centre is located right off Highway 11 Northbound, just north of Highway 117. If you are accessing the site from the Northbound lanes keep your eyes peeled after you pass under Highway 117. You will pass one road (do not exit onto this road because the BRMC is the next road up #5140). If you are accessing the site from the Southbound lanes it is a bit more complicated—you need to either exit off Hwy 11 onto 117, go over the highway and re-enter Northbound. You could also use the median lane at High Falls Road to jog-back northbound to the BRMC entrance, but this is a high-adrenaline option.
Heading back towards your destination after your ski is another feat because you must drive north on Highway 11. If you need to head south, some study of the roads on a map ahead-of-time would be a good idea.
Important note: Successfully exiting the BRMC parking lot towards your destination takes a bit of study and sober second thought. YOU MUST TURN RIGHT and head Northbound. Please remember that the average speeds on this highway range from 90kph -120kph. Take your time to judge the speed and density of the vehicles approaching.
Huntsville has always been a part of my existence, and I am ashamed to say that it has taken me a lifetime to realize that Hunter’s Bay Trail is a fantastic trail! Though my pals often spoke of the virtues of this trail, I was just content to stay in the forest. The Muskoka Trails Council Blog Project brought me to walk this historical path, that meanders between Hunter’s Bay on Fairy Lake and the railway tracks, for the first time.
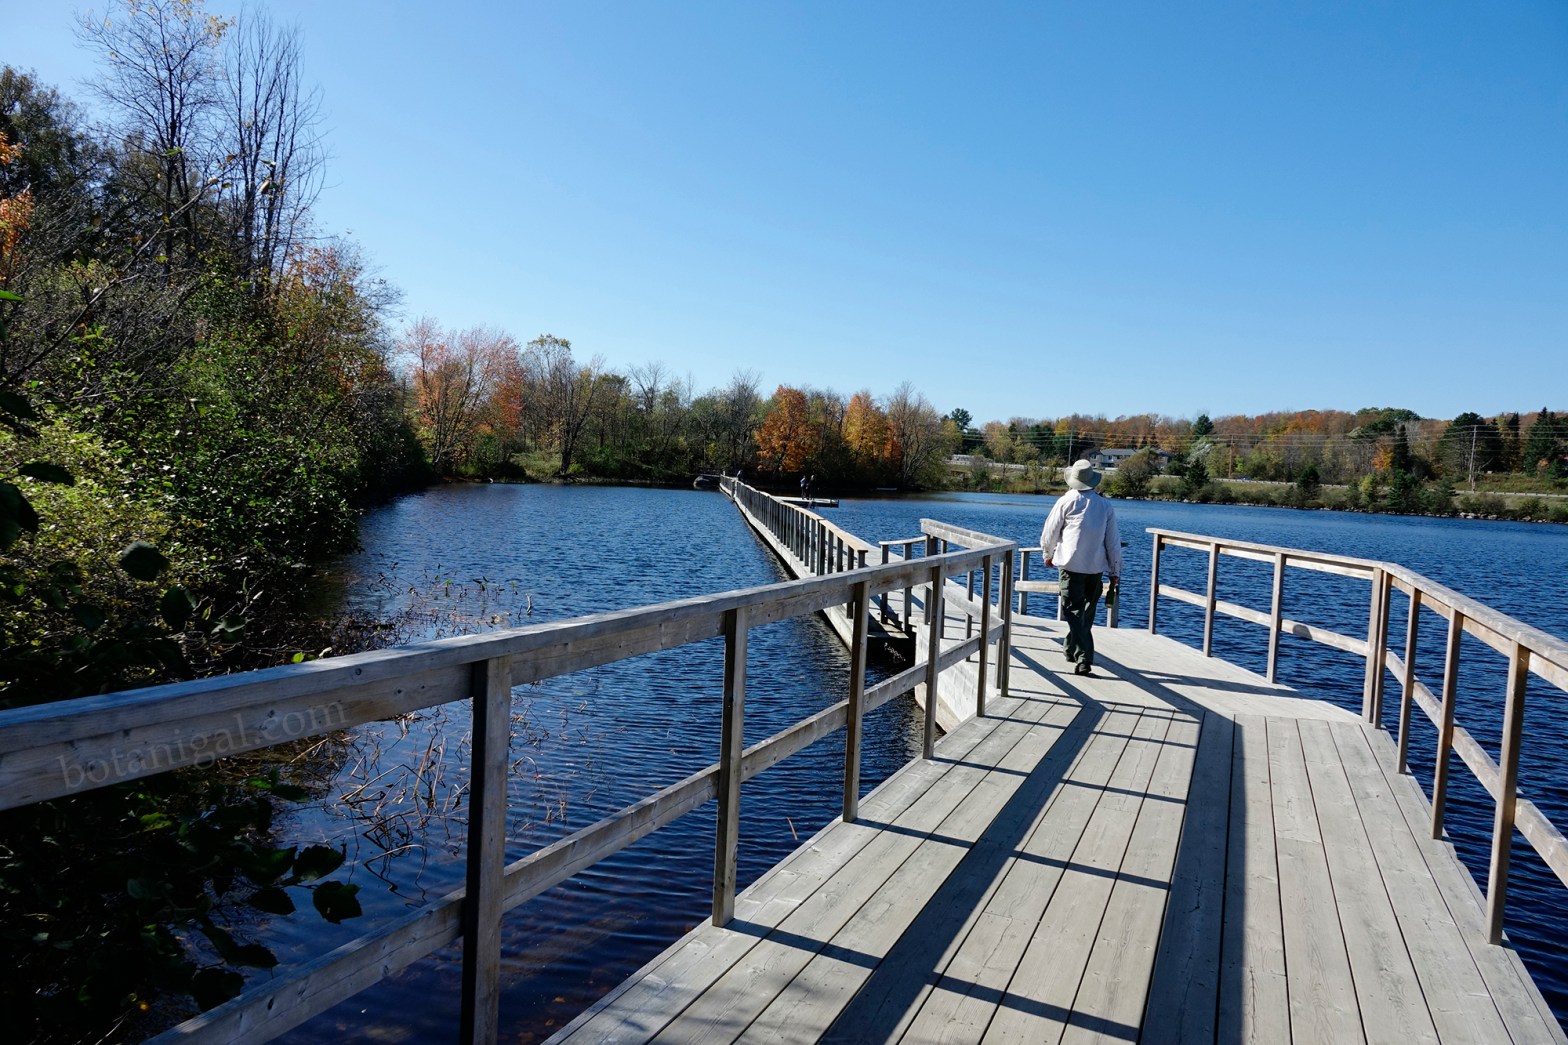
It was so interesting, I had a hard time focusing on any one area of the Abiotic, Biotic, and Cultural triangle of our ecosystem exploration here with any brevity. This is a waterfront and water-centric trail with impressive floating boardwalks, beautiful scenery, and again, great birding.
This trail was, and still is integral to the history of Huntsville, and it shows; being peppered with relics that represent an interesting history, and by sporting a promising new floating trail extension from East Airport Road – under Highway 11 – to Lakeshore Road. Huntsville is close to becoming the Boardwalk Empire of Muskoka!
A Common Loon is oblivious to the new change coming to Huntsville, as a contractor is one day away from finishing the new access boardwalk which will allow pedestrian traffic to travel along Hunter’s Bay Trail to and from the north side of Highway 11.
Hunter’s Bay Trail is easily accessible. There are four locations where you can park close to the trail, which allows one to adapt a route in accordance with one’s hiking abilities and those of their companions. The investment into extending the trail from East Airport Road under Highway 11 to Lakeshore Road is absolutely brilliant, as Huntsville now has a safe pedestrian connection to the other side of this major trucking route. This is a game-changer for Huntsville, as well as for the Trans Canada Trail!
The Town of Huntsville’s Hunter’s Bay Trail is a connective section of the Trans Canada Trail.
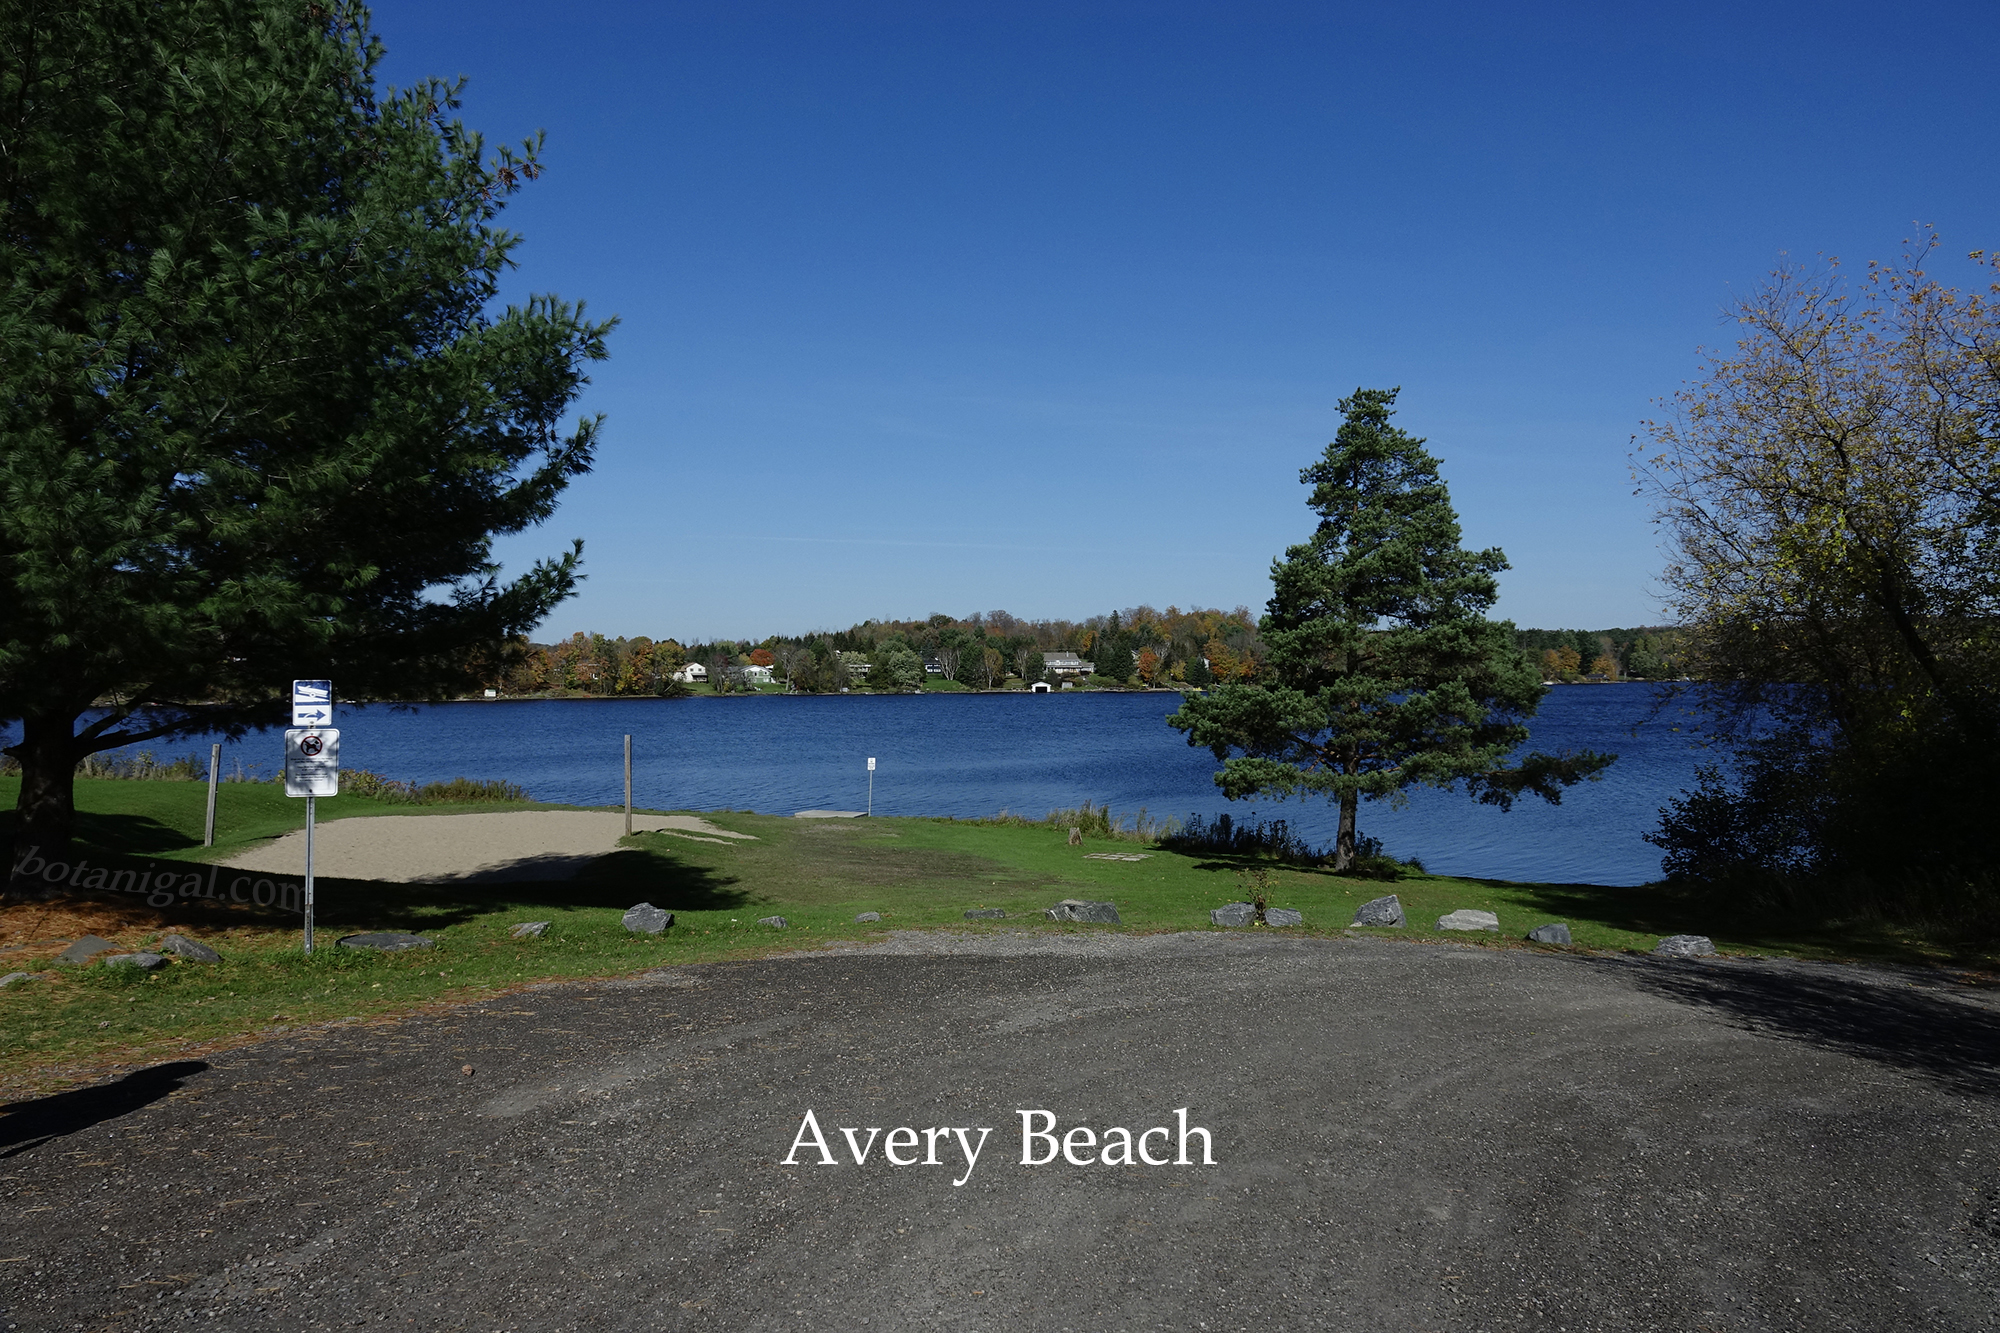
We hiked Hunter’s Bay Trail near the end of October and the weather was still superb. My hiking partner was reluctant to hike in Huntsville at all, as he is a Woodsie like me, so I decided to cut the hike in two with the ultimate hope that I could manage to manipulate him into exploring the trail in its entirety (between ‘town tasks and too many errands’) by the end of the day. We began at Avery Beach and were drawn right in when we saw the boardwalk extension under construction. My plan had worked! My buddy now had a destiny with curiosity.
Though we divided our hike in two, whereas we parked in two different locations to explore the trail in a dissected fashion, this blog will explore the trail from the east end, starting at KW Pipe, and run through it westward to the new extension at the west end.
This old relic sits between the trail and the river where the tannery once operated. It was located at the base of Centre Street* (because the bridge wasn’t built yet). The tannery used Hemlock bark as their key ingredient. Hemlock (Tsuga canadensis) was as good as gold in those days!
The Grand Trunk Railway originally serviced the lumber industry and the tannery, along with other commerce of the day, and was key to the birth of Muskoka’s tourism industry.
My trekking companion warmed up to the idea of hiking in town after noticing that the chunks of Huntsville’s history got him off of the ground so he could display his fall plumage.
While walking along the waterfront we noticed that the soils and terrain have been repeatedly altered and effectively reflect the cultural history of Huntsville. Since Captain Hunt decided to start a community along the shores of Fairy Lake in 1869*, there has been a bustle of human activity along what is now Hunter’s Bay trail. The town seems to have been built to avoid the bedrock of the Precambrian Shield, which forms the hills above the downtown core. If there were any bedrock outcrops along the trail we didn’t pay them any mind. The trail traverses the outwash sandy soils typical to land along shorelines in Muskoka, and pockets of clay that have either existed as a true mineral pocket, or have been dug up and redistributed throughout the town’s development. The soils here have been pushed and pulled for the construction and maintenance of the rail line, as well as both the construction and destruction of several waterfront commerce operations throughout the town’s history. There have been many a fire in Huntsville. Songs have been written about them.
These chiselled rocks are an example of the spirit and resolve that drove the early industrial years of the Town of Huntsville.
Evidence of one of the grand wharfs that accepted steamships back in the day
This photo of the Muskoka Wood Manufacturing Plant at the mouth of the Muskoka River was taken in 1902. We couldn’t believe that anything could possibly grow back after this, but as you can see along the trail, it did!
The rich cultural history of the trail is evident in the plant life found here too. There are many species along the trail that are inherently connected with early small-town settlements across Ontario.
Highbush Cranberry is an old school fruit from a hardy shrub of the north. It was used to make jams and jellies. They are not a conventional fruit and taste best after a bit of frost has hit them. These fruit were ready for harvest when this photo was taken, as the first frost had arrived.
Wild Grapes were planted by the area’s first travellers and settlers as well. Frost Grape and Riverbank Grape are our two native grape species here in Central Ontario. Aptly named, the Frost Grape is sweeter after frost and families would rejoice when it frosted because the wild grape treats were a free source of sweets for everyone.
There are also examples of several invasive species that arrive with modern town life. The area around Hunter’s Bay Trail has been a historical tourism and industrial corridor. It still has an active rail line used for importing goods and livestock. Plants always take advantage of the open trail by spreading their roots and seeds through manure. They sit in wait, warm and moist in the digestive tracts of livestock or migrating birds; patiently waiting to put roots down in new destinations through pooh. Whether it rattles off a train, or walks, or flies off to a new home; pooh really does help plants succeed!
The European Buckthorn is often found next to Ontario’s rail lines and in railway towns. It is much more common south of The Shield but can be found along Hunter’s Bay Trail.
The location of this newer invasive species – Wild Parsnip, right next to the tracks, suggests that arrived to establish in Huntsville by train.
There are many beautiful examples of native early-succession forest from White Birch groves to Poplar and Cherry groves along Hunter’s Bay Trail. These tree species love the sun and establish quickly after a site is disturbed. There is also a cultural grove of trees in Orchard Park; a truly historical apple orchard along the trail.
White Birch (Betula papyrifera) do best in deep soils that sit just above the water table and prefer to grow in groups like in this beautiful waterfront grove.
Orchard Park is just that, an orchard. It is full of fruit in late September and the Town of Huntsville and other partners have worked on planting new apple trees to keep the tradition alive.
The fact that the trail meanders through a significant length of the Riparian Zone of Fairy Lake allows us to wander about the richest biodiversity area in town. Pedestrians can mingle with the array of wildlife that uses this ribbon of life for food, shelter, breeding – and for water of course. The birding is excellent. We spotted several butterflies during our hike, and there were still Meadowhawk dragonflies present, which led us to believe that the Odenate observing in July could be spectacular.
This American Lady butterfly was flittering about Orchard Park in search of Self-heal flowers.
The Common Loon is a regular sight on Hunter’s Bay. This photo was taken on October 18th and this Loon is displaying its winter plumage.
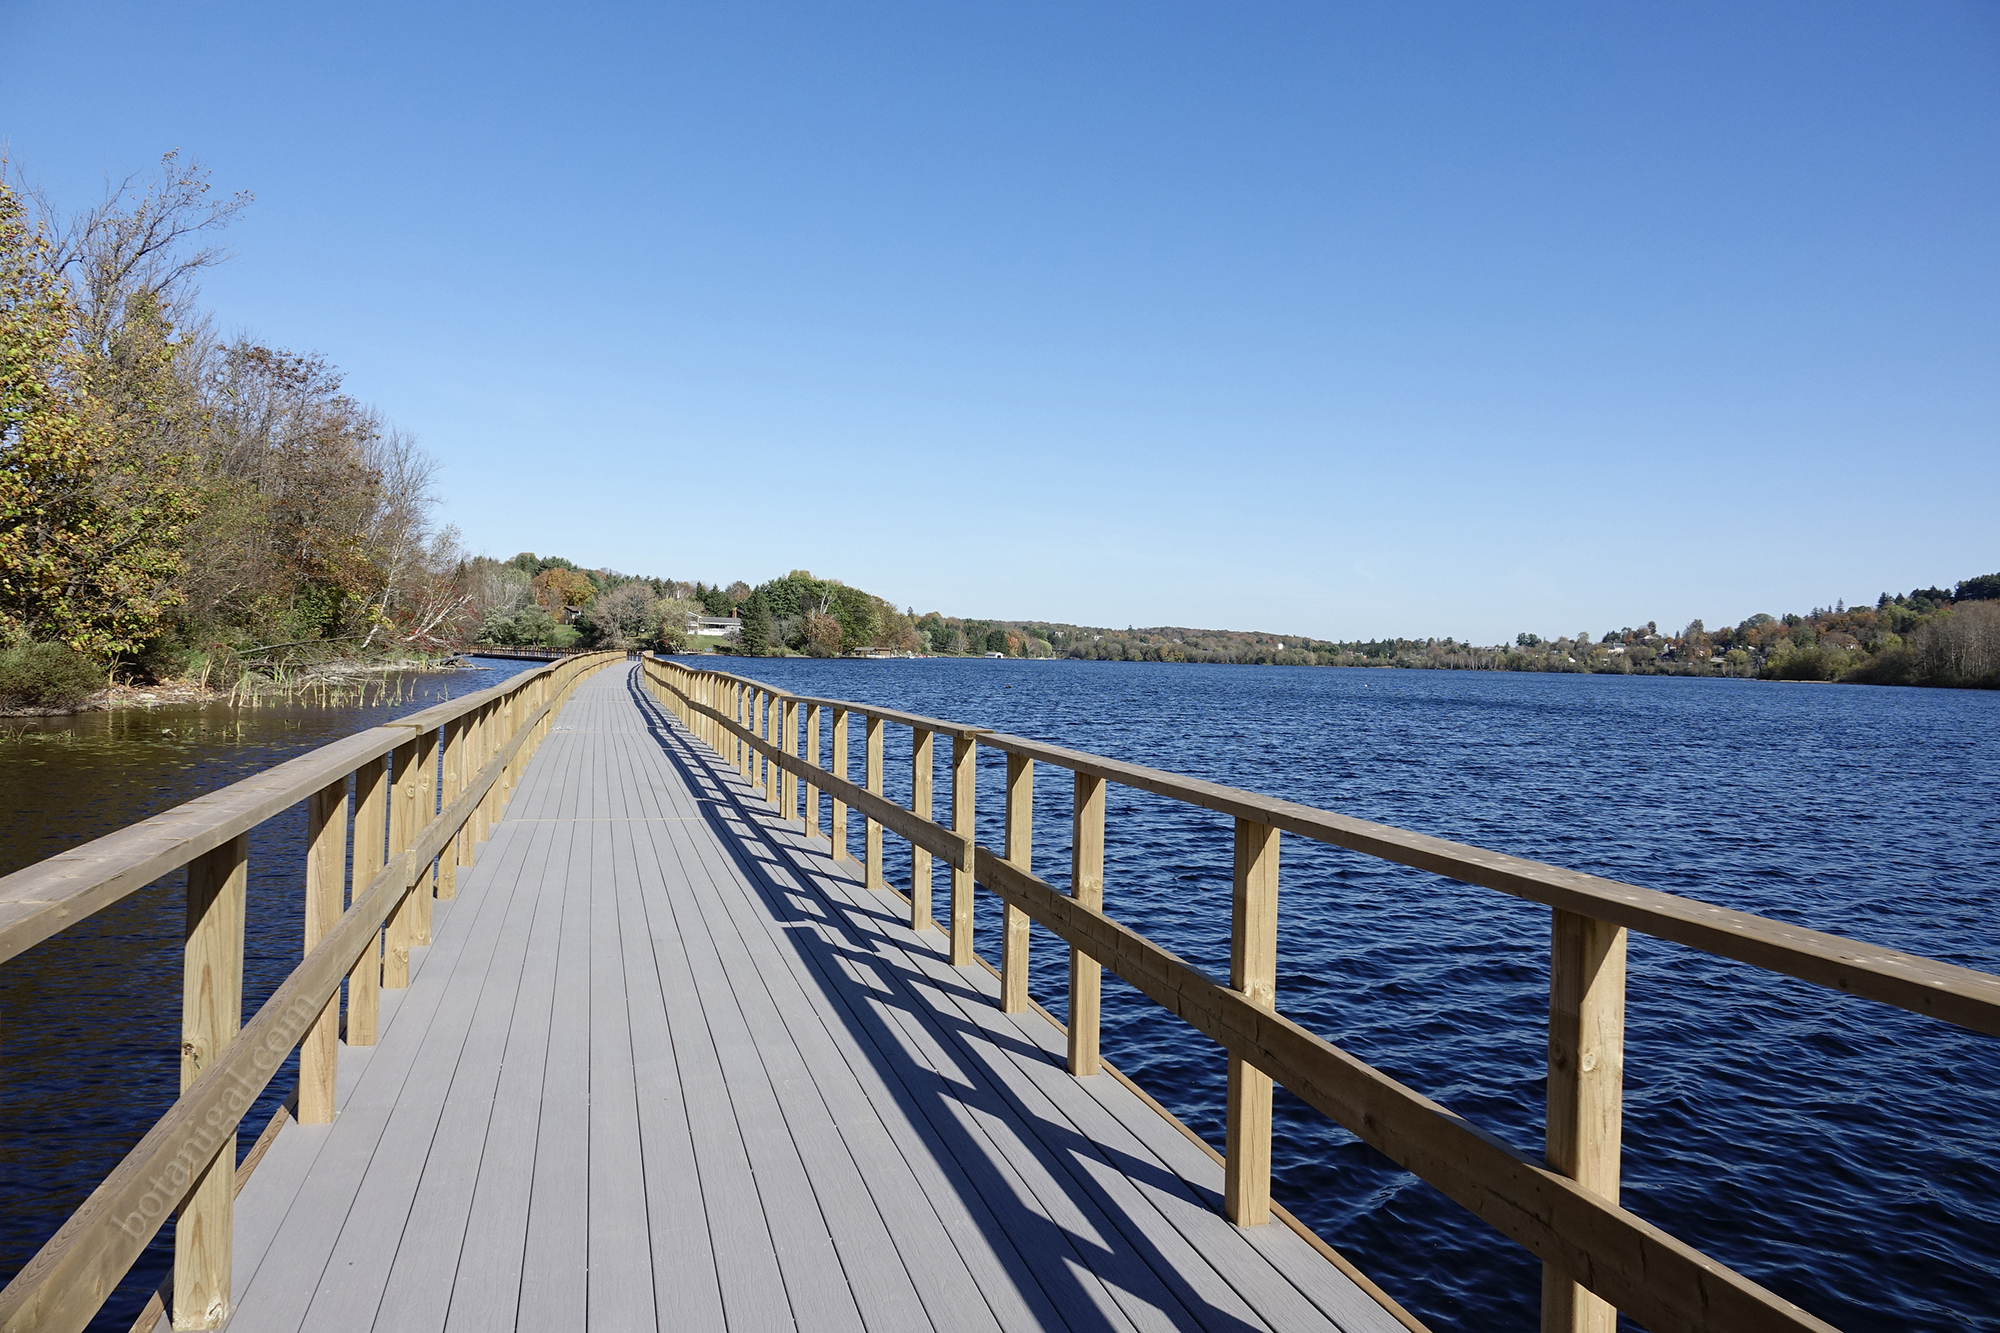
We marvelled on how the grippy composite decking along Hunter’s Bay Trail’s original floating boardwalk made us feel safe and secure. Seriously, it was excellently grippy, and there was no danger of slipping when wet and are pleased that the Town of Huntsville and the District of Muskoka has invested in extending the trail 840 metres from East Airport Road to Lakeshore Road on the north side of Highway 11. It just so happened that the extended trail wasn’t open yet, but we spoke with the contractor and discovered that the extension was scheduled to open the following day.
The new bridge for the Hunter’s Bay Trail is the gateway to the new Hunter’s Bay trail extension which runs another 840 meters, under Highway 11 to Lakeshore Road.
The new floating boardwalk, made with composite decking, runs under Highway 11 to Lakeshore Road.
With the trail extension there are now four parking and access points for Hunter’s Bay Trail:
North of Highway 11: The end of Lakeshore Road off of Aspdin Road and Lakewood Park
West Side: Orchard Park off of East Airport Road
Central: Avery Beach Parking off of Yonge Street
East end: K.W. Pipe (Hunter’s Bay side) immediately south of the Centre street bridge (note: this is practically a hidden entryway – it is hard to spot and is a hairpin turn).
Hunter’s Bay Trail parking can be found in four locations around Huntsville. From west to east: Orchard Park off East Airport Road; Avery Beach off Yonge Street North; K.W. Pipe just off of Centre Street North at the south end of the bridge. Parking on the north side of Highway 11 is located at the end of Lakeshore Road by taking Lakewood Park Road right off Aspdin Road
The adaptability of the trail certainly worked for me on that October day. My hiking buddy got back into the car (both times) completely charmed by Hunter’s Bay Trail and stated that it will now be a hiking destination that he is exited to explore more often. As for me? I’m looking forward to walking along it again whenever I have time to spare between my tasks in town.
Hope you can enjoy the sights, sounds, and history along this trail as much as we did!
May the forest be with you.
* Historical dates and references researched from the book Huntsville: With Spirit and Resolve by Susan Pryke with Huntsville Heritage, 2000.
Written by Rebecca Krawczyk aka Botanigal. www.botanigal.com @botanigals
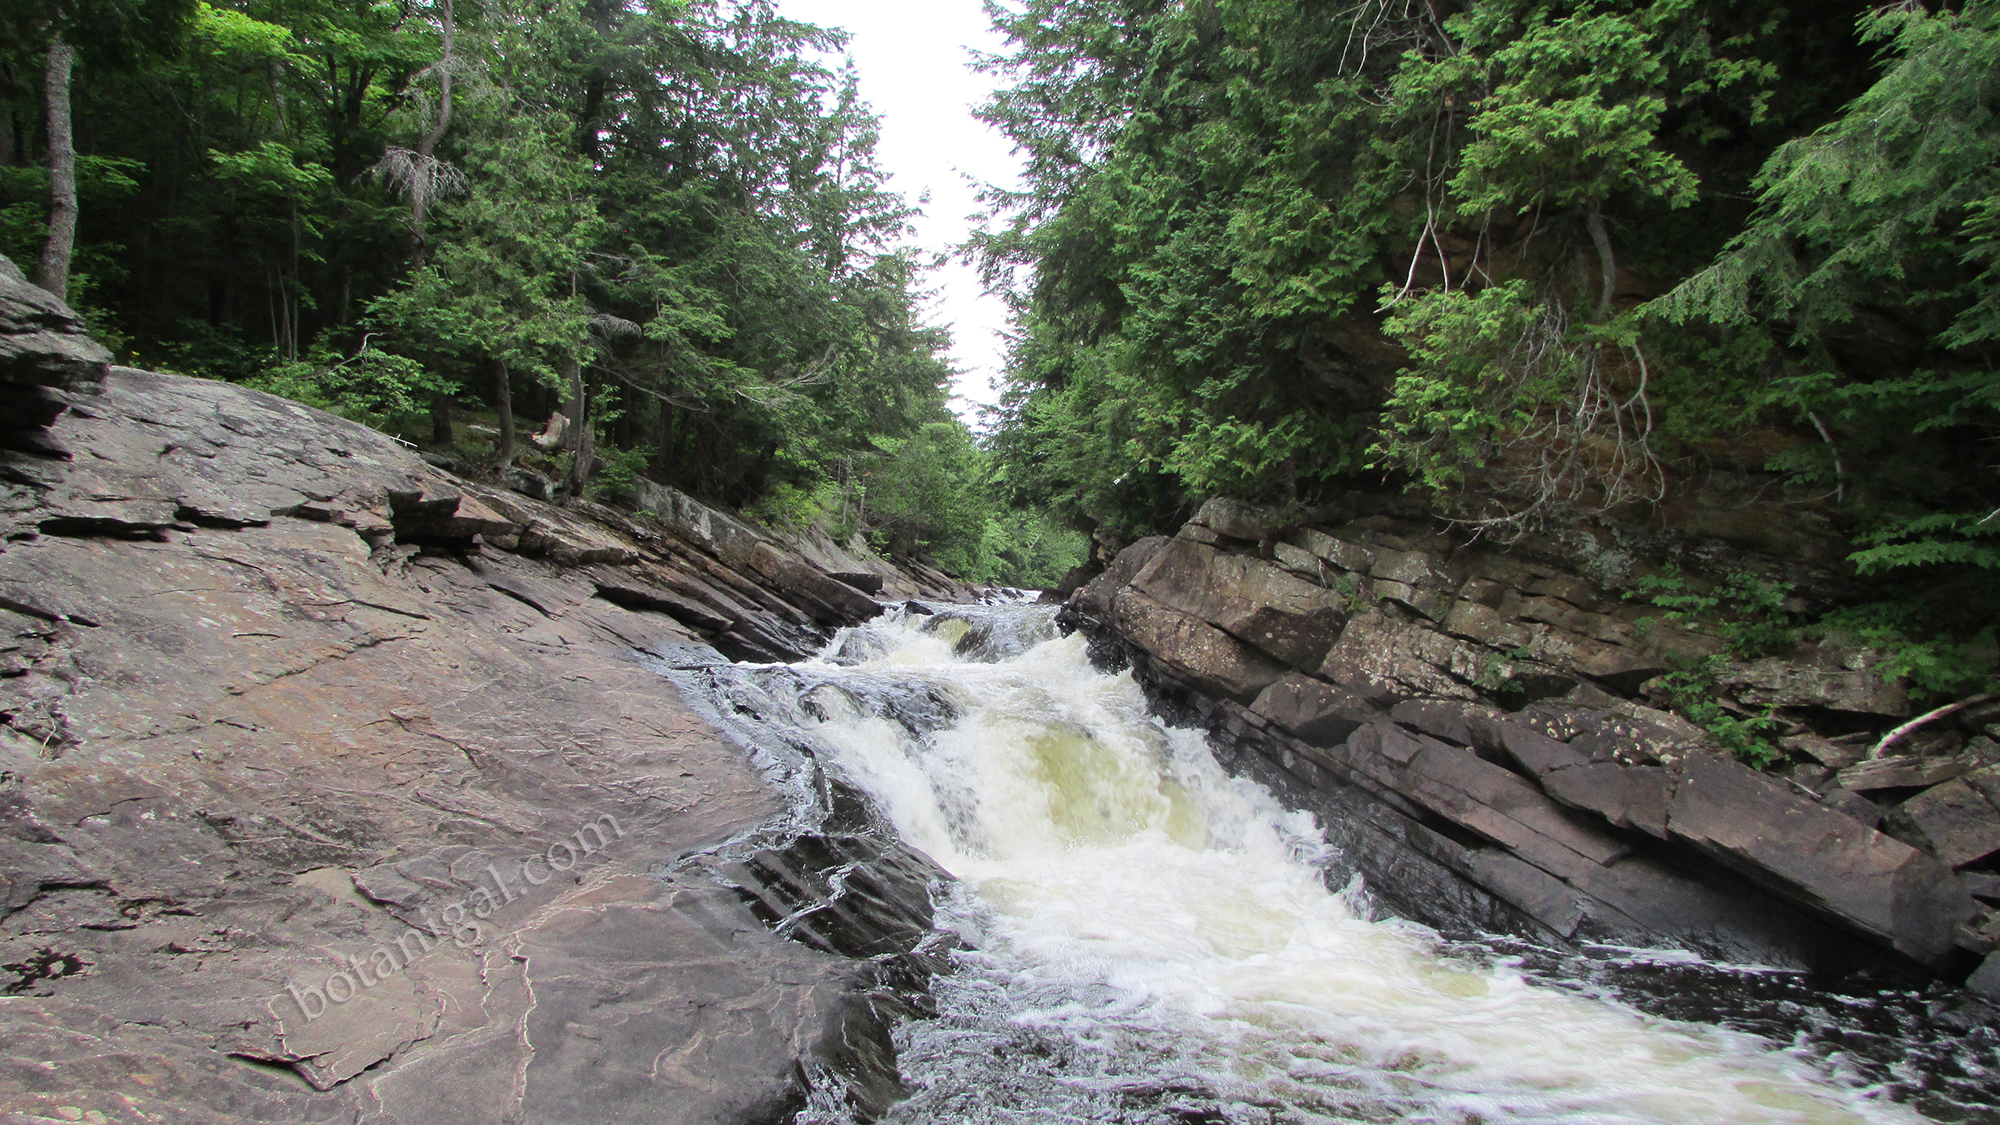
The Oxtongue Rapids trail is a fantastic exploration of white-water ecology.
White-water ecosystems are special because they take in water, roll it about, and improve the oxygen and mineral content of water as it moves downstream. They provide specialized niche habitats for countless creatures, and are a vital asset to the planet.
Turbulent high-oxygen waterways are used by many animals, including humans. Many of the natural heritage attractions along the Oxtongue Rapids Trail highlight water’s power to carve through stone, as well as the local plant and animal community’s ability to adapt to the wild ways of white water. As you will find, humans were pretty good at carving out a niche through this landscape as well.
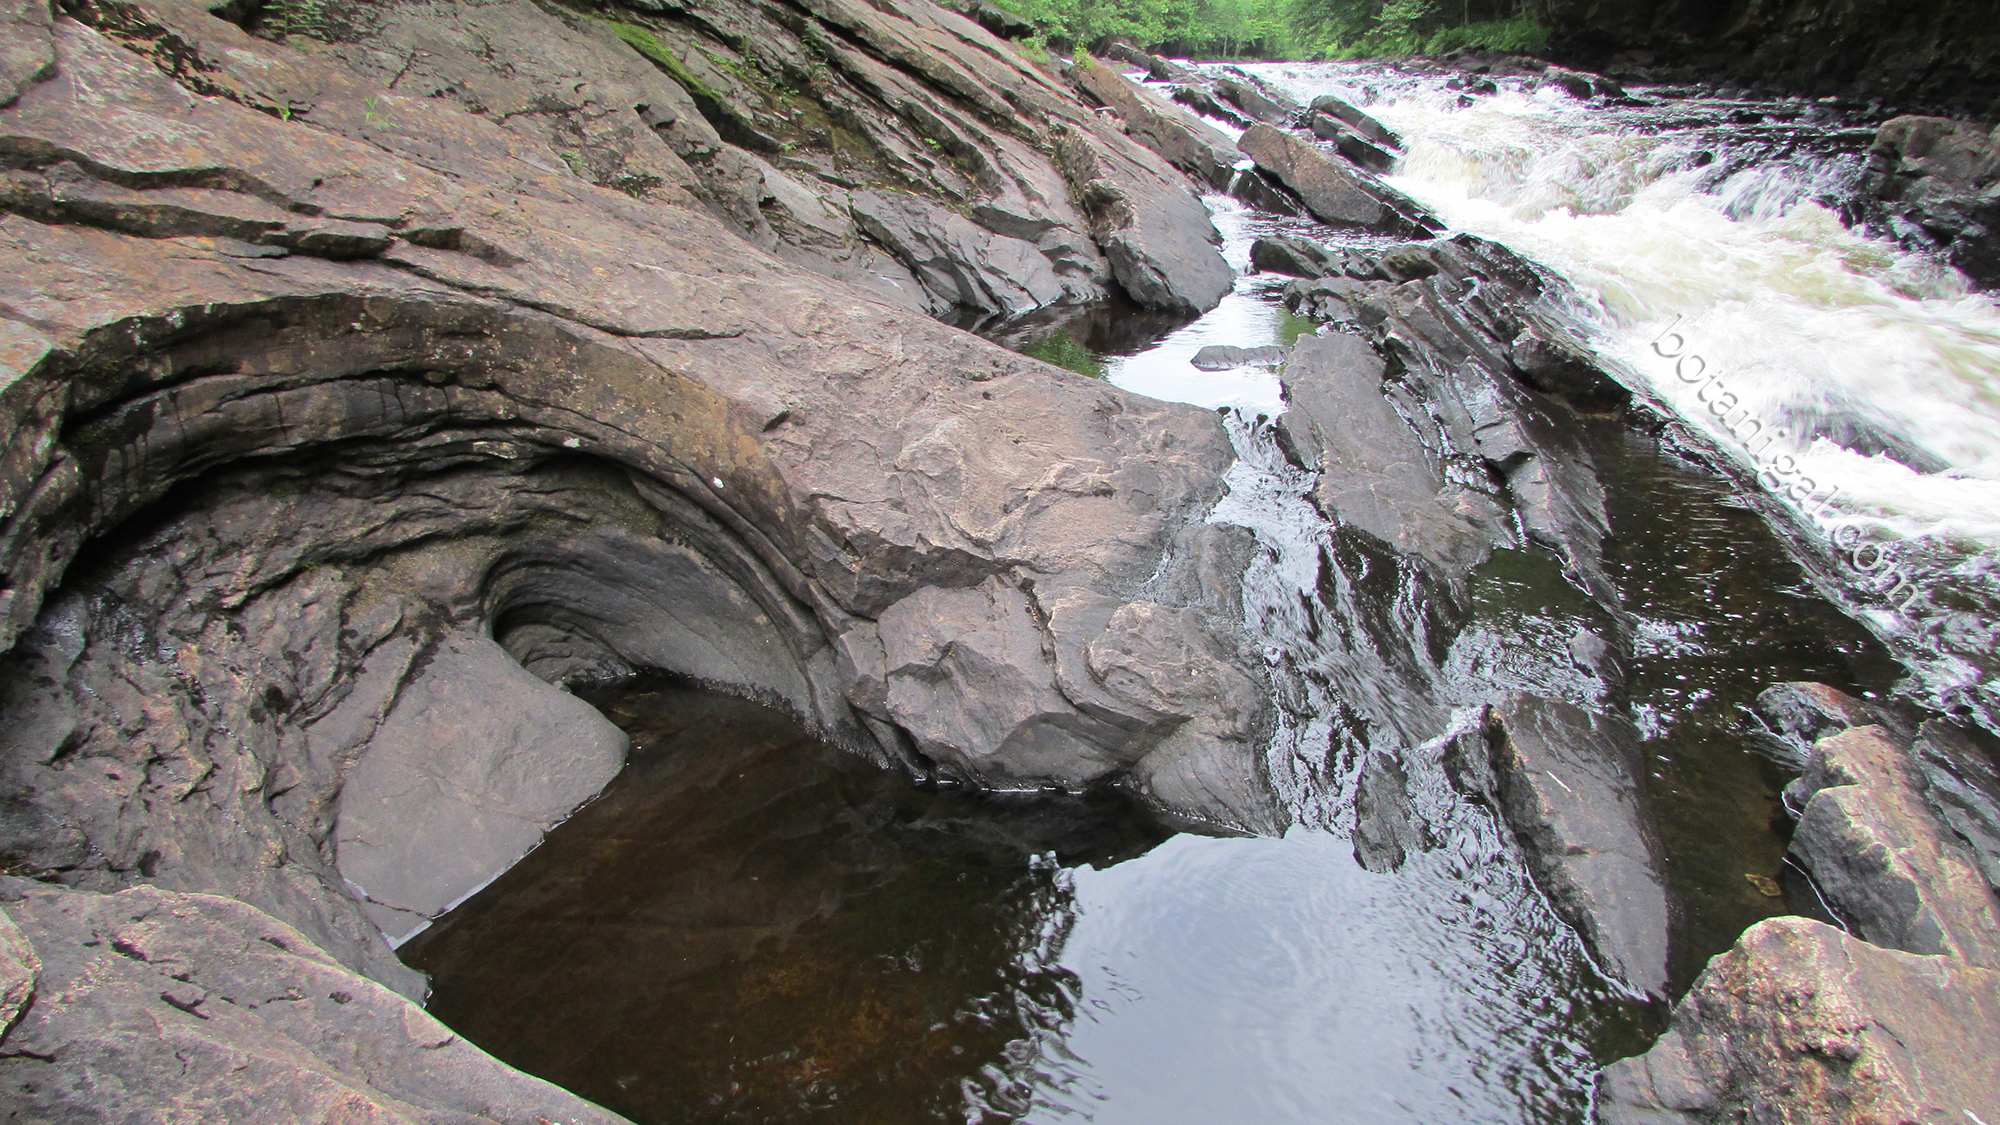
As you walk alongside the Oxtongue River Rapids, you will see many interesting geological features; the result of a long history of water vs. rock. Potholes are evident here and are very interesting to gaze into. You will also find interesting patterns in the rock below your feet, which are the result of igneous intrusions eroding at a different rate from the surrounding material.
Potholes begin forming when pebbles catch in a fissure in the river bedrock and are tumbled indefinitely drilling deeper over time.
These igneous intrusions are not as easily persuaded by white water to erode away, and therefore leave raised patterns in the surrounding river bedrock.
The main point of interest is what the locals call the ‘Hogs Trough’ and can be found at the end of the trail, which is where the water is the fastest and the most dangerous. This landform is the reason why the portage and trail evolved in the first place.
Turbulent water systems are biologically rich, providing habitat for many macroinvertebrate species who breed and thrive under the surface. These are an invaluable food source for local wildlife. From mammals to songbirds, fish to insects, macroinvertebrates (and the resulting adults) are key for sustenance. With Mayflies, Caddisflies, Dobsonflies, crayfish, minnows, and tadpoles living in this habitat, it is a hidden city in itself. And what a high-speed environment!
Rapids are a ruthless and dangerous place to live. Not only do the inhabitants have to endure the pounding current, but they must always be on guard for their lives! Several species of aquatic macroinvertebrates even prey upon their own relatives!
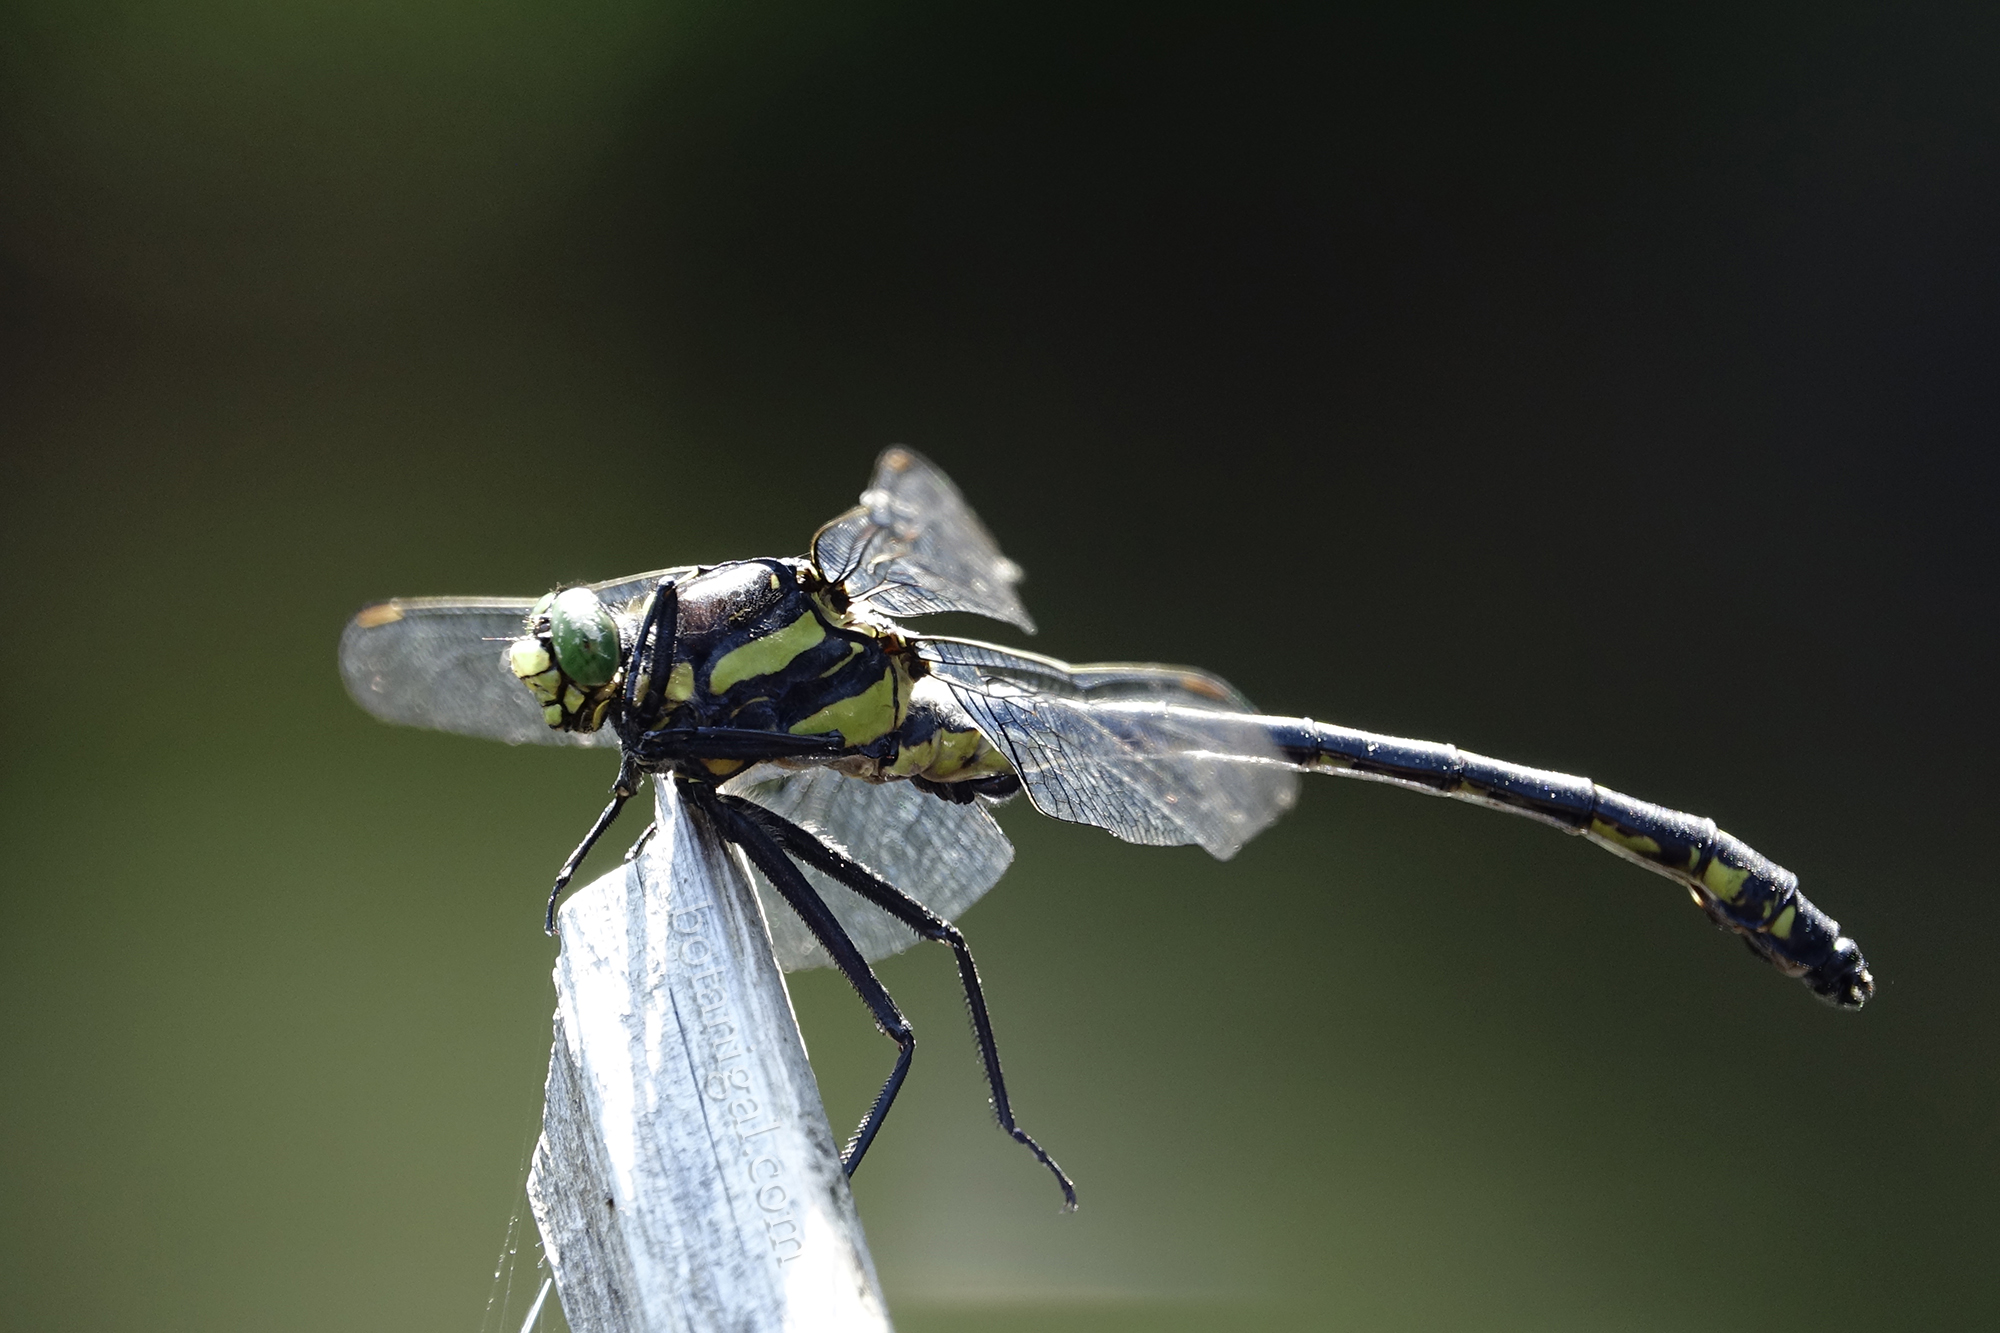
Some dragonfly species can spend four years or more as an aquatic larva and will ambush minnows, and even tadpoles for a meal. All the while, they themselves are hunted by frogs, birds, fish, and other dragonfly nymphs! Dragonhunter (Hagenius brevistylus) dragonfly larvae will morph from preying on other dragonfly larvae in the river, to catching other species of dragonflies right out of the air! They can be seen hunting above the mist of the rapids on warm, sunny days.
The Dragonhunter. Note the size of this dragonfly’s hind legs along with the tiny size of this species’ head in relation to its massive thorax!
Another dragonfly found here is aptly named the Ebony Jewelwing. With its distinctive black wings, and an iridescent emerald body, it is truly a dainty gem representing the vitality of this ecosystem.
Many birds, particularly Flycatcher species, can be seen swooping across the expanse of the rapids to net flying insects. Kingfishers find the calm pools and eddies between the white-water ideal for plucking up frogs and minnows. Whereas mammals, such as Raccoon, Mink, Weasel and Otter, rely on the rapids and shallow pools to provide crayfish, frogs, fish, and plant tubers. Talk about meat and potatoes!
This deposit of Dobsonfly wings depicts the important role macroinvertebrates play in the food chain here. Dobson fly larvae appear quite frightening, and the adults are apparently quite delicious.
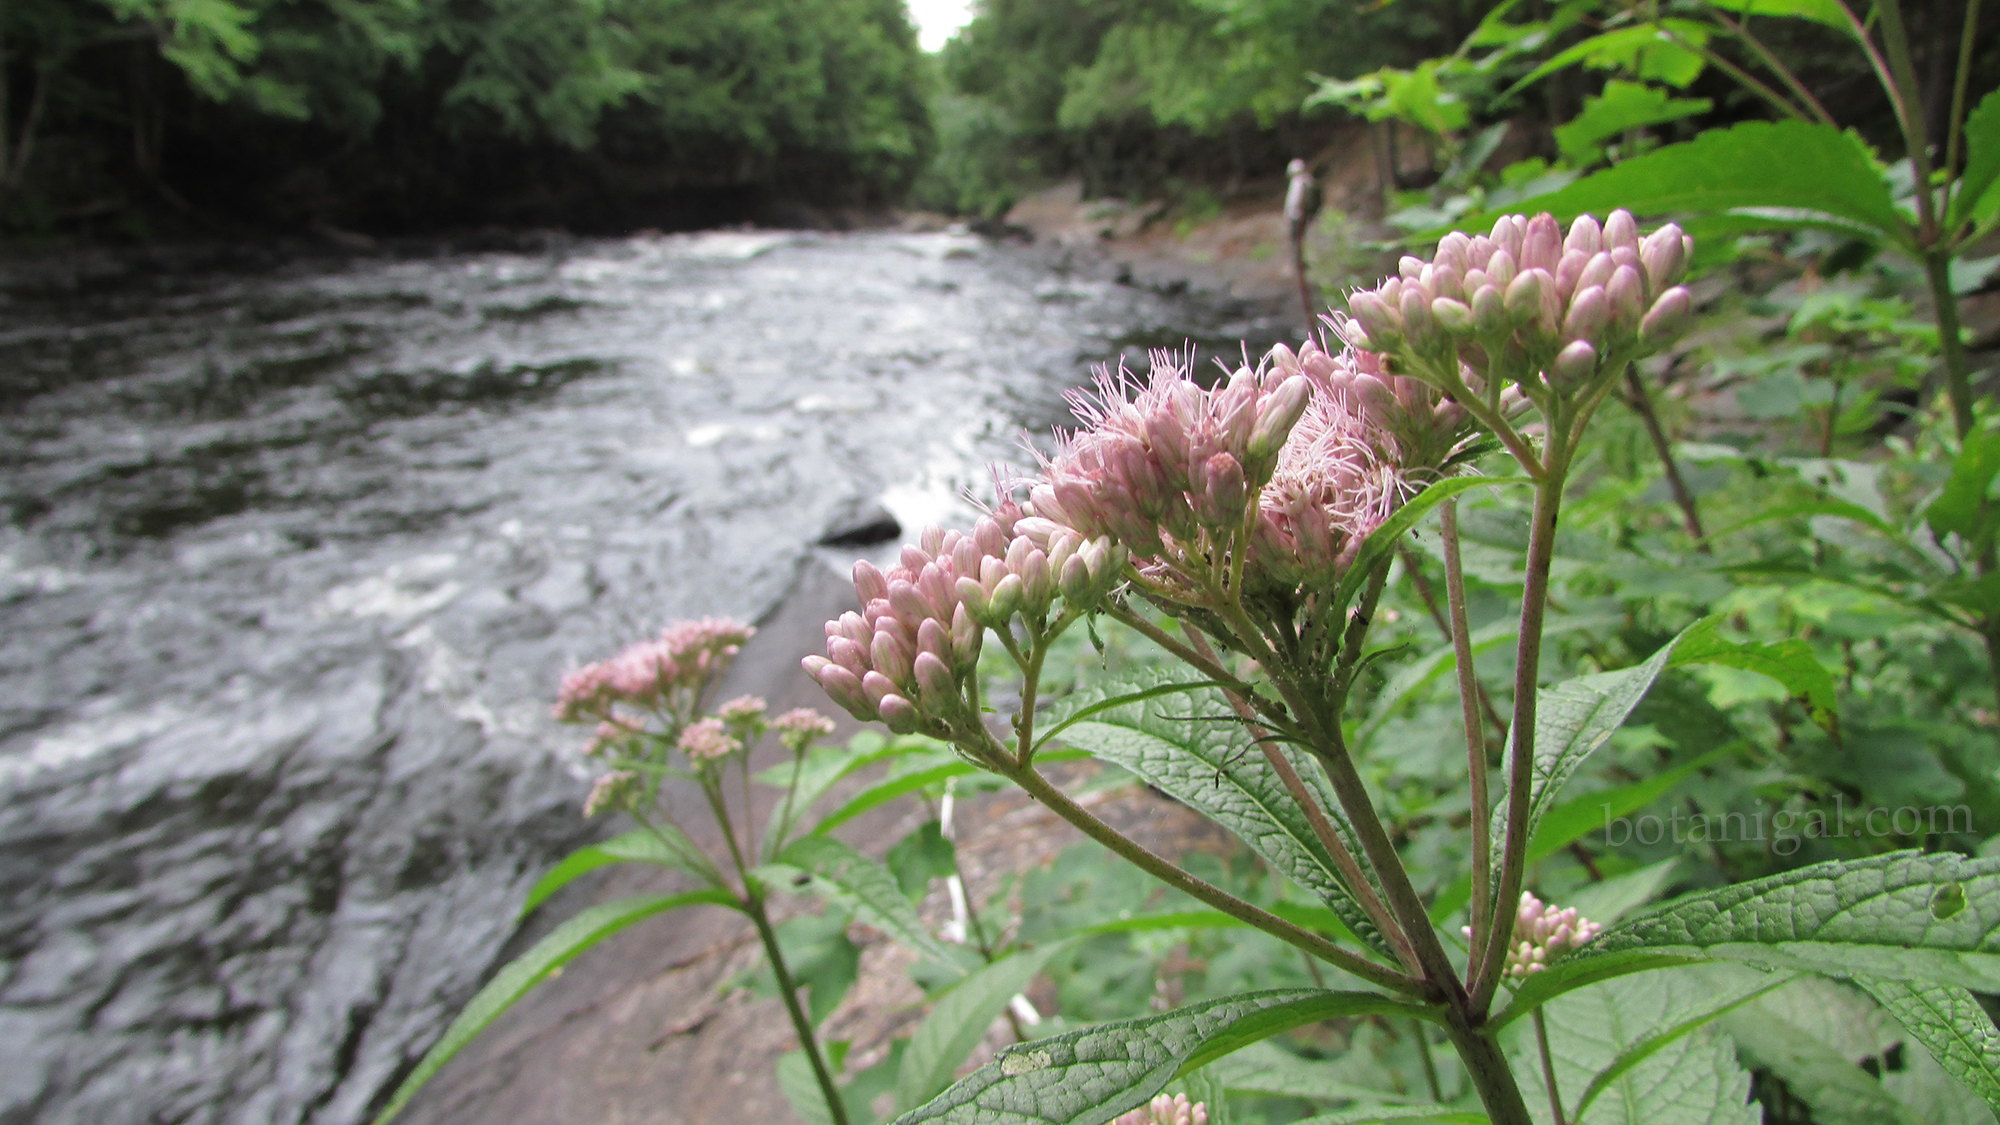
The flora that take root along these rapids really hold on to survive through fluctuating water levels, unpredictable saturation, and a turbulent environment. The Cardinal Flower (Lobelia cardinalis) miraculously grows from the tiniest of seeds. These seeds are driven down into crevices between the rocks which are full of sand. Here they tumble in the grit, where the seed coat is scratched thin so the root can break through and take hold. The Royal Fern (Osmunda regalis) eject microscopic spores which stick to organic deposits, often in fissures, where their roots can take hold.
Cardinal Flower and Royal Fern are tenacious companions along the edge of the Oxtongue River Rapids.
Spotted Joe Pye-weed (Eupatorium maculata) is another fine-seeded species that seems to thrive here, despite the fine size of the seed. They are another wonderful addition to the Oxtongue Rapids floral palette.
Hummingbirds, butterflies, and other pollinators love Cardinal Flower and Joe Pye-weed blooms. Plants at the water’s edge are very important for aquatic larvae so they can climb above the water and stay sheltered as they dry in the sun and transform to remain a valuable link in the Oxtongue Rapids food chain.
The areas First Peoples used the Oxtongue Rapids as a route for travel efficiency and optimum health. They created the original human trail here. It was a valuable portage route with reliably clean and oxygenated water. As water levels dropped later in the summer, the river bed made for easier trekking and foraging, with a clear path and a steady breeze, rather than competing with the foliage and biting insects.
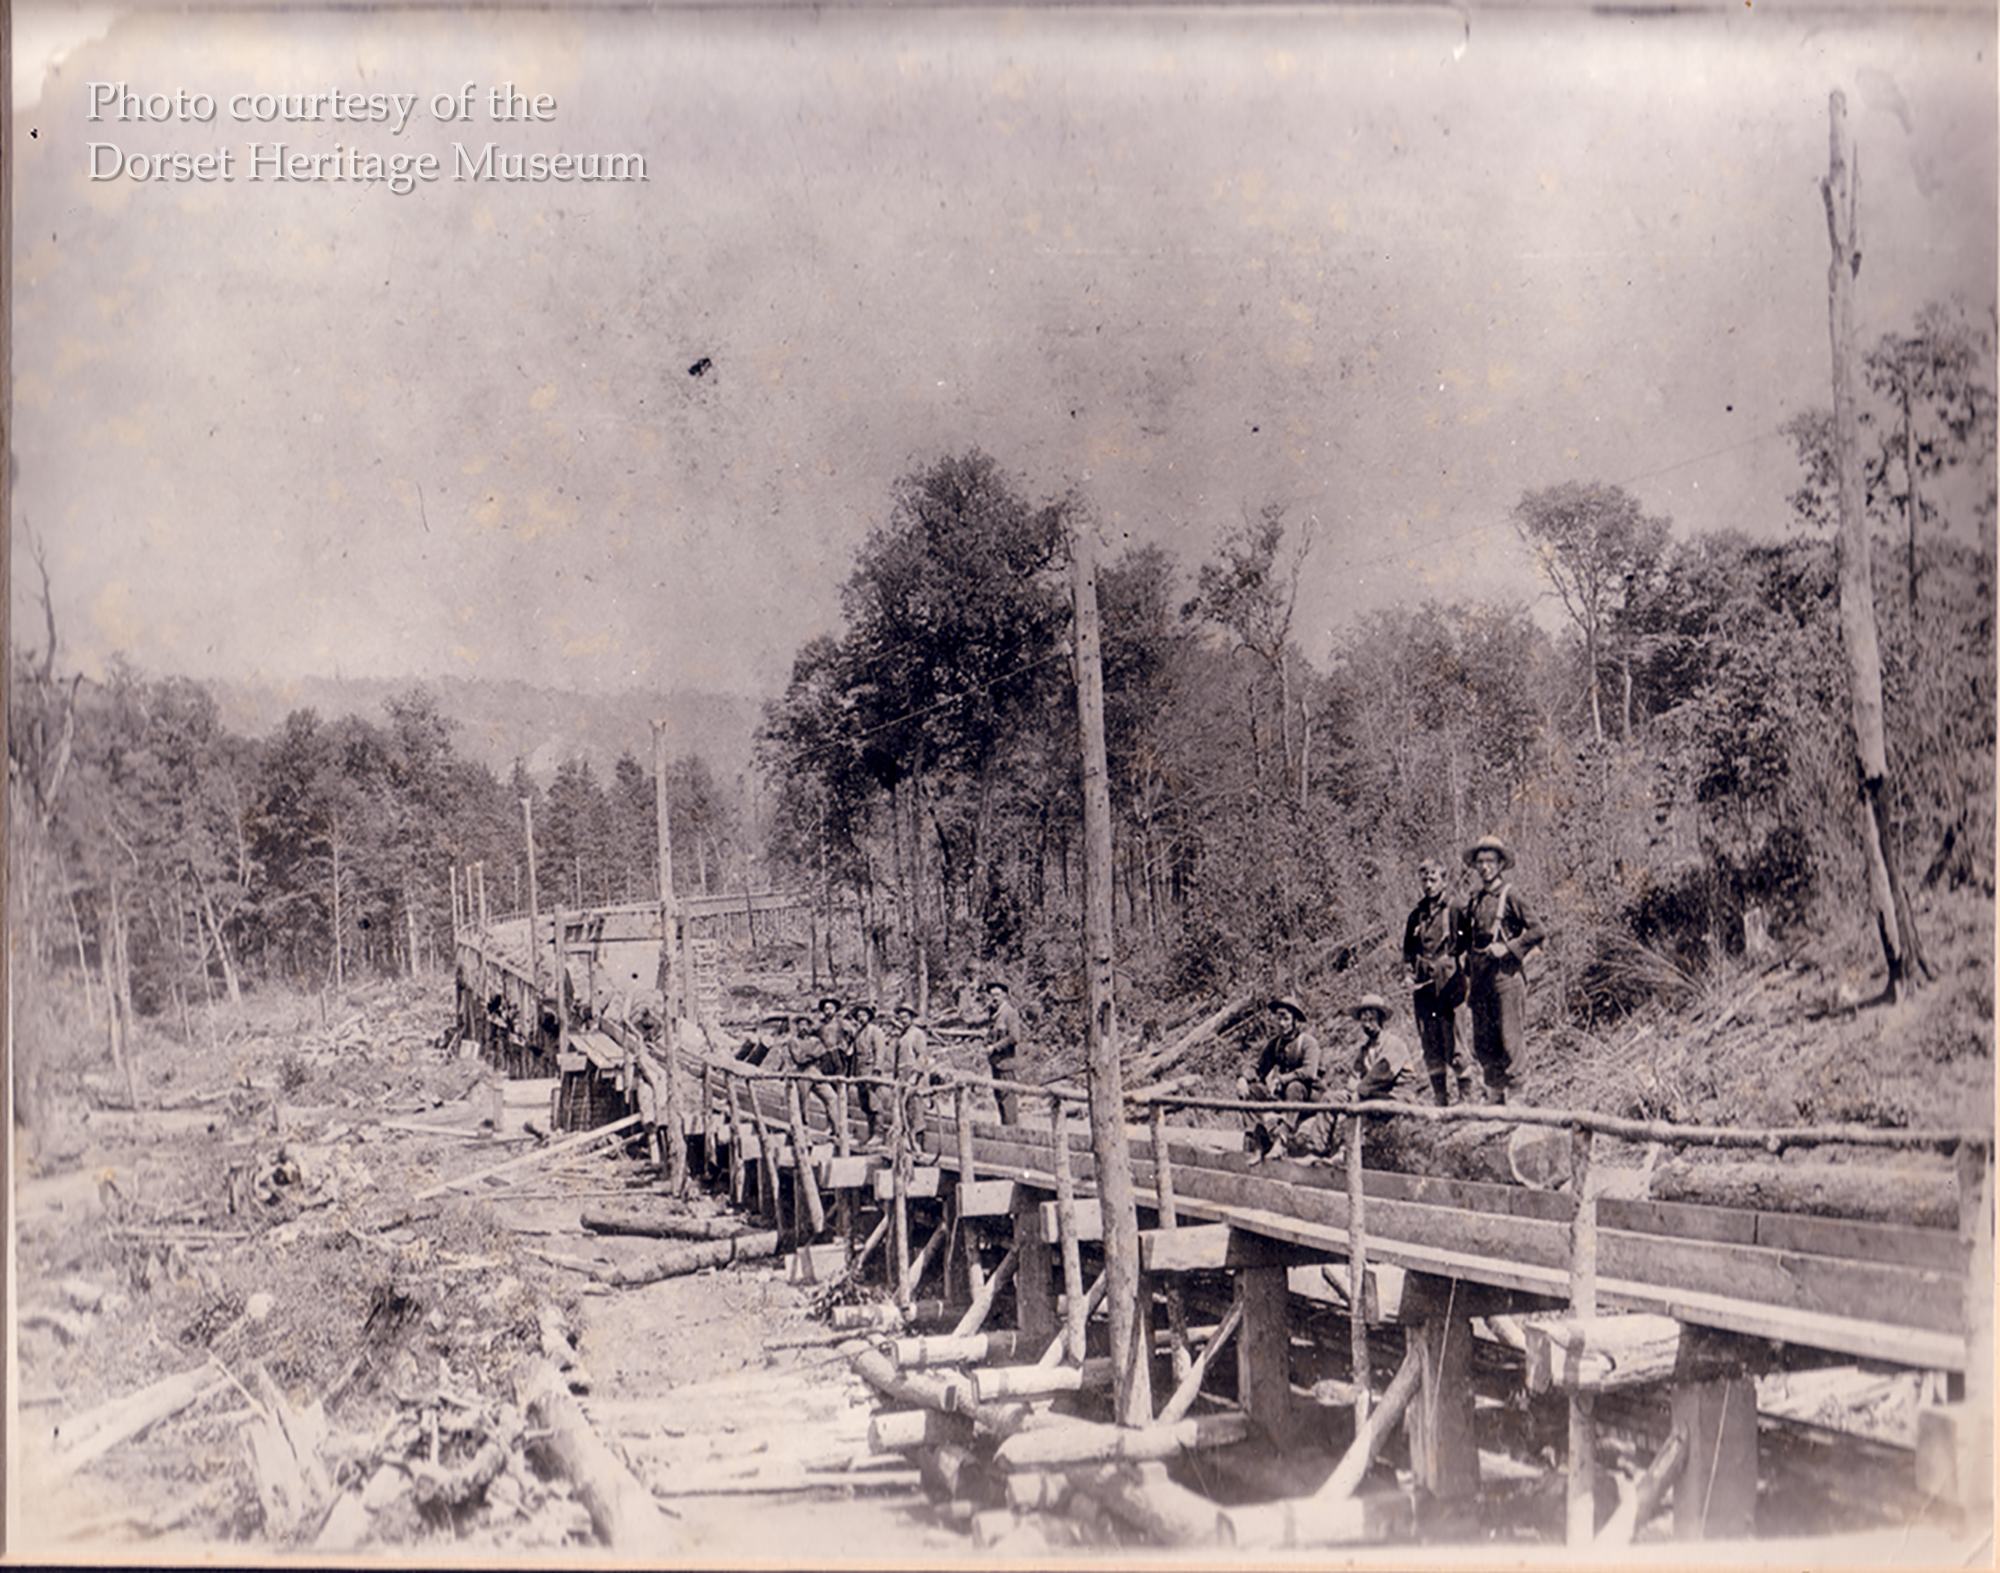
In 1892 David Gilmour bought the timber rights to the Oxtongue area where he would become Lake of Bays’ most famous logging baron. Gilmour envisioned the Oxtongue river system as a tool for logging efficiency and profit, though it turned out to be quite an exhaustive endeavour. The failure of the operation and the resulting bankruptcy is part of what brought him fame, though the Log-lifting Tramway in Dorset was quite a feat of engineering!
This five-kilometre Jack-ladder took many years and many men to build in harsh and dangerous conditions. You can learn more about the Gilmour Tramway with a visit to the Dorset Museum, which has an impressive model depicting this feat of human industry.
Aside from a lumber run, the Oxtongue River Rapids portage was seen by Gilmour as an ideal path to drive cattle to his Canoe Lake logging camp for his men. What he didn’t know was that cattle poo is a major distributor of poison ivy and other foreign weeds. Poison Ivy is still evident here along the river’s edge, so watch out, but it is rare to non-existent in the surrounding forests.
Poison Ivy: Note how shiny the leaves are. Leaves of three, let it be’.
Next time you are on your way to or from Algonquin Park, take a brief detour off Highway 60 down Oxtongue Rapids Road, stay on the LEFT fork, and pass by the municipal landfill (which is where you’ll end up if you take the fork to the right). The road is quite rustic, and is shared by hikers, cyclists, and ATVs, so take your time as you make your way to the parking landing by the picnic shelter, which is on the right shoulder of the road.
We hope you enjoy the sights, sounds, and smells of the Oxtongue Rapids Trail!
So many people ask me what the difference is between Native Species, Naturalized Species, and Invasive Species. Here are my loose definitions from my nutshell.
Native Species have originated from an area, like Muksoka and Haliburton, and belong in that particular Ecotype where they are typically found. They have always grown there, participating with their wild communities, providing food and habitat without competing with their neighbours.
Naturalized Species managed to take root here when they were either: A. Planted by people who brought them over because they liked to use them at home or, B. Hitched a ride by way of seed or root bit as humans traversed an area. i.e. Poison Ivy made its way across Ontario often by way of livestock manure. But Naturalized Species have kind of found their own harmless niche, other than sometimes being a nuisance in the vegetable garden.
Invasive Species take hold and choke out all other floral forms of life and provide little or no food or habitat for local wildlife. Phragmites, for example can be seen alongside our roadways, choking out the native Cattail marshes and wetlands. It is a relentless and ruthless plant.
So really, this blog isn’t about native edibles, though invasives do get pretty wild, which is why they have become an issue.
Since wildcrafting and foraging have become quite popular over the past few years, being advertised in LCBO’s Food and Drink magazine, and being used to advertise the restaurants of large resorts in Cottage Country, we’ve become a little concerned here at Lake of Bays. Concerned that this activity could start to do great harm to our forests on a new level. Wild edibles colonies in this area, particularly the leeks, ferns, and mushrooms, have taken generations, even centuries, to be what they are today. There is nowhere where humans can’t reach anymore.
BUT the interest is there, so how can we take advantage of it as a sustainable learning tool?
My Elders tell me tales of caution. Tales where they have discovered that after teaching perfectly honourable students their knowledge about Wild Edible Survival, the pinpointed wild edible colonies disappeared, even though the Wild Harvest Code was repeated throughout the teachings, and the teachings took place in protected places.
All it took was a positive tale of a student’s experience, solely word of mouth of what they’d learned, over time… These innocent discussions eventually resulted in the disappearance of those colonies, particularly the mushrooms, which my Elders used to visit to teach. It is only human nature. Although there are sustainable harvesters out there, there are others who will not learn proper practise and will keep foraging until all of the Fiddleheads, mushrooms, and Wild Leeks are gone; perhaps for financial reasons, and who can blame them?
I started to wonder, after attending a Lake of Bays Association Invasive Species Tracking Committee meeting, if we, as foragers leading large public groups, can instead help mitigate the harm caused by invasives, AND divert some of the now popular public foraging out of the forest to solve the invasive species issue in Lake of Bays, and perhaps in other communities, altogether!
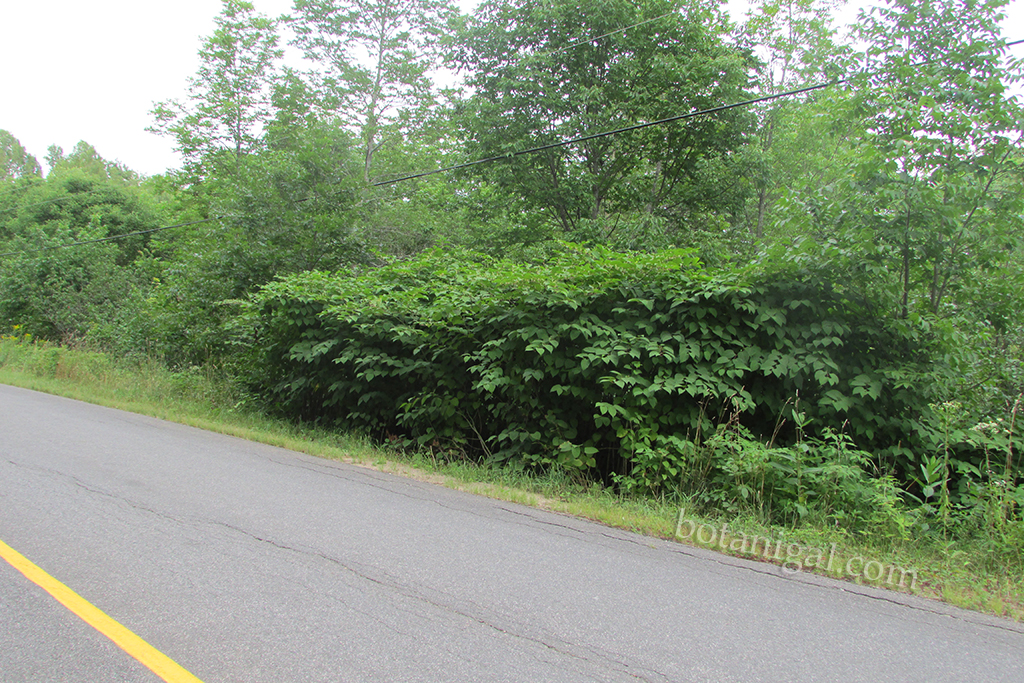
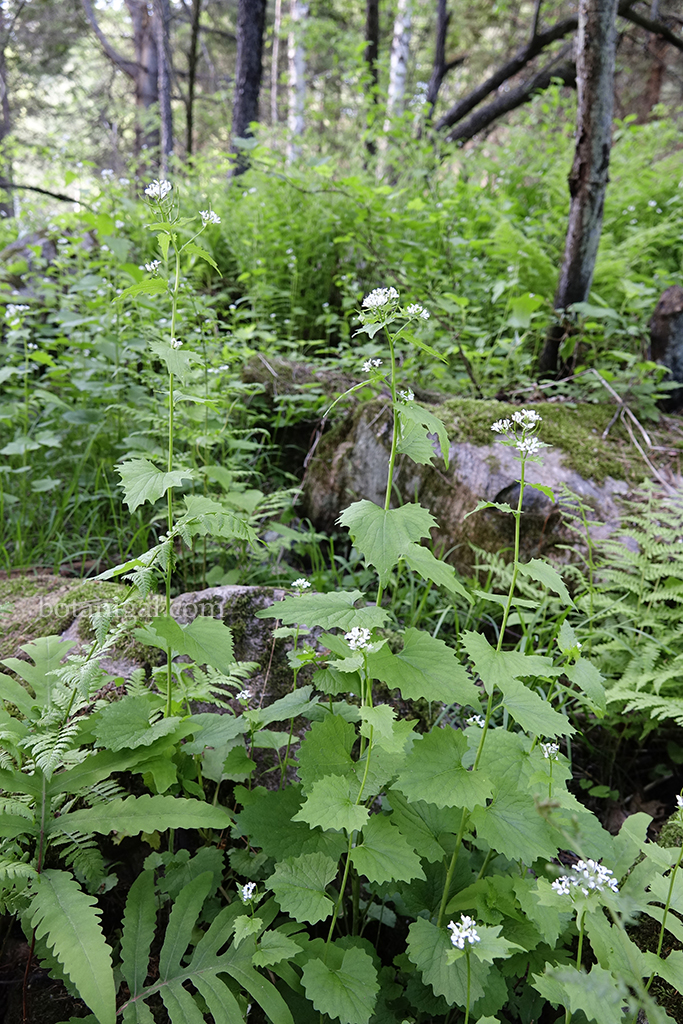
Case in point: Japanese Knotweed and Garlic Mustard.
Now, there are many invasive species that are not useful to humans in a food sense, BUT off of the top of my head, Japanese Knotweed (Fallopia japonica) and Garlic Mustard (Allaria petiolata) are totally useful to humans as an edible. Good ones at that!
So I’m going to show you some key ID features for each species and some basic preparation methods for each as well. I’ll start with recipes, as neither of these are harvestable now, this being August, BUT I’ll post preparation method with photos in the spring when they are again useful.
The late-season photos will help you identify your local colonies NOW, in late summer, as they are quite evident (even though they may not be edible now). An important thing to remember, especially when harvesting Garlic Mustard, is that you don’t trample down the woodland species intermixed with it.
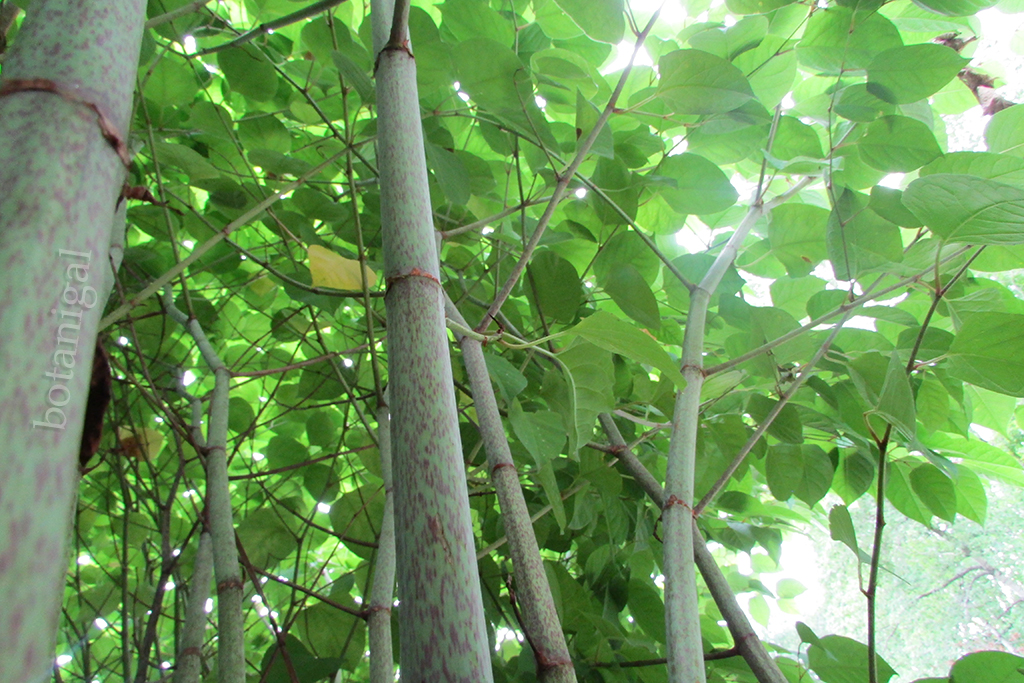
As you can see above, Japanese Knotweed is quite obvious in its height, leaf patterning and density. It grows in VERY DENSE thickets. You can’t even walk through because the previous years’ stalks trip you. The plant dies back every year, leaving the wilted stalks on the ground and put up new shoots, like asparagus every year, which is why people brought it over from their origins in the first place.
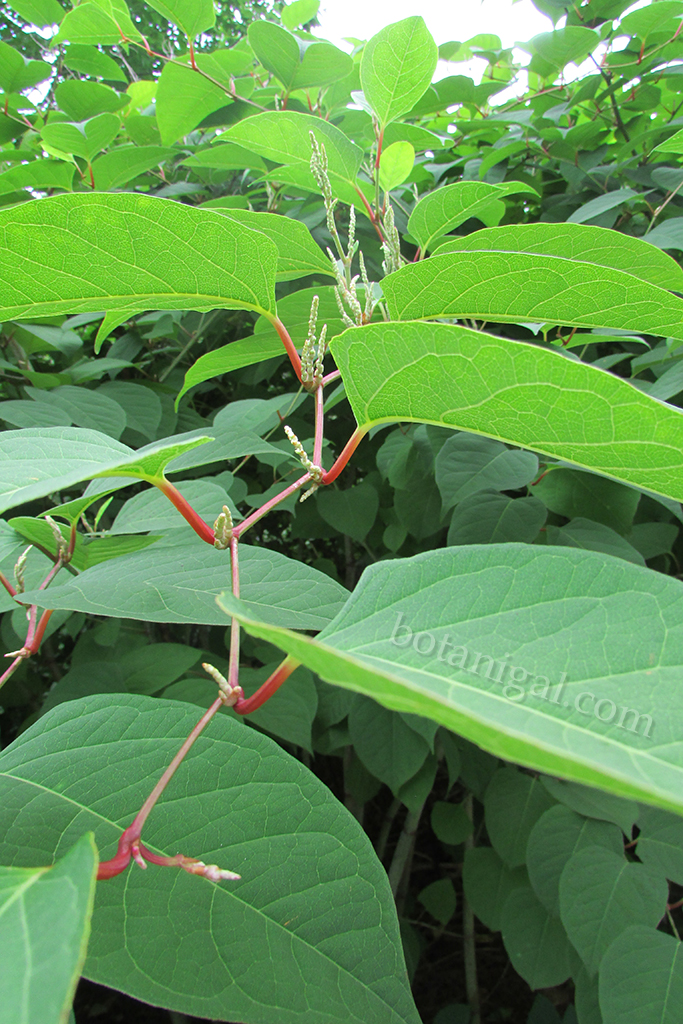
The flowers of Japanese Knotweed look like other flowers in the Polygonaceae, or Buckwheat family.
Believe it or not, these woody stalks are edible when fresh and new in the spring, like asparagus! Note the red petioles on the heart shaped leaf.
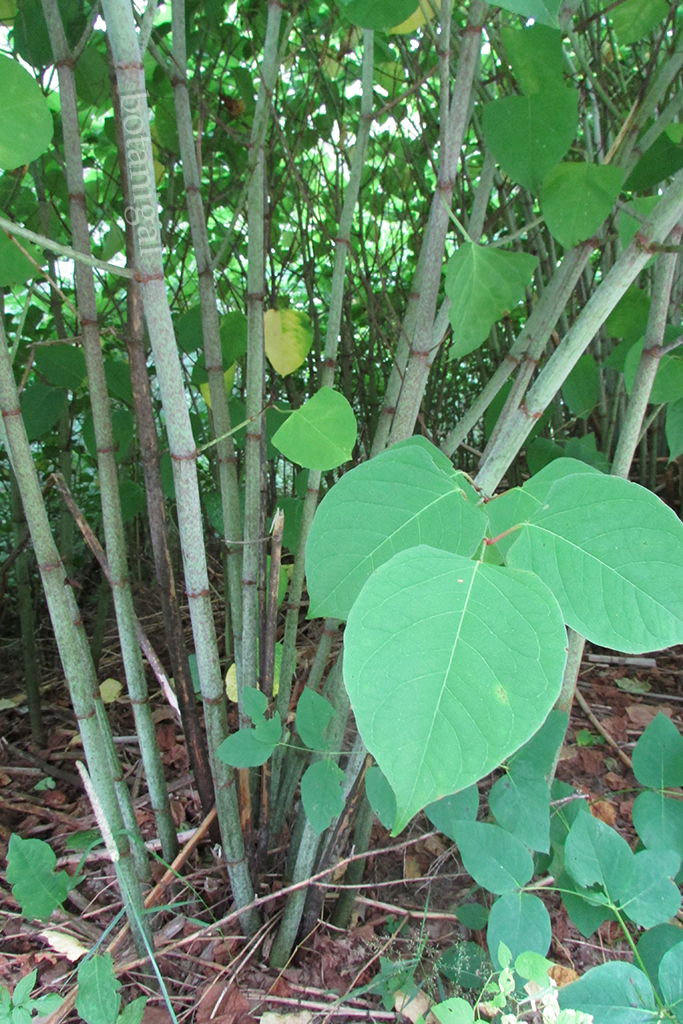
Note the patterning on the stalks. They grow so fast the patterns stretch with the growth. You can see why this plant is also called ‘Shrubby Bamboo’.
PREPARATION: The young spring shoots of Japanese Knotweed should be harvested before they are 4″ tall, like a stalk of asparagus. You would do well to boil them in a change of water as described in the Botanigal ‘Rapini Demystified‘ blog post.
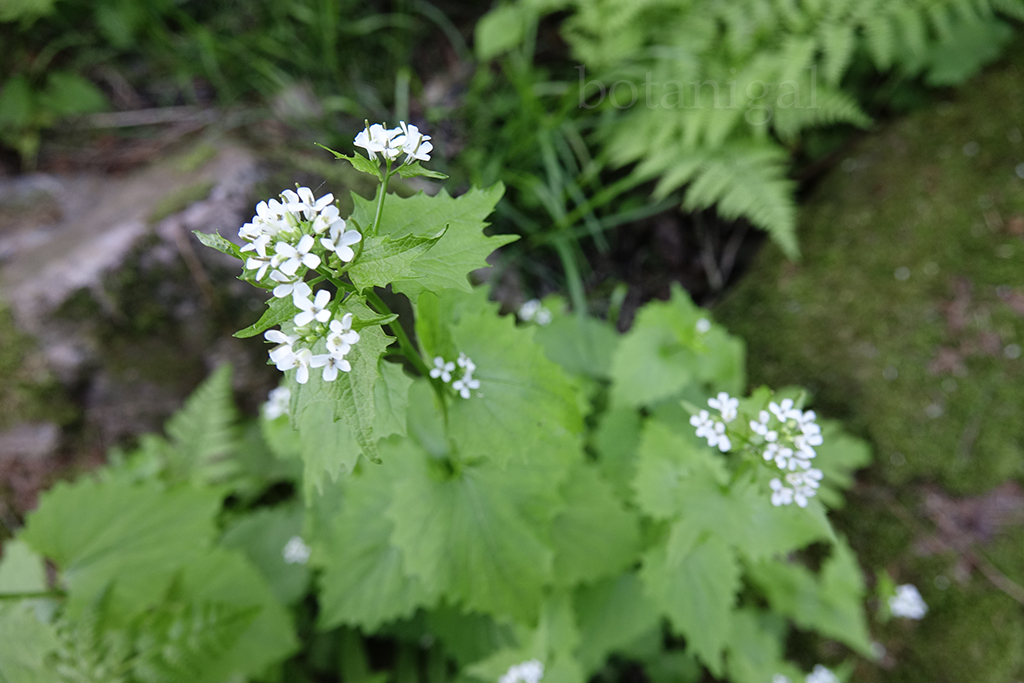
Garlic Mustard, being a Brassica, or mustard, is a hardy traveller. Mustards explosively dehisce their seeds, throwing them far from the mother plant. A good ID feature for this plant is that it smells like an Allium, or garlic more specifically, when crushed.
Soft and not serrated. Gentle scallops along the leaf blade is another ID feature. Cabbage White butterflies are one species that thrive off of the flowers of this particular invasive.
Note the flowers of the Garlic Mustard, typical of the Brassicaceae, off of which the Cabbage Whites thrive.
PREPARATION: Garlic Mustard is delicious without changes of water when harvested young. Though, you can cook it like Rapini (see the Botanigal blog ‘Rapini Demystified’ for further instruction), without the garlic of course…
Bear with me, I’ll keep adding to this post as I get the photos and further information.
By the way, Purple Loosestrife (Lythrum salicaria), an invasive of wet meadows and fens, is a great source of Wild Dye, which will be the topic of my next post.
Humans have needed plants to stay healthy throughout their history. You are what you eat, they say. And so it is June, and I let my guard down, after all it is almost summer, and I ALMOST came down with something – some flu type thing, again… So I went into defence mode and dug into my arsenal.
Whenever somebody in my circle is feeling like they are a little under the weather, or need to heal from a minor trauma, these are my recommendations.
EAT AN APPLE A DAY – Really, this works.
BRUSH YOUR TEETH WITH PEPPERMINT ESSENTIAL OIL
Make sure that the oil you purchase is:
Organic
Food-grade and,
Palatable
We use KaroocH brand Peppermint essential oil and place two drops into our toothbrush under the paste, and brush with it once a day (tongue and cheeks too) during the flu season. We’ve used other brands, but have found several of them unpalatable because, go figure, they weren’t food-grade, and were cut with another base oil, which we could certainly taste. Yuk. If it doesn’t taste right, don’t use it.
HAVE A BATH WITH JUNIPER AND ROSEMARY ESSENTIAL OILS
Fill a shot-glass with milk and add:
3 drops of Juniper essential oil and 3 drops of Rosemary essential oil. Try not to add more than 6 drops total to the mix.
Run your bath, and pour the milk mixture under the tap into the bathwater, stir the bath.
I like crushing a few Juniper berries and a sprig of Rosemary, and throw them in there too.
GARLIC ONION SOUP FOR COLDS AND FLU
This is a great broth to have on hand in the freezer so you can heat it quickly and bring it into action you feel a cold or flu coming on. It is also very soothing to sip from a mug if the bug beats you, and you are relaxing on the sofa with a book.
Garlic and onion boost immunity, and the thyme, bay-leaf, and sage honey, along with the white wine, work together to bolster your body to deal with the virus.
2 TBSPS Ghee, butter, or veggie oil of choice
4 large onions, thinly sliced
2 whole heads of garlic, minced
4 cups veggie broth
1 tsp thyme dried or several sprigs fresh
¼ tsp cayenne pepper
1 tsp black pepper
1 bay leaf
½ cup of dry white wine
3 TBSP honey (sage honey is a wonderful addition to this soup)
Sage honey? Easy. Buy a jar of liquid honey. Stir in dried sage leaves. Label as ‘sage honey’.
Heat the oil in a large sauce pan. Add the onions to the oil and stir occasionally until they start to brown. Add the garlic once the onions are a nice golden brown. Sautee the onions and garlic until they begin to caramelize, the longer they brown, the sweeter they get, BUT don’t burn the garlic.
Add the veggie broth, thyme, cayenne, black pepper, bay leaf and white wine.
Bring the broth to a boil and lower heat to minimum to simmer.
Simmer for several hours on very low heat.
You can strain the broth at this point, or leave the chunks in according to preference.
Add the honey before serving.
Salt to taste.
ELDERBERRY SYRUP FOR IMMUNITY BOOSTING (see Wild Recipes for Biodiversity)
Use SambucusCanadensis only (Black Elderberry) not Red, Box, Narrow or Blue Elder.
2 cups of Black Elderberries fresh (Sambucus canadensis) or 1 cup dried
1 cup of rosehips
1/2 cup Echinacea purpurea root chunked
1/4 cup Chicory root chunked
1/4 cup chunked and bruised ginger root
1 Cinnamon stick
5 whole cloves
Zest of 1/2 a lemon
1/4 cup of honey
1/8 teaspoon cayenne
Add 5 cups of water (or unsweetened sumac-ade) to the fruit and roots (See the Wild Recipes blog post for sumac-ade directions)
Heat to a simmer and continue gently for 10 minutes, mashing the fruit, roots and spices, and simmer for 10 minutes more.
Pour the contents of the saucepan through a ‘jelly bag’ made of several layers of cheesecloth, twist up the mash once the liquid has strained into the container, and squeeze out the remaining juice. You can place a plate with a rock press on the bag and allow to strain further for an hour or two and add that to the batch before dividing into jars.
Add the honey to the warm liquid while it is still hot so it dissolves.
Add another cup of sumac-ade and pour into mason jars for storage in the refrigerator.
You can make a canning bath for this recipe by speeding the final mash squish step, but it is best fresh anyhow.
DANDELION CHICORY ‘COFFEE’
These two plants hold many vitamins and minerals, including vitamin A and D, and are a wonderful source of iron. They act as a diuretic, which help flush sickness through the liver, kidneys and our of the body.
Dandelion and Chicory roots can be harvested, dried, and slow roasted at 120oC (250oF) for 4 hours or until the roots snap drily and appear dark brown in the centre. Grind or fracture and store. Chunked roots hold their properties longer than shredded or ground.
OR you can purchase dried dandelion and chicory roots at your local health food store. Ask for the chunky style of root over the shredded, and roast them yourself as outlined above at home.
Take your roasted root mix and:
simmer 1 palm-full of roasted dandelion and chicory root fragments to every 1 cup of water for as long as you want. The longer the simmer, the stronger the flavour.
We can get a double batch of this tea if the roots are chunky, you can drink the liquid, add more clean water, and simmer again.
This is a great tea or coffee substitute, which is better for your liver and kidneys while you are fighting an illness, or healing.
You may add milk and/ or honey as you wish.
Dandelion and Chicory roots for this purpose can be gathered any time of the year; however, they will be most potent before any energy is put into greening up or flower production.
After I had each of my girls, I received an after-care kit, which included a 225 millilitre ‘Rinsing Bottle’ for my battered Lady Bits n’ Pieces.
Eleven years later, I still use these bottles often, and recommend that everybody have one in their First Aid kit. I believe these are available at any pharmacy, and even your local Dollar Store.
We make a special rinse for our friends and family that is great for all of our minor healing needs from cat scratches, to blisters, to bug-bites, hives, hemorrhoid’s, nipple irritations from breastfeeding, and cleaning surgical wounds.
Take your 225 ml Rinsing Bottle and add:
1 TBSP Witch Hazel
1-2 drops of Lavender essential oil
1-2 drops of Tea Tree essential oil
1-2 drops of Bergamot essential oil
Fill the remainder of the bottle with warm water and shake.
The three oils listed above are: anti-fungal, antibacterial and antiviral, which covers all of the bases, and the Witch Hazel is an astringent.
Apply to any abrasion, minor burn, or irritation as often as you like. You don’t have to use it all at once. If we need cooling action, like on sore, blistered feet, we store the mix in the fridge. Give the area time to dry before you dress it. I’ve used this on all of my parts, and my girls use it, and my guys use it.
You can, of course soak a cloth with the solution and use it as a compress, or wipe as well.
This DOES NOT replace the good work done by antibacterial ointments. We try to use them as little as possible, but we don’t mess around with bacterial infections. This is a preventative and healing rinse.
This is also for external use only DO NOT put it into your eyes.
TURMERIC
We pack turmeric powder into many deeper wounds we may receive, that aren’t quite big enough for stitches.
Our dogs got into a bit of a nippy fight last week, and our Puggle got the short end of the stick,.
After we irrigated the wound with our Magic Rinse (former recipe), we packed the wound on his muzzle with turmeric.
Please use your own judgement to determine the severity of each situation.
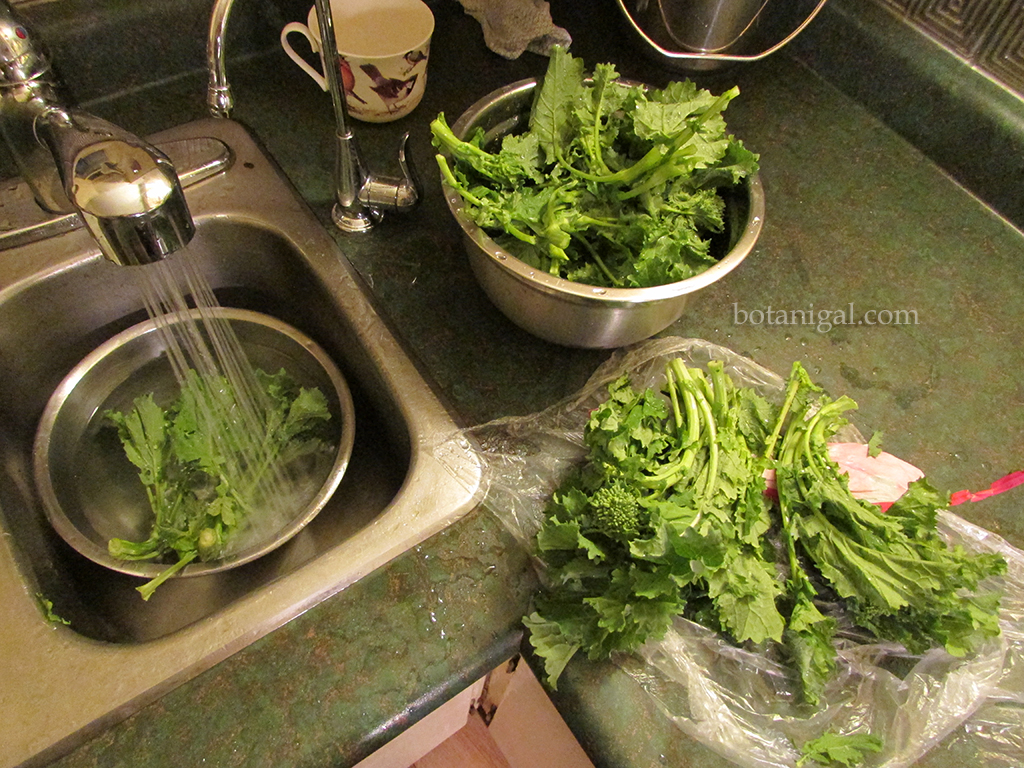
There was once a time when seeing Rapini in the produce section of urban grocery stores made me feel like a bit of a failure. Here was a vegetable I couldn’t quite grasp. I’d buy it, bring it home, cook it, and it tasted awfully bitter – time and again. So I stopped buying it.
Then those bunches of green flowers taunted me every time I saw them out of the corner of my eye. ‘Hey you. Botany girl, teacher of wild edibles and vegetable production. Why can’t you make me work for you?’
By chance, the subject came up at a get together, where I had prepared something that baffled the group, and I admitted that I wasn’t that great because I still couldn’t get a grasp on Rapini, and my friend Ian told me how to prepare it, so now I’ll share this with you because it really is a beautiful vegetable that is invigorating to eat and is great for your body and its easy.
The funny thing is that the key to prepping this veggie is the same as many wild edibles, including the stalwart of wild edibles, Dandelion greens, where changes of water are involved, though Rapine is easier, as it only requires one boil, not two or three exchanges of boiling water to get the bitterness out for edibility.
Fill up and set a large pot of slightly salted water to boil. The more the rapini can roll in the boil, the better the bitter will draw out.
Wash the rapini of course. It is a fairly clean vegetable, not sandy or silty like coriander or spinach.
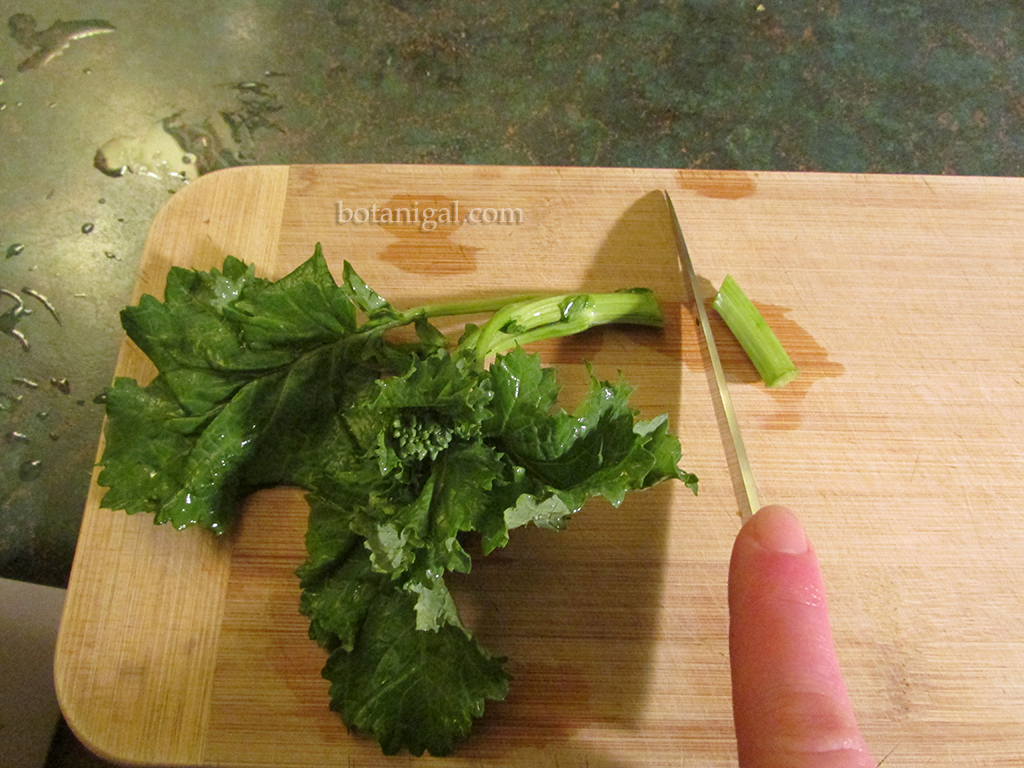
Snap off or cut off the tougher bases of the stalk. Sometimes I’ll tear off the lower leaves, just to make smaller pieces.
Set the rapini into the rolling boiling water. Allow water to cover all of the bits and pieces. Boil for about 7-10 minutes. You don’t want it to turn to mush, and you may prefer a little bit of bitter.
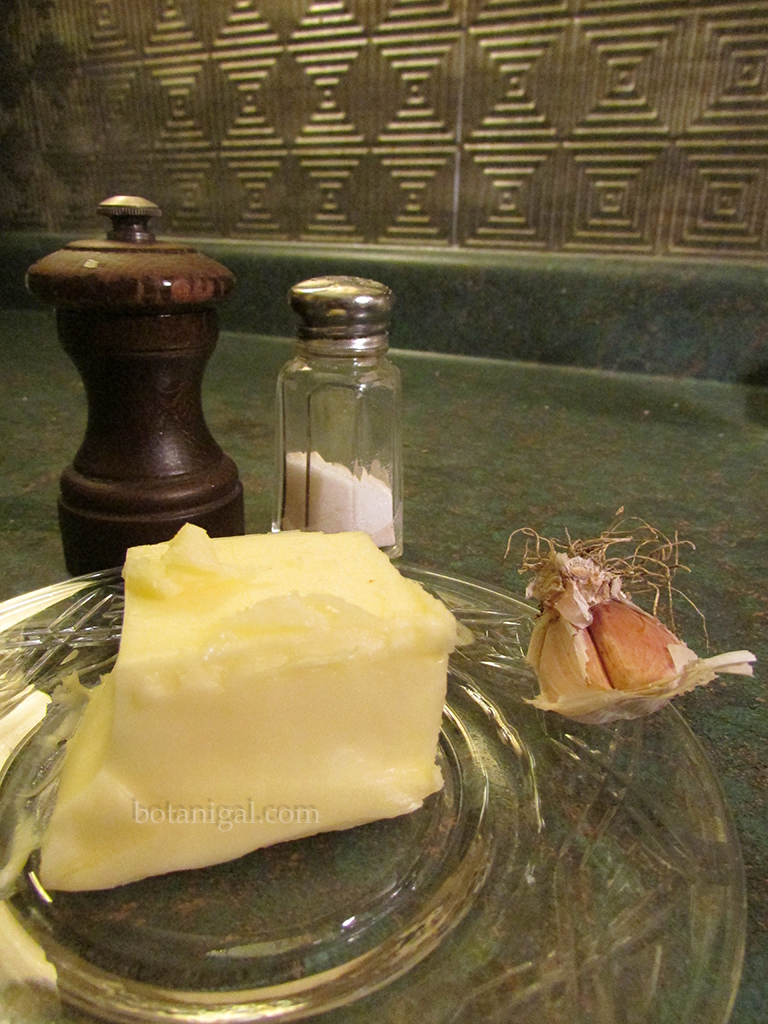
Get a frying pan ready with butter, salt, pepper and a bit of minced garlic to taste. Brown the garlic a bit for a sweeter flavour.
You can tell if the rapini is boiled enough by the colour of the water. They yellow signifies the drawn bitter.
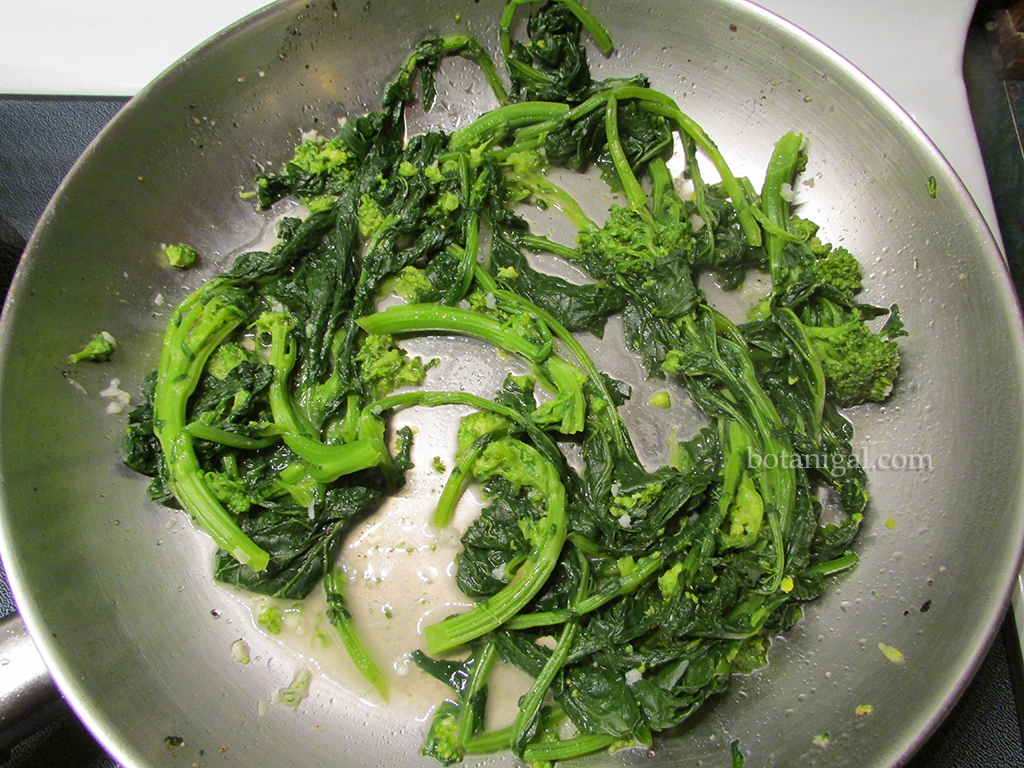
Transfer the boiled rapini into the melted butter and browned garlic. Stir fry until coated.
Voila! Nice and hot, buttery, salty, rapini ready to eat.


 Note the flowers of the Garlic Mustard, typical of the Brassicaceae, off of which the Cabbage Whites thrive.